


Managing your own file storage is a common need for teams that want full control over their data. With 72% of data breaches involving cloud-stored information, many are turning to self-hosted solutions like Nextcloud to keep their information secure.
Setting up Nextcloud directly on a server can be tricky, with multiple dependencies and manual steps. Using Docker makes it simpler by packaging the application and its services into isolated, reproducible containers.
In this guide, we’ll show you how to install Nextcloud with Docker on an Ubuntu 24.04 VPS and configure it for a production-ready setup.
Prerequisites
Ensure your BaCloud VPS meets the following requirements:
-
Ubuntu 24.04 server
-
Non-root user with sudo privileges
-
Ports 80 (HTTP) and 443 (HTTPS) open and accessible from the internet
For HTTPS (recommended):
-
A domain name with a DNS A record pointing to your server’s IP address
Recommended baseline:
-
≥ 2 GB RAM (4 GB recommended for production use)
-
Firewall configured (e.g., UFW) to allow HTTP and HTTPS traffic
Install Docker and Docker Compose
Set up Docker and Docker Compose, which are required to run the Nextcloud containers.
Nextcloud runs entirely in containers, so Docker must be available on your server. If you haven’t installed it yet, follow our Docker installation guide for Ubuntu 24.04 before continuing.
Once Docker is installed, install the Docker Compose plugin:
sudo apt updatesudo apt install docker-compose-plugin -yThis installs the modern Docker Compose v2 plugin (docker compose).
Verify Installation
After installation, confirm both Docker and Docker Compose are working.
Run:
docker --versionIf Docker is installed correctly, you should see output similar to:
![]()
Next verify that Docker Compose is available by running:
docker compose versionYou should see output similar to:
![]()
If both commands return version information, you’re ready to proceed.
Project Setup
Now, we’ll set up a clean working directory to keep all Nextcloud files organized.
First, create the main directory where everything will live:
sudo mkdir -p /opt/nextcloudThis creates the /opt/nextcloud directory that will hold all project files.
Next, move into the directory so we can start setting things up:
cd /opt/nextcloud Next, we’ll create the subdirectories that keep our data organized and persistent:
mkdir -p db nextcloud redisThis creates directories for the database, application data, and Redis cache.
With this in place, our project will follow this structure:
nextcloud/├── docker-compose.yml├── .env├── db/├── nextcloud/└── redis/Here’s what each part is used for:
-
docker-compose.yml → Defines the services and how they run
-
.env → Stores configuration values and sensitive credentials
-
db/ → Keeps MariaDB data persistent
-
nextcloud/ → Stores user files and application data
-
redis/ → Handles caching and file locking
Environment Configuration (.env)
Here, we’ll define environment variables to configure the database, Nextcloud, and general settings.
While still in the /opt/nextcloud directory, create the .env file, run:
nano .envThis opens a new .env file for defining environment variables.
Next, add the following configuration values:
# Database configurationMYSQL_DATABASE=nextcloudMYSQL_USER=nextcloudMYSQL_PASSWORD=strong_passwordMYSQL_ROOT_PASSWORD=strong_root_password# Nextcloud admin accountNEXTCLOUD_ADMIN_USER=adminNEXTCLOUD_ADMIN_PASSWORD=strong_admin_password# General settingsNEXTCLOUD_TRUSTED_DOMAINS=your-domain.comTZ=UTCThis file stores configuration values that will be passed to the containers at runtime.
-
Database variables → configure MariaDB credentials and database name
-
Nextcloud variables → define the initial admin account
-
General variables → control domain access and timezone
Before proceeding, update the placeholder values:
-
Use strong, unique passwords for all accounts
-
Avoid reusing passwords across services
-
Replace your-domain.com with your actual domain
Do not store sensitive values directly in docker-compose.yml.
Using a .env file keeps the setup clean and portable, making it easier to manage and update configuration without modifying the main Compose file.
Docker Compose Configuration
In this step, we’ll define the services that make up the Nextcloud stack using Docker Compose.
Start by creating the docker-compose.yml file in your project directory:
nano docker-compose.ymlThis file will define the application services, how they connect, and where data is stored.
Add the following configuration:
In addition to the core services, this configuration also includes a reverse proxy (Caddy), which we’ll configure later to securely expose Nextcloud over HTTPS.
|
services: db: image: mariadb:10.11 container_name: nextcloud-db restart: unless-stopped env_file: - .env volumes: - ./db:/var/lib/mysql redis: image: redis:7 container_name: nextcloud-redis restart: unless-stopped nextcloud: image: nextcloud:29 container_name: nextcloud-app restart: unless-stopped env_file: - .env environment: - MYSQL_HOST=db - REDIS_HOST=redis volumes: - ./nextcloud:/var/www/html depends_on: - db - redis caddy: image: caddy:2 container_name: nextcloud-caddy restart: unless-stopped ports: - "80:80" - "443:443" volumes: - ./Caddyfile:/etc/caddy/Caddyfile - ./caddy_data:/data - ./caddy_config:/config depends_on: - nextcloud networks: default: name: nextcloud-network |
How This Configuration Works
This setup defines three core services:
-
db → MariaDB database for storing Nextcloud data
-
redis → Handles caching and file locking (important for stability)
-
nextcloud → The main application serving the web interface
-
caddy → A reverse proxy that will be configured in a later step to handle HTTPS and route traffic
Each service uses an official Docker image and includes:
-
restart: unless-stopped → ensures containers restart automatically unless stopped manually
The .env file is loaded into the containers:
-
env_file: .env → supplies database credentials and other configuration values
Ensure your .env file includes required database variables such as MYSQL_DATABASE, MYSQL_USER, MYSQL_PASSWORD, and MYSQL_ROOT_PASSWORD.
Nextcloud connects to the database and Redis using service names:
-
Database host → db
-
Redis host → redis
Docker automatically creates an internal network for the stack, allowing services to communicate securely using these names.
At this stage, Caddy is included but not yet configured. In the next step, we’ll define how it securely exposes Nextcloud over HTTPS using your domain.
Reverse Proxy and HTTPS Setup
To securely expose your Nextcloud instance over the internet, we’ll configure a reverse proxy and enable HTTPS.
Earlier, we included a Caddy service in our Docker Compose configuration. Now we’ll configure it to securely expose Nextcloud over HTTPS.
Create the Caddy Configuration File
Start by creating a Caddyfile in your project directory:
nano CaddyfileThis file defines how incoming requests are routed to your Nextcloud container.
Define Routing and HTTPS
Add the following configuration:
{ email [email protected]}your-domain.com { reverse_proxy nextcloud:80}How this works
-
Routes traffic from your-domain.com → Nextcloud container
-
Automatically provisions and renews SSL certificates via Let’s Encrypt
-
Handles HTTPS and secure headers by default
Ensure Correct File Permissions
Because Nextcloud stores data on a mounted volume, the container must have write access to its configuration directory.
Run the following from your project directory:
# Nextcloud config & datasudo chown -R 33:33 ./nextcloudsudo chmod -R 750 ./nextcloud# MariaDB datasudo chown -R 999:999 ./dbsudo chmod -R 750 ./dbThis ensures the container’s internal user (www-data) can write to the necessary directories during initial setup.
During initial setup, once you start the stack in the next step, Caddy will automatically obtain SSL certificates for your domain. If you encounter a “Can't write into config directory” error, recheck file permissions and restart the Nextcloud container.
Start the Containers
Launch the Nextcloud stack and verify that all services are running correctly.
While still in the /opt/nextcloud directory, start all containers:
docker compose up -dThis builds and starts all services in the background.
Give the containers a few seconds to initialize, then check their status:
docker psThis lists running containers and their current status.
You should see containers for:
-
nextcloud-app
-
nextcloud-db
-
nextcloud-redis
-
nextcloud-caddy
All should show a status of Up, similar to the image below:

Update Nextcloud for Reverse Proxy
To ensure Nextcloud works correctly behind a reverse proxy, you may need to update its configuration file.
-
Copy config.php from the container to your host
This allows you to edit it locally:
docker cp nextcloud-app:/var/www/html/config/config.php ./config.php-
Edit the file on your VPS
Open the configuration file with a text editor:
nano ./config.php-
Update domain and proxy settings:
At the end of the file, add or update the following lines, replacing your-domain.com with your actual domain:
Add or update the following lines inside the $CONFIG array (before the closing );), replacing your-domain.com with your actual domain:
'trusted_domains' => array ( 0 => 'your-domain.com', ),'trusted_proxies' => ['172.16.0.0/12'],'overwritehost' => 'your-domain.com','overwriteprotocol' => 'https','overwrite.cli.url' => 'https://your-domain.com',-
Copy the updated file back into the container
Apply your changes without restarting the container:
docker cp ./config.php nextcloud-app:/var/www/html/config/config.phpWhy this matters:
-
Ensures Nextcloud recognizes your domain
-
Prevents “untrusted domain” and mixed content errors
-
Ensures background jobs and CLI commands use the correct URL
-
Improves compatibility when running behind a reverse proxy
Tip: If you set NEXTCLOUD_TRUSTED_DOMAINS in your .env before starting the containers, this step may be optional. This method is useful for later adjustments or adding additional domains.
Complete Nextcloud Setup (Web UI)
Access the Nextcloud web interface to complete the initial setup. Open your browser and navigate to your domain:
https://your-domain.com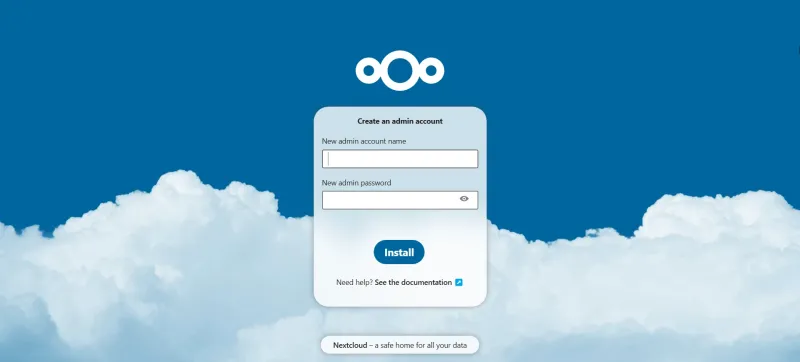
You should see the Nextcloud web interface similar to the one above.
Admin Account
If the admin account was not preconfigured via .env, create one when prompted:
-
Enter a username and strong password for the admin account.
Database Connection
Configure the database:
-
Database type: MySQL/MariaDB
-
Database host: db (the Docker service name)
-
Database name, user, and password: values from your .env file
This connects Nextcloud to the MariaDB container defined earlier.
Data Directory
Confirm the data directory:
-
Default: /var/www/html/data (inside the container)
-
This maps to your ./nextcloud/data folder on the host.
You can keep the default unless you have a specific requirement. Permissions should already be set correctly if you followed the previous steps.
Finalize Installation
Click Install to complete the setup. Nextcloud will initialize the database and finalize the configuration.
Verify Installation
Once setup is complete:
-
You should be redirected to the Nextcloud dashboard, similar to the image below:
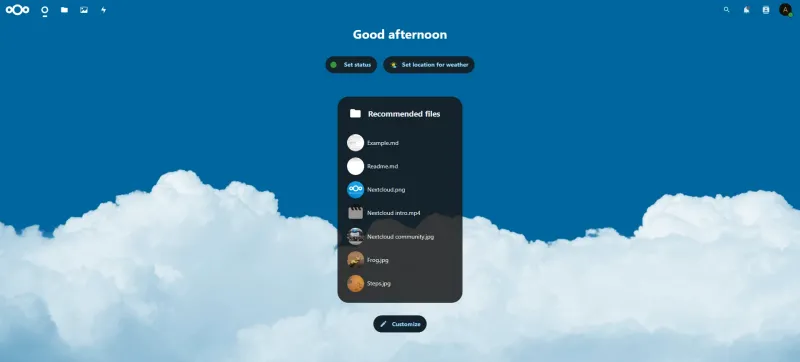
-
No setup errors should appear.
-
Files and apps should load normally.
Tip: If you encounter any permission or connectivity issues, double-check the previous steps for file ownership, directory permissions, and .env database credentials.
Production Configuration
Apply essential settings to ensure stability, performance, and proper background processing.
Enable Redis for File Locking
Redis is already included in the stack, but Nextcloud must be configured to use it.
Open the Nextcloud configuration file:
nano nextcloud/config/config.phpAdd the following settings inside the $CONFIG array if they are not already present:
'memcache.local' => '\OC\Memcache\APCu','memcache.locking' => '\OC\Memcache\Redis','redis' => [ 'host' => 'redis', 'port' => 6379,],These settings enable file locking to prevent data corruption and improve performance for concurrent access.
Configure Background Jobs (Cron)
By default, Nextcloud uses AJAX for background jobs, which is not suitable for production.
Switch to system cron for reliable execution.
Run the following command to test:
docker compose exec -u www-data nextcloud php cron.phpThis executes background jobs manually inside the container.
To automate this, open the crontab:
crontab -eAdd the following line:
*/5 * * * * docker compose exec -u www-data nextcloud php cron.phpThis runs background jobs every 5 minutes.
For a deeper explanation of how cron works and how to manage scheduled tasks, see: How to Schedule and Automate Tasks on Ubuntu VPS Using Cron Jobs
Confirm HTTPS and Domain Settings
Open the configuration file if needed:
nano nextcloud/config/config.phpAllows you to verify Nextcloud settings.
Ensure the following values are set correctly:
-
trusted_domains includes your domain
-
overwriteprotocol is set to https
-
overwrite.cli.url matches your domain
Optional Configuration
Add the following line to remove regional warnings:
'default_phone_region' => 'US',Set it to your country’s ISO code (e.g., US for United States).This helps eliminate admin warnings and ensures proper regional defaults.
Basic Maintenance
Perform routine updates and backups to keep your Nextcloud deployment stable and recoverable.
Updating Containers
To apply updates, pull the latest images:
docker compose pullThis downloads the latest versions of the images defined in your Compose file.
Next, recreate the containers with the updated images:
docker compose up -dThis restarts services using the updated images with minimal downtime.
This ensures your stack includes the latest security patches and improvements.
Backing Up Your Data
Regular backups are essential to prevent data loss.
-
Enable Maintenance Mode (Recommended)
Before starting the backup, enable maintenance mode:
docker compose exec -u www-data nextcloud php occ maintenance:mode --onThis temporarily disables user access to prevent data changes during backup.
-
Database Backup
This creates a backup of the Nextcloud database on the host.
docker compose exec db sh -c 'mysqldump -u root -p"$MYSQL_ROOT_PASSWORD" "$MYSQL_DATABASE"' > db-backup.sql-
Data Directory Backup
This archives all user files, apps, and data stored in Nextcloud.
tar -czf nextcloud-data.tar.gz nextcloud/-
Configuration Backup
This copies the main Nextcloud configuration file.
cp nextcloud/config/config.php config-backup.php-
Disable Maintenance Mode
After the backup is complete, re-enable access:
docker compose exec -u www-data nextcloud php occ maintenance:mode --offThis restores normal operation of the application.
Store these backups in a secure location, preferably off the server or on external storage.
Conclusion
We now have a fully functional Nextcloud instance running on Docker, complete with a reverse proxy and database. With background jobs and basic maintenance in place, the setup is stable enough for everyday use while remaining easy to manage and update. From here, you can start using Nextcloud for file storage and collaboration, or extend it further with additional apps and integrations as your needs grow.
For more in-depth tutorials, visit the BaCloud blog, where you’ll find helpful guides.