


Routine server tasks like backups, log rotation, and cache cleanup are vital, yet handling them manually introduces unnecessary risk. The Uptime Institute Annual Outage Analysis 2025 found that 58% of human-error related outages occurred because staff failed to follow established procedures, a figure that has risen by 10 percentage points in just one year.
Automating routine operations is one of the most effective ways to reduce these risks. On Ubuntu systems, Cron provides a built-in scheduling utility that allows commands and scripts to run automatically at defined times or intervals.
In this guide, we’ll configure cron jobs on an Ubuntu VPS to schedule and automate routine tasks so critical maintenance operations run consistently without manual intervention.
Prerequisites
Before you begin, make sure you have the following:
-
Ubuntu VPS (Ubuntu 22.04, or 24.04)
-
A non-root user with sudo privileges
-
Basic familiarity with the Linux terminal
-
A script or command you want to automate (optional)
Understanding Cron and Crontab
Before creating scheduled tasks, it’s helpful to understand how cron works and how crontab stores those tasks.
What the Cron Daemon Does
The cron daemon is a background service that automatically runs scheduled commands or scripts at specific times.
It checks the system’s crontab files every minute and executes commands when their scheduled time matches the system clock.
Difference Between cron and crontab
Although the terms are often used together, they refer to different components:
-
cron → the background service that executes scheduled jobs
-
crontab → the configuration file where users define their scheduled tasks
Each user on a Linux system can maintain their own crontab file, allowing multiple users to schedule their own tasks independently.
Structure of a Cron Job Entry
A cron job is written as a single line in a crontab file that defines when a command should run and what command should execute.
Basic format:
* * * * * command_to_executeThis structure tells cron the exact schedule for running the command.
Cron Schedule Fields
Each asterisk represents a specific time field in the schedule.
* * * * * command| | | | || | | | └ Day of week (0-7) (Sunday = 0 or 7)| | | └ Month (1-12)| | └ Day of month (1-31)| └ Hour (0-23)└ Minute (0-59)The first five fields define the schedule, and the final part specifies the command or script to run.
Verify the Cron Service
Before scheduling tasks, make sure the cron service is installed and running on your Ubuntu server.
Check the Cron Service Status
Run the following command to verify whether the cron service is active:
sudo systemctl status cronThis command displays the current status of the cron service as shown below.
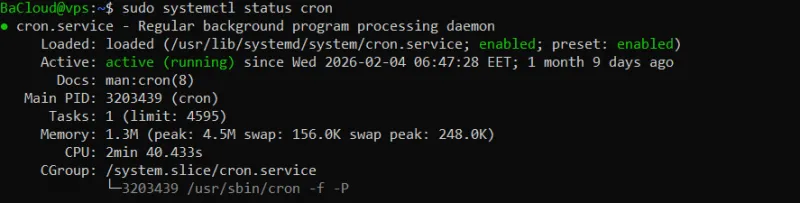
If cron is running correctly, you should see “active (running)” in the output.
Enable Cron to Start at Boot
If the cron service is not enabled to start automatically when the server boots, you can enable it with the following command:
sudo systemctl enable cronThis command configures the system to start the cron service automatically whenever the server boots.
Start the Cron Service (If Needed)
If the service is not currently running, you can start it manually:
sudo systemctl start cronThis command immediately starts the cron scheduler so it can begin executing scheduled tasks.
Creating Your First Cron Job
Now that you understand how cron works and how to access your crontab, you can create your first scheduled task.
Add a New Cron Job
Open your crontab file using the following command:
crontab -eThis command opens your personal crontab file in a text editor, allowing you to add new scheduled tasks.
If this is your first time running crontab -e, You may see an output like this:
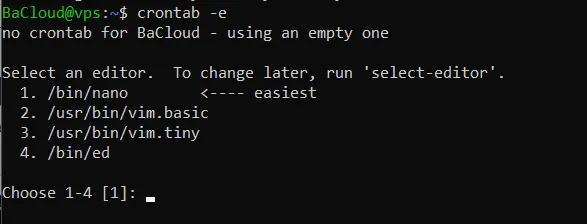
-
Ubuntu is informing you that there is no existing crontab file, so it will create an empty one.
-
You are asked to select a text editor:
-
1: nano → easiest for beginners
-
2–4: vim or ed editors → more advanced
-
Enter the number corresponding to your choice (usually 1 for nano) and press Enter.
Once the editor opens, you can start adding your cron job entries.
Example: Run a Script Daily at 2:30 AM
Add the following line to the crontab file:
30 2 * * * /home/user/backup.shThis cron job runs the backup.sh script every day at 2:30 AM.
Explanation of the schedule:
-
30 → run at minute 30
-
2 → run at 2 AM
-
* → every day of the month
-
* → every month
-
* → every day of the week
The last part of the line specifies the command or script that cron will execute.
Example: Run a Script Every 5 Minutes
You can also schedule tasks to run at regular intervals.
*/5 * * * * /home/user/scripts/monitor.shThis cron job runs the monitor.sh script every 5 minutes.
The expression */5 tells cron to execute the command every five minutes.
Example: Run a Weekly Maintenance Task
0 3 * * 0 /home/user/scripts/cleanup.shThis job runs the cleanup.sh script every Sunday at 3:00 AM.
-
0 → minute
-
3 → hour
-
0 in the final field represents Sunday
Save the Cron Job
After adding your cron job, save and close the editor.
The cron daemon automatically reads the updated crontab file and will run the task according to the schedule you defined.
Viewing Cron Logs and Troubleshooting
If a cron job does not run as expected, you can check system logs and review common configuration issues.
View Cron Activity in the System Log
On Ubuntu systems, cron activity is recorded in the system log file.
Run the following command to filter cron-related entries:
sudo grep CRON /var/log/syslogThis command searches the system log and displays entries related to cron jobs, which can help you verify whether a scheduled task was executed.
Common Cron Job Issues
If your cron job is not running correctly, check the following common problems:
Incorrect schedule syntax
A mistake in the cron timing fields can prevent the job from running at the expected time. Verify that the schedule follows the correct five-field format.
Missing absolute paths
Cron runs with a limited environment, so relative paths may fail. Always specify the full path to scripts and commands.
Example:
/home/user/scripts/backup.shPermission issues
The user running the cron job must have permission to execute the command or access the required files.
Scripts not executable
If a script does not have execute permission, cron will not be able to run it. You can make a script executable with:
chmod +x /home/user/scripts/script.shThis command adds execute permission to the script.
Environment variables not available
Cron jobs run with a minimal environment, so some variables (such as PATH) may not be available. If needed, define required environment variables directly in the script or within the crontab file.
Best Practices for Reliable Cron Automation
Following a few best practices helps ensure your cron jobs run reliably and are easier to troubleshoot.
Use Full Paths for Commands
Always specify the full path to commands and scripts in your cron jobs.
Cron runs with a limited environment and may not recognize commands without their full paths. For example, instead of using a relative command, specify the full location of the script:
/home/user/scripts/backup.shThis ensures cron can correctly locate and execute the command.
Redirect Output to Log Files
By default, cron jobs may not display output in the terminal. Redirecting output to a log file helps you monitor job results and diagnose issues.
Example:
0 1 * * * /path/script.sh >> /var/log/script.log 2>&1This cron job runs the script every day at 1:00 AM and writes both standard output and errors to /var/log/script.log.
-
>> appends the output to the log file instead of overwriting it
-
2>&1 redirects error messages to the same log file
Prevent Overlapping Jobs
If a scheduled task takes longer to finish than the interval between runs, multiple instances of the same job may start at the same time.
To avoid this, ensure that:
-
the script finishes before the next scheduled run, or
-
the script includes logic to prevent multiple instances from running simultaneously.
Test Scripts Before Scheduling
Before adding a script to cron, run it manually in the terminal to verify that it works correctly.
Example:
/home/user/scripts/backup.shRunning the script manually allows you to identify errors or permission issues before automating the task with cron.
Conclusion
In this guide, we’ve seen how to use cron to schedule and automate tasks on an Ubuntu VPS. We covered how cron works, how to manage your crontab file, and how to create scheduled jobs for scripts and commands. By using cron effectively, you can automate routine maintenance tasks and reduce manual server management. With these basics in place, you can begin building more advanced automation workflows for your system.
For more in-depth tutorials, visit the BaCloud blog, where you’ll find helpful guides.