

This guide walks you through setting up and configuring WordPress in a VPS with LiteSpeed and LScache, using best practices for 2025 to optimize your hosting setup.
If you need a guide on how to set up a VPS with LiteSpeed and MariaDB, please follow this guide.
At this stage, LiteSpeed is configured and serving files from /var/www/html. Now, we’ll install WordPress in that directory and connect it to the MariaDB database that was created earlier.
-
Navigate to the Web Root
This is the directory where LiteSpeed serves files from. Run:
|
cd /var/www/html |
This is where WordPress will be installed.
-
Download and extract WordPress
Next, download the latest version of WordPress from the official source:
|
sudo wget https://wordpress.org/latest.zip |
Unzip the downloaded archive:
|
sudo unzip latest.zip |
Move all WordPress files into the current directory:
|
sudo mv wordpress/* . |
Then, remove the leftover folder and ZIP file to keep things clean:
|
sudo rm -rf wordpress latest.zip |
Now verify that WordPress files are in the correct location.
Run the following command to list the contents of your WordPress directory:
|
ls -l /var/www/html |
You should see an output similar to this:
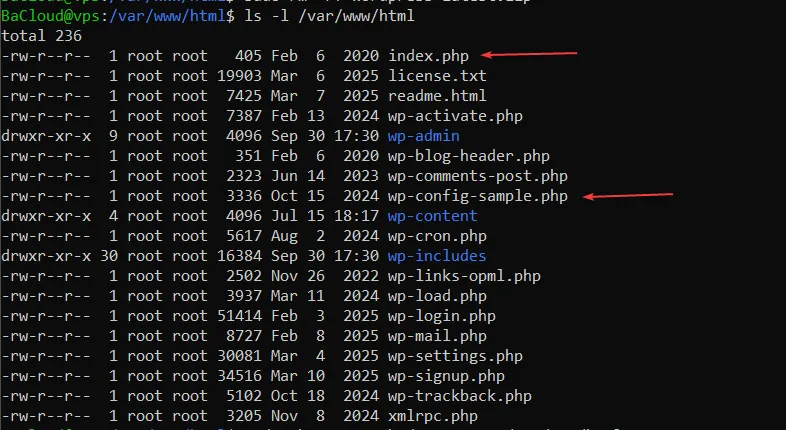
If your listing looks similar and files such as index.php and wp-config-sample.php are present, your extraction and file placement are correct.
-
Set correct ownership and permissions
LiteSpeed runs under the user nobody:nogroup by default. We need to make sure the web server has the proper access to these files:
|
sudo chown -R nobody:nogroup /var/www/html sudo chmod -R 755 /var/www/html |
This ensures LiteSpeed can read and serve your files properly.
-
Create the WordPress database
Create a database for WordPress.
Start by logging into MariaDB as the root user:
|
sudo mysql -u root -p |
When prompted, enter your MariaDB root password (set in Step 2).
Inside the MariaDB shell, run the following commands (replace wpuser and password with your preferred username and secure password):
|
CREATE DATABASE wpdb; |
This creates a database named wpdb, a user called wpuser, and grants it full privileges on the new database.
-
Complete the installation in your browser
At this point, you can complete the installation using the WordPress setup wizard.
Open your web browser and visit:
|
http://<server-ip>:8088/ |
You should see the WordPress installation screen. Follow the on-screen steps:
-
Choose your language.
-
Enter the database name, username, and password you created earlier.
-
Set your site title, admin username, and password.
After completing the installation, you can access your WordPress dashboard at:
|
http://<server-ip>:8088/wp-admin/ |
At this point, WordPress is fully installed and ready for performance optimization. Next, we’ll configure LiteSpeed caching to speed up your site.
Step 5 — Enable and Configure LiteSpeed Cache for WordPress
LiteSpeed Cache improves site performance by storing dynamic pages as static copies. Follow these steps to install and configure it:
-
Access the WordPress Admin Panel
First, log in to your WordPress dashboard to manage plugins and settings:
|
http://<server-ip>:8088/wp-admin |
-
Install the LiteSpeed Cache plugin
To enable caching, we need to install the LiteSpeed Cache plugin:
Navigate to Plugins → Add New
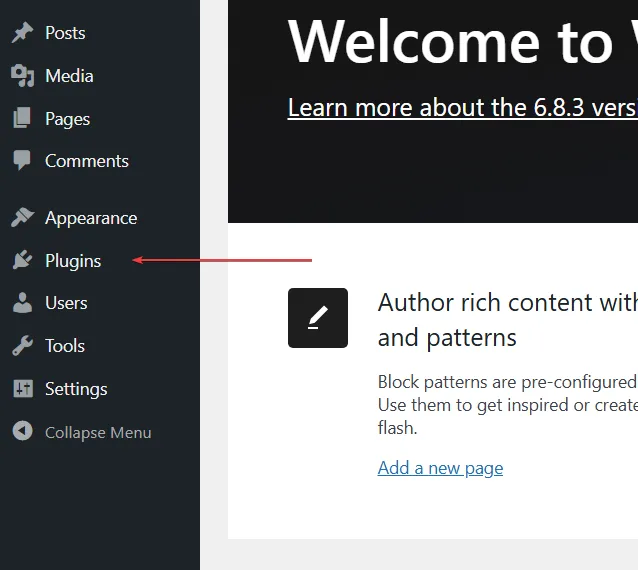
Search for LiteSpeed Cache
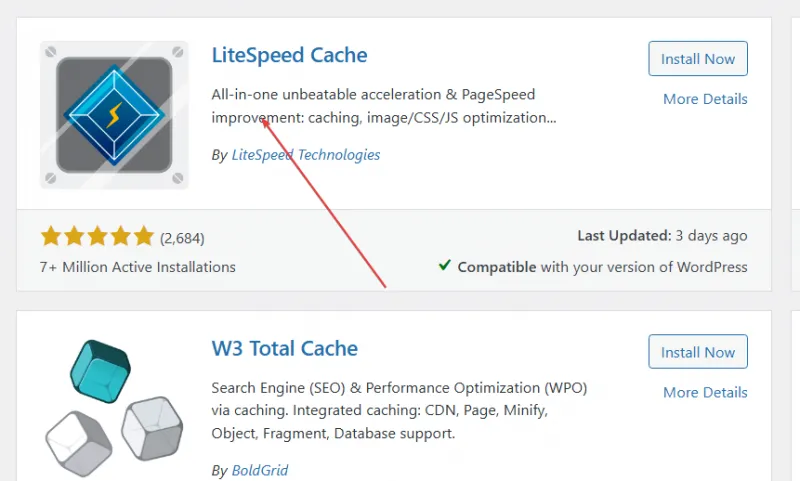
Click Install Now, then Activate
-
Enable basic caching settings
Next, configure the plugin to start caching dynamic pages:
Go to LiteSpeed Cache → Cache → Purge
-
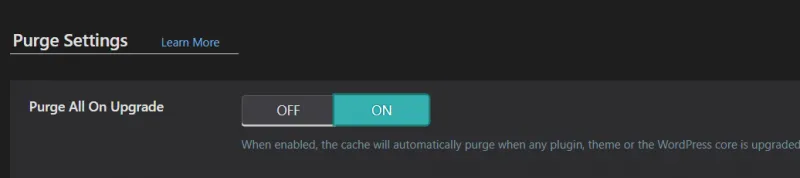
Turn on Purge All On Upgrade to automatically clear cache after plugin, theme, or WordPress updates
-
Review Auto Purge Rules for Publish/Update and select the archive types you want automatically purged.
Click Save Changes to apply these settings
-
Clear existing cache
Now we want to start with a clean cache to ensure all pages load fresh:
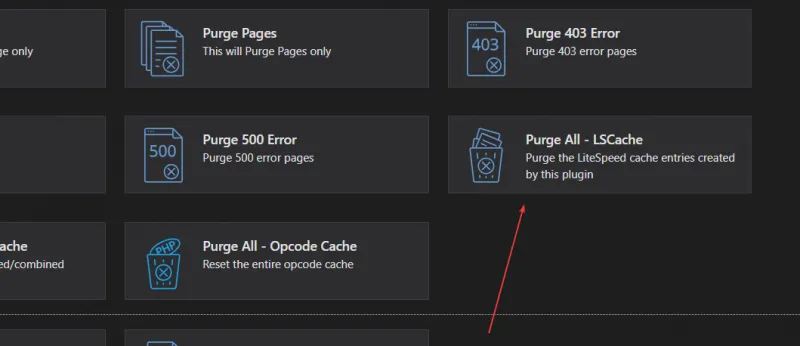
Go to LiteSpeed Cache → Toolbox → Purge
Click “Purge All – LSCache” to clear all cached pages created by the plugin
Your WordPress site is now fully cached and optimized for faster performance.
Step 6 — Security and Optimization (Recommended)
Now that WordPress and LiteSpeed Cache are running correctly, it’s time to harden your setup and fine-tune performance.
-
Enable HTTPS with Let’s Encrypt
Secure your site with a free SSL certificate.
Run each command separately:
|
sudo apt install acme.sh -y |
(Replace example.com with your actual domain name. If you’re using only the server IP for now, you can skip SSL until a domain is connected.)
After the certificate is issued, configure OpenLiteSpeed to use it:
-
Go to WebAdmin → Listeners → Default → SSL
-
Enable SSL and point the certificate paths to:
-
Certificate File: /root/.acme.sh/example.com/fullchain.cer
-
Key File: /root/.acme.sh/example.com/example.com.key
-
Then restart LiteSpeed:
|
sudo systemctl restart lshttpd |
Your site will now be accessible at:
|
https://example.com/wordpress |
-
Secure the LiteSpeed WebAdmin Panel
Reset your WebAdmin password periodically:
|
sudo /usr/local/lsws/admin/misc/admpass.sh |
Optionally, restrict access by IP:
-
WebAdmin → Configuration → Server → Security
-
Add your trusted IP under Allowed List
-
Keep Your CMS and Plugins Updated
Regularly update WordPress core, themes, and plugins to patch security vulnerabilities:
Run each command separately:
|
cd /var/www/wordpress |
(Requires WP-CLI — optional but recommended.)
-
Enable Compression for Faster Delivery
LiteSpeed Cache supports both Gzip and Brotli compression.
These help reduce page size and improve load times.
In your WordPress Dashboard:
-
Go to LiteSpeed Cache → General → Tuning
-
Enable Brotli Compression (if available)
-
Or ensure Gzip Compression is active
-
Optional: Enable HTTP/3 and QUIC
For even faster HTTPS connections:
-
In WebAdmin → Listeners → Default → SSL
-
Enable QUIC protocol
Then restart LiteSpeed:
|
sudo systemctl restart lshttpd |
Conclusion
Your WordPress site is now installed and fully configured on a VPS powered by LiteSpeed and LSCache, providing a fast, secure, and stable foundation for your project. Most of the setup work is now complete — from here, ongoing tasks will focus on refining cache rules, monitoring performance, and maintaining WordPress's security and up-to-date status.
For BaCloud users, the VPS environment comes with LiteSpeed Enterprise and LSCache pre-configured at the server level, so the performance stack is ready right out of the box. This greatly simplifies setup, allowing you to concentrate on optimizing and managing WordPress itself.
For more in-depth tutorials, visit the BaCloud blog, where you’ll find helpful guides.