

Telegram’s Bot API has been around since 2015, and since then, bots have become a core part of the platform, powering everything from trading tools and AI assistants to full-fledged Telegram-based SaaS products. If you’ve built a bot or are just getting started, hosting it on a BaCloud VPS is one of the best ways to keep it online 24/7.
In this guide, you’ll learn how to set up your environment, deploy your Telegram bot, and run it continuously, even after you close your terminal or log out.
Prerequisites
Before you begin, make sure you have the following:
- A VPS — We’ll use a Bacloud VPS running Ubuntu 24.04 for this guide.
- A Telegram account — You’ll use this to create your bot and communicate with it.
- Python 3 and pip — Required to run the bot and install its dependencies. (We’ll install these in the setup steps.)
Step 1: Create Your Telegram Bot
To create a bot, Telegram provides an official bot called @BotFather. This is the tool you'll use to register your bot and generate the unique token that allows your code to interact with the Telegram Bot API.
Follow these steps:
- Open Telegram and search for @BotFather. Make sure it’s the official one; it should have a star badge next to its name.
- Start a chat with BotFather and type the command:
|
/newbot |
- BotFather will ask for two things:
- A name for your bot (this is what users will see).
- A username (must be unique and end in “bot”, like Mybot).
- Once completed, BotFather will generate your bot’s API token, a long string of letters and numbers. This token is like a password for your bot, and you'll need it in your code to send and receive messages.
Be sure to copy and save your token in a safe location. If someone else gets access to it, they could control your bot.
Step 2. Prepare Your VPS
To run your Telegram bot, you’ll need to set up your server with the right tools. This includes connecting to your VPS, updating your system, installing Python (the programming language we'll use to build the bot), and creating a virtual environment to isolate and manage your project's dependencies and errors.
Connect to your VPS via SSH
Use the command below from your terminal to access your server:
|
ssh username@your-vps-ip |
Replace username with your VPS user (often root) and your-vps-ip with the IP address of your server.
Update System Packages
Once connected, update your package list and install the latest available upgrade:
|
sudo apt update && sudo apt upgrade -y |
This updates your system, minimizing the risk of compatibility issues in the future.
Install Python and pip
In this guide, we’ll write the bot in Python, one of the most popular choices for developing a Telegram bot due to its simplicity and strong library support. To proceed, make sure Python 3 and pip (Python’s package manager) are installed:
|
sudo apt install python3 python3-pip -y |
Ubuntu 24.04 typically comes with Python 3 pre-installed, but running this command ensures you have the latest version and that pip is available.
Create and activate a virtual environment
To avoid permission errors and keep your bot’s dependencies organized, it's best to use a Python virtual environment.
First, create a project folder for your bot and navigate into it:
|
mkdir bacloud-bot |
Next, create and activate the virtual environment using the following command:
|
python3 -m venv botenv |
This creates a virtual environment named botenv in your current directory.
Next, activate the virtual environment using:
|
source botenv/bin/activate |

Once activated, your terminal prompt will change (you’ll see something like (botenv)), which indicates that all Python packages will now be installed inside this isolated environment.
Step 3: Write a Simple Telegram Bot Script
Now that your VPS is ready, it’s time to create your bot’s code. For this guide, we’ll use the python-telegram-bot library, which provides an easy interface for interacting with Telegram’s Bot API.
Create the bot script file
While inside your project folder (e.g., bacloud-bot), use a text editor like nano to create a Python file for your bot:
|
nano bot.py |
Add a basic bot script
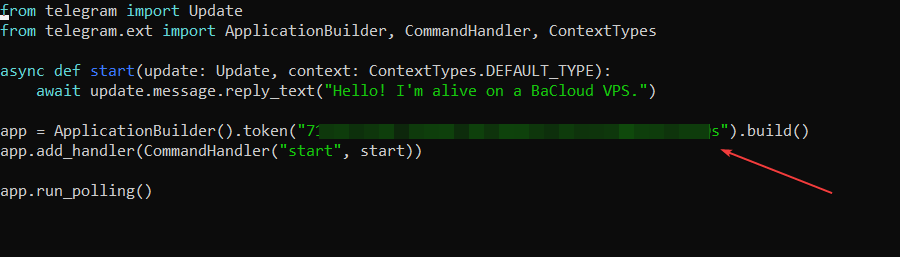
Paste the following code into the file. This script sets up a simple /start command that replies when a user interacts with the bot.
|
from telegram import Update |
Replace "YOUR_TELEGRAM_BOT_TOKEN" with the actual token you received from @BotFather earlier. run_polling() keeps the bot running and checks for new messages by polling Telegram’s servers in a loop.
See image below for how your script should look:
If you're using nano, press Ctrl + X, then press Y and Enter to save and exit.
Step 4: Install Required Libraries
With your bot script ready, the next step is to install the necessary Python library that allows your code to interact with Telegram’s Bot API.
We'll be using the python-telegram-bot library, which provides an easy-to-use interface and supports the latest Telegram features.
From inside your bot project folder, run:
|
pip install python-telegram-bot --upgrade |
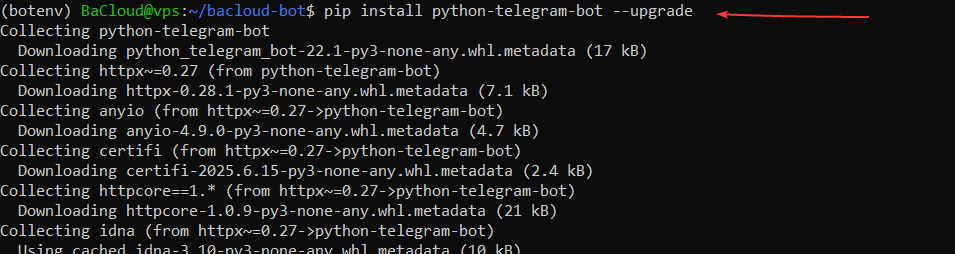
This command installs the latest version of the library and ensures you have all the required dependencies. The --upgradeflag makes sure you get the most recent version, which is important.
Once this is done, your environment is ready to run the bot.
Step 5: Test the Bot
Now that everything is in place, it’s time to test your bot and make sure it works as expected.
In your project folder, run the Python script:
|
python3 bot.py |
If the script starts without any errors, your bot is now live and listening for incoming messages.
To test it:
- Open Telegram.
- Search for your bot by its username (the one you set up using BotFather).
- Send the /start command.

If everything is working correctly, your bot should respond with the message you defined in your script (e.g., "Hello! I'm alive on a BaCloud VPS."). If you don’t get a response like the one in the image above, double-check that your bot token is correct and that the script is still running in the terminal.
At this point, you’ve successfully deployed a working Telegram bot on your VPS.
While the bot is running, your terminal will appear inactive. This is normal. To stop the bot, press Ctrl + C.
Step 6: Keep the Bot Running 24/7
When you run your bot using python3 bot.py, it will only stay active as long as your terminal session is open. If you close the terminal or disconnect from your VPS, the bot will stop running. To keep it running continuously, even when you're logged out, you can use a terminal tool called screen.
Run Your Bot in the Background with screen
screen is a terminal utility that lets you run processes in a detachable session; perfect for keeping your bot alive 24/7.
Install screen (if it’s not already installed):
First, make sure screen is installed on your server. It may already be available, but this command ensures it:
|
sudo apt install screen |
Start a new screen session:
Now, create a new screen session where your bot will run. You can name the session anything, here we’ll call it telegrambot.
|
screen -S telegrambot |
This opens a new session that functions like a separate terminal.
Navigate to your project folder:
Inside the screen session, make sure you're in your bot's project directory (e.g., bacloud-bot). If you're not already there, run:
|
cd ~/bacloud-bot |
Activate your virtual environment inside the screen
Once inside reactivate your virtual environment (since screen starts a fresh shell session):
|
source botenv/bin/activate |
Run your bot inside the screen
Once inside the screen session, start your bot as usual:
|
python3 bot.py |
You should see the bot start up. Leave it running.
Detach from the screen session
To leave the session and return to your normal terminal (while keeping the bot running in the background), press Ctrl + A, then D.
Reattach to your screen session later
If you want to return to the session to check logs or stop the bot, run:
|
screen -r telegrambot |
Step 7 (Optional): Use a .env File to Store Your Bot Token Securely
Hardcoding your bot token directly into your script works, but it’s not a good long-term practice, especially if you ever plan to share or publish your code. Instead, it's better to store sensitive data, such as API tokens, in a separate .env file.
This approach keeps your credentials out of your main codebase, making it easier to manage them securely.
Install python-dotenv
We’ll use the python-dotenv package to load environment variables from a .env file:
|
pip install python-dotenv |
Create a .env file
In the same folder as your bot.py script, create a new file named .env. You can do this using nano:
|
nano .env |
Inside the file, paste your bot token you got from BotFather like this:
|
TELEGRAM_TOKEN=your_bot_token_here |
Then press Ctrl + X, then Y, and hit Enter to save and exit.
Update your Python script to load the token
Now, modify your bot.py file to read the token from the .env file instead of hardcoding it.
Open your bot script to make the necessary changes:
|
nano bot.py |
At the very top of your script (above everything else), add the following lines:
|
import os |
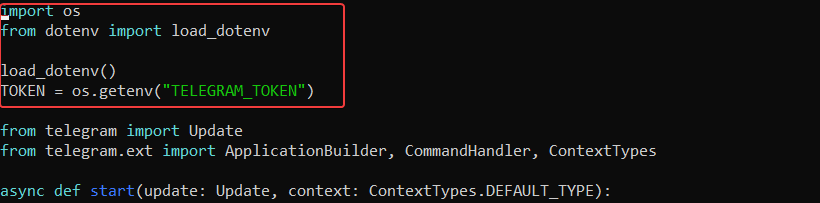
Then, find the line where your app is initialized and update it:
Before:
|
app = ApplicationBuilder().token("YOUR_TELEGRAM_BOT_TOKEN").build() |
After:
|
app = ApplicationBuilder().token(TOKEN).build() |
With this setup, your script will now read the token from the .env file, rather than having it visible in your code. This is a safer and more professional way to handle sensitive information.
-
Add .env to .gitignore
If you're using Git to track your project, it's important to prevent sensitive files like .env, from being added to version control. You can do this by adding .env to your .gitignore file. This way, your bot token won’t accidentally be uploaded to GitHub or any remote repository.
Run this command in your project directory:
|
echo .env >> .gitignore |
This appends .env to the .gitignore file, telling Git to ignore it when committing changes.
Conclusion
You now have a working Telegram bot running on your BaCloud VPS, and configured to stay online even after you log out. This provides a solid foundation for building more advanced features or managing multiple bots.
If you're also interested in setting up a Discord bot, check out our following tutorial: How to Host a Discord Bot on a BaCloud VPS — a great next project if you're expanding into Discord.