

 As software projects grow, keeping your code organized and accessible becomes increasingly important. A Git hosting platform provides a central place to store code, collaborate, and track changes.
Gitea is a lightweight, open-source Git hosting platform that allows you to run your own Git service on a server. It provides a simple web interface for managing repositories while keeping your data under your control.
In this guide, you'll deploy Gitea on a BaCloud VPS running Ubuntu 26.04 LTS using Docker and Docker Compose. You'll configure persistent storage, set up a secure HTTPS connection through Nginx, and prepare Gitea for repository access.
Prerequisites
Before you begin, make sure you have the following:
-
An Ubuntu 26.04 LTS VPS
-
A sudo-capable user
-
SSH access to the VPS
-
A domain name pointing to the VPS
Step 1: Update Ubuntu
Before deploying Gitea, update the package index and upgrade the installed packages to ensure your Ubuntu 26.04 LTS server is up to date.
Update the package list:
sudo apt updateUpgrade the installed packages:
sudo apt upgrade -yThis keeps the server prepared for the installation steps that follow.
Step 2: Install Docker Engine and Docker Compose
Before deploying Gitea, install Docker Engine and Docker Compose on your Ubuntu server.
If Docker is not already installed, follow our How to Install and Set Up Docker on Ubuntu 26.04 guide before continuing.
After the installation is complete, verify that Docker Engine is available:
docker --version
Then verify that Docker Compose is installed:
docker compose versionIf both commands return version information, Docker is installed correctly and you can continue with the Gitea deployment.
Step 3: Create the Gitea Project Directory
Before creating the Gitea container, create a dedicated directory to store the Docker Compose configuration. Keeping each application in its own directory makes it easier to manage multiple services on the same VPS.
Create the Gitea directory:
mkdir -p ~/giteaMove into the directory:
cd ~/giteaVerify the current location:
pwdExpected output:
/home/USERNAME/gitea Step 4: Create the Docker Compose File
The Docker Compose file defines how Gitea runs on the VPS, including the container image, restart behavior, storage location, port mapping, and timezone settings.
Create the Compose file:
nano compose.ymlAdd the following configuration:
services: gitea: image: docker.gitea.com/gitea:1.27.3 container_name: gitea restart: unless-stopped ports: - "3000:3000" - "222:22" volumes: - gitea-data:/data - /etc/timezone:/etc/timezone:ro - /etc/localtime:/etc/localtime:rovolumes: gitea-data:Save and exit the file.
Configuration overview
-
docker.gitea.com/gitea:1.27.3 uses a fixed Gitea version to keep the deployment consistent.
-
restart: unless-stopped allows Docker to automatically restart Gitea after a VPS reboot or container failure.
-
3000:3000 exposes the Gitea web interface for initial setup.
-
222:22 maps the VPS SSH port 222 to Gitea's internal SSH service port.
-
gitea-data:/data stores Gitea data in a Docker volume so it persists after container recreation.
-
The timezone mounts synchronize the container timezone with the VPS.
Note
Port 3000 is used only during the initial Gitea configuration. After you set up Gitea, you can put the web interface behind Nginx with HTTPS and remove direct public access to port 3000.
Step 5: Download and Start Gitea
Download the Gitea container image:
docker compose pullStart the Gitea container in the background:
docker compose up -dVerify that the Gitea container is running:
docker compose psIf the deployment is successful, you should see the gitea service with a status similar to Up.
Step 6: Complete the Initial Gitea Configuration
After the container is running, open a browser and access the Gitea web interface:
http://SERVER_IP:3000Replace SERVER_IP with the public IP address of your VPS.
On a fresh installation, Gitea will display the Initial Configuration page.
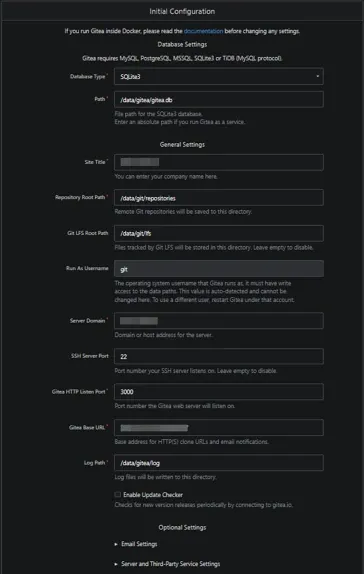
This temporary HTTP access is for initial configuration only. Later, Nginx will place the web interface behind HTTPS.
Database Settings
Gitea automatically selects SQLite3 for this deployment.
Confirm that the database path is set to:
/data/gitea/gitea.dbSQLite keeps this deployment self-contained and avoids the need to run a separate database container.
General Settings
Use the following values:
-
Site Title: Gitea (or your project name)
-
Repository Root Path: /data/git/repositories
-
Git LFS Root Path: /data/git/lfs
-
Run As Username: Leave auto-detected
-
Server Domain: Your VPS IP address (for initial setup)
-
SSH Server Port: 222
-
Gitea HTTP Listen Port: 3000
-
Gitea Base URL: Leave the temporary HTTP URL (using your VPS IP address)
-
Log Path: /data/gitea/log
The SSH Server Port is set to 222 because Docker maps the VPS port to Gitea's internal SSH service:
VPS port 222 → container port 22Gitea listens internally on port 22 inside the container, while external Git SSH connections use port 222 on the VPS.
Optional Settings
Leave email configuration and other optional settings unchanged for this guide.
Create the Administrator Account
Create the first administrator account, then complete the installation.
Step 7: Verify the Initial Gitea Installation
After setup, sign in to Gitea with the administrator account.
Create a Test Repository
From the Gitea dashboard:
-
Select + in the top-right corner.
-
Choose New Repository.
-
Enter: Repository Name: test-repository
-
Leave the remaining options at their default values.
-
Select Create Repository.
Verify the Repository
After creating the repository, Gitea will open the repository page.
Confirm that:
-
the repository page loads correctly;
-
the repository name test-repository is displayed;
-
the repository owner and repository details are shown.
Step 8: Restrict Gitea Web Access to localhost
Before configuring Nginx, update the Gitea container so its web interface is accessible only locally on the VPS.
Nginx will act as the public entry point and forward web requests to Gitea through the local address.
From your Gitea project directory, open the Compose file:
nano compose.ymlFind the current web port mapping:
- "3000:3000"Change it to:
- "127.0.0.1:3000:3000"This binds port 3000 only to the VPS localhost interface. The Gitea web service remains available inside the container, but the web interface is no longer directly exposed to public network access.
Keep the Gitea SSH port mapping unchanged:
- "222:22"Save and exit the file.
Apply the updated configuration:
docker compose up -dVerify that port 3000 is bound only to localhost:
sudo ss -lntp | grep ':3000'The output should show:
127.0.0.1:300000confirming that the Gitea web interface is only accessible locally.
Nginx can now connect to Gitea through:
127.0.0.1:3000 Step 9: Install Nginx
Nginx will act as a reverse proxy for Gitea, handling public web requests and forwarding them to the Gitea service running locally on the VPS.
Install Nginx:
sudo apt install nginx -yCheck that the Nginx service is running:
sudo systemctl status nginx --no-pagerThe output should show Active: active (running), confirming that the Nginx service started successfully.
Enable Nginx to start automatically after system reboots:
sudo systemctl enable --now nginx Step 10: Configure Nginx for Gitea
Nginx will act as a reverse proxy, allowing users to access Gitea through your domain while forwarding requests to the local Gitea service.
Create a new Nginx site configuration:
sudo nano /etc/nginx/sites-available/giteaAdd the following configuration:
server { listen 80; server_name your-domain.com; location / { proxy_pass http://127.0.0.1:3000; proxy_set_header Host $host; proxy_set_header X-Real-IP $remote_addr; proxy_set_header X-Forwarded-For $proxy_add_x_forwarded_for; proxy_set_header X-Forwarded-Proto $scheme; }}Replace your-domain.com with your actual Gitea domain.
Enable the Gitea site:
sudo ln -s /etc/nginx/sites-available/gitea /etc/nginx/sites-enabled/Test the Nginx configuration:
sudo nginx -tIf the configuration is valid, reload Nginx:
sudo systemctl reload nginxNginx is now configured to forward requests to the local Gitea service.
Step 11: Configure UFW
If UFW is enabled on the VPS, allow the ports required for web access, HTTPS, and Gitea SSH connections.
Check the current firewall status:
sudo ufw statusAllow HTTP traffic for Nginx:
sudo ufw allow 80/tcpPort 80 is required for Let's Encrypt to verify domain ownership when issuing the SSL certificate.
Allow HTTPS traffic:
sudo ufw allow 443/tcpThis allows users to access Gitea securely after HTTPS is configured.
Allow the Gitea SSH port:
sudo ufw allow 222/tcpThis allows Git SSH connections through the port configured earlier in Docker.
Verify the updated firewall rules:
sudo ufw statusPort 3000 does not need to be opened because the Gitea web interface is now bound only to 127.0.0.1 and is accessed externally through Nginx.
Step 12: Configure HTTPS with Let's Encrypt
HTTPS encrypts communication between users and the Gitea web interface. This protects login credentials and repository access when using Gitea through your domain.
Install Certbot
Install Certbot and the Nginx plugin:
sudo apt install certbot python3-certbot-nginx -yRequest the SSL Certificate
Run Certbot using your Gitea domain:
sudo certbot --nginx -d yourdomain.comReplace yourdomain.com with the actual domain configured for your Gitea installation.
Certbot will automatically update the Nginx configuration to use the SSL certificate.
Verify HTTPS Access
Open:
https://yourdomain.comConfirm that the Gitea web interface loads successfully through HTTPS.
Update the Gitea Base URL
After HTTPS works, update Gitea's public URL to use the final HTTPS address.
From your Gitea project directory, open the Compose file:
nano compose.ymlUnder the gitea service, add the environment section alongside the existing ports and volumes sections.
Your Gitea service should have the following structure:
services: gitea: image: docker.gitea.com/gitea:1.27.3 container_name: gitea restart: unless-stopped ports: - "127.0.0.1:3000:3000" - "222:22" environment: - GITEA__server__ROOT_URL=https://yourdomain.com/ volumes: - gitea-data:/data - /etc/timezone:/etc/timezone:ro - /etc/localtime:/etc/localtime:rovolumes: gitea-data:Replace:
yourdomain.comwith the actual domain configured for your Gitea installation.
Save and exit the file.
Apply the updated configuration:
docker compose up -dThis restarts Gitea with the updated public URL configuration. The ROOT_URL setting controls the public address Gitea uses when generating web links, repository URLs, and other generated addresses.
Step 13: Verify the Secured Gitea Deployment
After completing the configuration, verify that Gitea is accessible through the secured domain.
Open:
https://yourdomain.comConfirm that:
-
the HTTPS connection loads successfully;
-
the SSL certificate is valid;
-
the Gitea web interface displays correctly;
-
the administrator account can sign in;
-
the test repository is available.
Conclusion
In this guide, you deployed Gitea on a BaCloud VPS running Ubuntu 26.04 LTS using Docker and Docker Compose. You configured persistent storage, placed the Gitea web interface behind Nginx, secured access with HTTPS using Let's Encrypt, and updated the public URL configuration.
Your Gitea instance is now ready for hosting Git repositories through your own self-managed server.
For more in-depth tutorials, visit the BaCloud blog, where you’ll find helpful guides.