

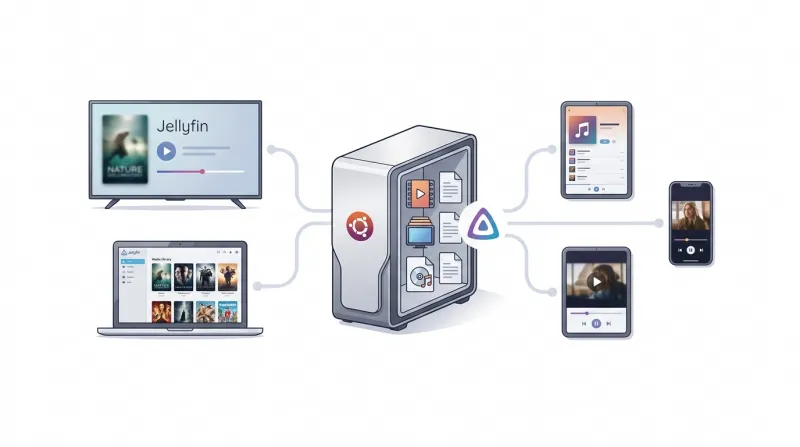
 Whether you've built a personal collection of movies, music, or family photos, accessing that media across multiple devices can quickly become challenging. A self-hosted media server provides a centralized way to organize and stream your content whenever you need it.
Jellyfin is a free and open-source media server that lets you stream your media library to web browsers, smart TVs, mobile devices, and other supported clients without subscription fees or proprietary restrictions. Unlike many commercial alternatives, Jellyfin does not require paid plans or collect telemetry.
In this guide, you'll install Jellyfin on Ubuntu 26.04 LTS, access the web interface, complete the initial setup, add your media libraries, manage the Jellyfin service, and verify that your media server is ready to use.
Prerequisites
Before you begin, make sure you have:
-
A BaCloud VPS running Ubuntu Server 26.04 LTS
-
Root or a sudo-enabled user account
-
Sufficient storage space for your media library
-
At least 2 CPU cores and 2 GB of RAM (4 GB or more recommended for larger media libraries or multiple concurrent streams)
Step 1: Update the System
Before installing Jellyfin, update your server's package index and upgrade the installed packages to their latest available versions. This helps ensure your system has the latest security updates, bug fixes, and package compatibility before installing new software.
Update the package index.
sudo apt updateUpgrade the installed packages.
sudo apt upgrade -yOnce the update is complete, you're ready to install Jellyfin from the official repository.
Step 2: Install Jellyfin from the Official Repository
The official Jellyfin APT repository provides the latest stable releases, installs the required dependencies, and allows Jellyfin to receive future updates through the APT package manager.
First, install the packages required to add external APT repositories and manage repository signing keys.
sudo apt install -y curl gnupg apt-transport-httpsCreate a directory to store the Jellyfin repository signing key.
sudo mkdir -p /etc/apt/keyringsDownload and install the Jellyfin repository signing key.
curl -fsSL https://repo.jellyfin.org/jellyfin_team.gpg.key | sudo gpg --dearmor -o /etc/apt/keyrings/jellyfin.gpgAdd the official Jellyfin APT repository to your system.
echo "deb [signed-by=/etc/apt/keyrings/jellyfin.gpg] https://repo.jellyfin.org/ubuntu $(lsb_release -cs) main" | sudo tee /etc/apt/sources.list.d/jellyfin.list > /dev/nullUpdate the package index to load packages from the newly added repository.
sudo apt updateInstall Jellyfin.
sudo apt install -y jellyfinInstalling Jellyfin from the official repository automatically installs the required Jellyfin FFmpeg package and other dependencies. No separate FFmpeg installation is required for a standard deployment.
Step 3: Verify the Jellyfin Service
After installation, Jellyfin automatically creates and starts a systemd service, allowing the media server to run in the background.
Verify that the Jellyfin service is running.
sudo systemctl status jellyfinIf the service is active, you should see an output similar to:
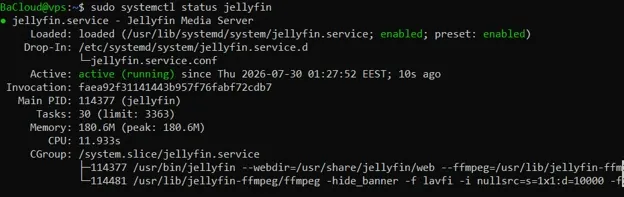
Press Q to exit the status view and return to the terminal.
Next, run the following command to configure the Jellyfin service to start automatically whenever the server boots.
sudo systemctl enable jellyfinOnce you've verified that the service is running, you can configure your firewall and access the Jellyfin web interface.
Step 4: Allow Jellyfin Through the Firewall (Optional)
If UFW is enabled on your server, allow incoming TCP connections on port 8096 so that Jellyfin can be accessed from other devices on your network or over the internet.
Allow traffic on port 8096.
sudo ufw allow 8096/tcpVerify that the firewall rule has been added successfully.
sudo ufw statusYou should see an entry similar to:
8096/tcp ALLOW AnywhereOnce the firewall is configured, you can access the Jellyfin web interface to complete the initial setup.
Step 5: Access the Jellyfin Web Interface
After installing and starting Jellyfin, open a web browser to access the Jellyfin web interface and complete the initial setup.
If you're accessing Jellyfin from another computer or device, enter the following URL in your web browser, replacing SERVER_IP with the local or public IP address of your server, depending on how you're connecting.
http://SERVER_IP:8096If you're using a web browser directly on the Ubuntu server where Jellyfin is installed, enter:
http://localhost:8096When the page loads for the first time, the Jellyfin setup wizard opens automatically.
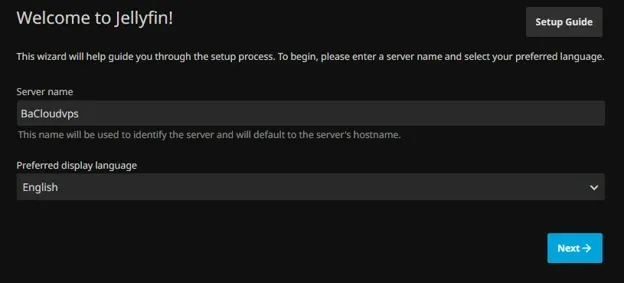
You'll use this wizard to configure the server, create an administrator account, and add your media libraries.
Once the setup wizard appears, you're ready to complete the initial configuration.
Step 6: Complete the Initial Setup Wizard
When you access Jellyfin for the first time, the setup wizard guides you through the initial server configuration.
On the Welcome to Jellyfin! page, enter a name for your server and select your preferred display language. Click Next to continue.
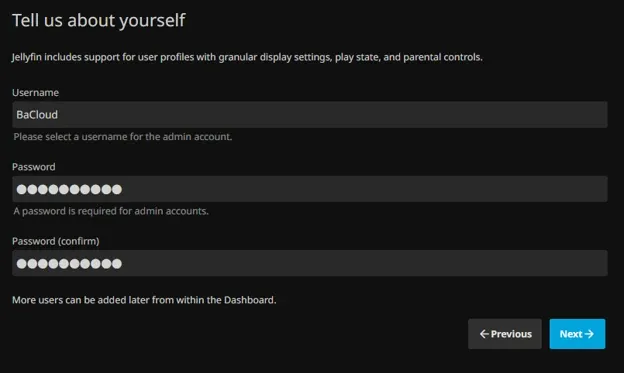
On the Tell us about yourself page, create the administrator account by entering a username and password. You'll use this account to sign in and manage your Jellyfin server.
On the Set up your media libraries page, click Add Media Library to add your first media library.
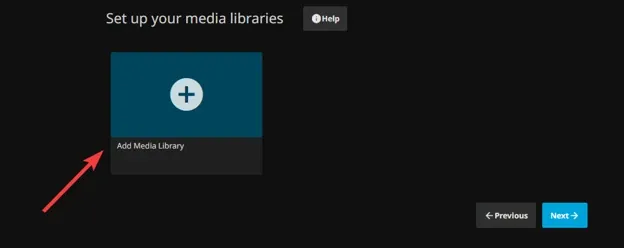
For example, to add a music library, select Music as the Content type, enter Music as the Display name, then click Folders and select the directory containing your music files. Click OK to save the library.
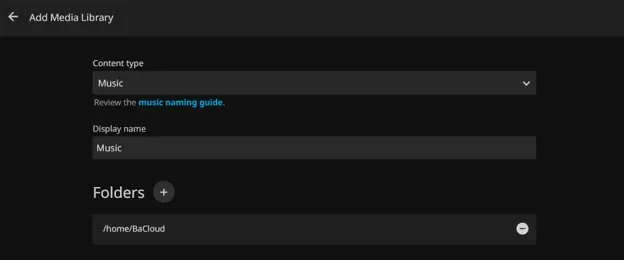
Repeat this process to add additional libraries for other types of media, such as Movies, TV Shows, or Photos, then click Next.
On the Preferred Metadata Language page, select your preferred Language and Country/Region.
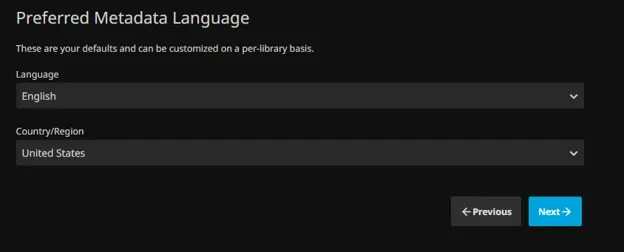
These settings define the default language and region Jellyfin uses when retrieving metadata such as titles, descriptions, and artwork. You can customize these settings later for individual libraries if required.
On the Set up Remote Access page, choose whether to enable the Allow remote connections to this server option.
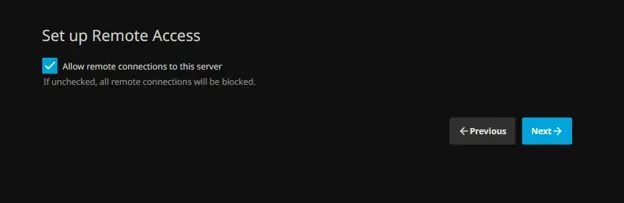
When enabled, Jellyfin allows connections from devices outside the server's local network, provided the required network and firewall settings are configured correctly. If you only plan to access Jellyfin locally, you can disable this option.
When you have configured the available settings, click Next to complete the initial setup.
Step 7: Verify the Installation
After completing the initial setup, verify that Jellyfin is installed and functioning correctly.
Confirm that the Jellyfin web interface loads successfully and that you can sign in using the administrator account you created during the setup wizard.
Next, verify that your media libraries appear in the Jellyfin dashboard and that Jellyfin has finished scanning the media files in the configured folders.
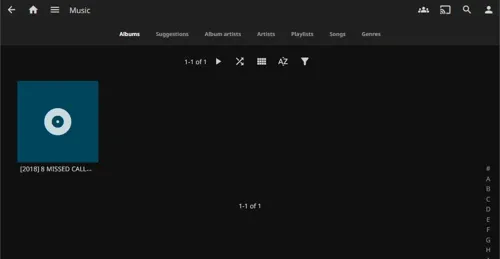
Finally, play a sample media file to confirm that your media library is accessible and that streaming is working correctly.
If all of these checks are successful, your Jellyfin media server is installed correctly and ready to stream your media.
Step 8: Manage the Jellyfin Service
After verifying that Jellyfin is installed and working correctly, you can use the following systemctl commands to manage the Jellyfin service.
Start the Jellyfin service if it is not running.
sudo systemctl start jellyfinStop the Jellyfin service.
sudo systemctl stop jellyfinRestart the Jellyfin service after making configuration changes or to apply updates.
sudo systemctl restart jellyfinCheck the current status of the Jellyfin service.
sudo systemctl status jellyfinUse these commands whenever you need to start, stop, restart, or verify the status of the Jellyfin service during routine administration or troubleshooting.
Conclusion
In this guide, you installed Jellyfin on an Ubuntu 26.04 LTS server, completed the initial setup, added a media library, and verified that your media server is ready to stream content.
As your media collection grows, you can add more libraries, configure secure remote access, and customize Jellyfin to suit your streaming needs.
For more in-depth tutorials, visit the BaCloud blog, where you’ll find helpful guides.