

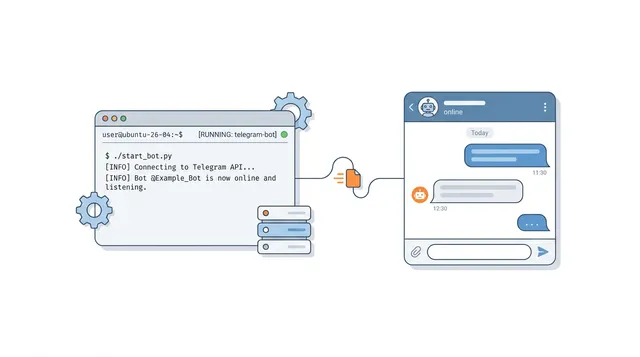
 Since its release in 2015, Telegram's Bot API has enabled developers to build a wide range of bots, from simple chat assistants to trading tools and automation services. Whether you're creating your first bot or deploying an existing project, hosting it on an Ubuntu 26.04 VPS is a reliable way to keep it running around the clock.
In this guide, you'll learn how to create a Telegram bot, prepare an Ubuntu 26.04 VPS, deploy your bot using Python, and configure it to run continuously using systemd.
Prerequisites
Before you begin, make sure you have the following:
-
A BaCloud VPS running Ubuntu 26.04
-
SSH access to the server
-
A Telegram account.
Step 1: Create Your Telegram Bot
To create a bot, Telegram provides an official bot called @BotFather. This is the tool you'll use to register your bot and generate the unique token that allows your code to interact with the Telegram Bot API.
Follow these steps:
-
Open Telegram and search for @BotFather. Make sure it’s the official one; it should have a star badge next to its name.
-
Start a chat with BotFather and type the command:
/newbot-
BotFather will ask for two things:
-
A name for your bot (this is what users will see).
-
A username (must be unique and end in “bot”, like Mybot).
-
Once completed, BotFather will generate your bot’s API token; a long string of letters and numbers. This token is like a password for your bot, and you'll need it in your code to send and receive messages.
Make sure to copy and save your token somewhere safe. If someone else gets access to it, they could control your bot.
Step 2. Prepare Your Ubuntu 26.04 VPS
Before creating your Telegram bot, you'll need to prepare your VPS by connecting to the server, updating installed packages, and setting up Python. We'll also create a virtual environment to keep the bot's dependencies isolated from the rest of the system.
Connect to your VPS via SSH using the following command:
ssh username@your-vps-ipReplace username with your VPS user and your-vps-ip with your server's IP address.
Once connected, update your package list and install the latest available updates:
sudo apt update && sudo apt upgrade -yKeeping your system up to date helps reduce compatibility issues and ensures you have the latest package and security updates available.
Next, install Python along with the tools needed to manage packages and virtual environments:
sudo apt install python3 python3-pip python3-venv -yThis command installs:
-
python3 — The Python programming language used to build and run the bot.
-
python3-pip — Python's package manager for installing libraries and dependencies.
-
python3-venv — A tool for creating isolated Python virtual environments.
After the installation completes, verify that Python and pip are available by running each command separately:
python3 --versionpip3 --versionYou should see the installed versions displayed in the terminal.
Next, create a directory for your Telegram bot project and move into it:
mkdir telegram-botcd telegram-botTo keep your project's dependencies isolated from the system Python installation, create a virtual environment:
python3 -m venv botenvThen activate it using:
source botenv/bin/activate
Once activated, you'll see (botenv) appear at the beginning of your terminal prompt, indicating that Python packages will be installed inside the virtual environment.
Step 3: Write a Simple Telegram Bot Script
Now that your VPS is ready, it's time to create your bot's code. For this guide, we'll use the python-telegram-bot library, which provides a simple way to interact with Telegram's Bot API.
-
Create the bot script file
While inside your project folder (telegram-bot), use a text editor like Nano to create a Python file for your bot:
nano bot.py-
Add a basic bot script
Paste the following code into the file. This script creates a simple /start command that responds when a user interacts with the bot.
from telegram import Updatefrom telegram.ext import ApplicationBuilder, CommandHandler, ContextTypesasync def start(update: Update, context: ContextTypes.DEFAULT_TYPE): await update.message.reply_text("Hello! I'm alive on a BaCloud VPS.")app = ApplicationBuilder().token("YOUR_TELEGRAM_BOT_TOKEN").build()app.add_handler(CommandHandler("start", start))app.run_polling()Replace "YOUR_TELEGRAM_BOT_TOKEN" with the bot token you received from BotFather earlier.
The run_polling() method keeps the bot running and checks Telegram's servers for new messages.
If you're using Nano, press Ctrl + X, then Y, and press Enter to save the file and exit.
Step 4: Install Required Libraries
With your bot script ready, the next step is to install the library required to run it.
From inside your project directory and with your virtual environment activated, run:
python3 -m pip install --upgrade python-telegram-botThis command installs the latest version of the python-telegram-bot library along with any required dependencies. The --upgrade flag ensures that the most recent version available is installed.
Once the installation is complete, your environment is ready to run the bot.
Step 5: Test the Telegram Bot
Now that everything is in place, it's time to test your bot and make sure it's working correctly.
From inside your project directory and with your virtual environment activated, run:
python3 bot.pyIf the script starts without any errors, your bot is now running and listening for incoming messages.
To test it:
-
Open Telegram.
-
Search for your bot using the username you created with BotFather.
-
Send the /start command.

If everything is configured correctly, the bot should respond with the message defined in your script.
If the bot doesn't respond, verify that you've replaced YOUR_TELEGRAM_BOT_TOKEN with the correct token and confirm that the script is still running in the terminal.
At this point, you've successfully deployed and tested a working Telegram bot on your Ubuntu 26.04 VPS.
While the bot is running, your terminal will appear occupied. This is normal. The bot will continue running only while the terminal session remains active.
To stop the bot, press:
CTRL + CStep 6: Store the Bot Token in a .env File (Optional but Recommended)
Hardcoding your bot token directly into your script works, but it's not a good long-term practice, especially if you plan to share your code or store it in a repository. Instead, it's better to store sensitive information such as your bot token in a separate .env file.
This keeps your credentials out of your source code and makes them easier to manage securely.
From inside your project directory and with your virtual environment activated, install the python-dotenv package:
python3 -m pip install python-dotenvIn the same directory as your bot.py script, create a new file named .env:
nano .envAdd your bot token to the file:
TELEGRAM_TOKEN=your_bot_token_hereReplace your_bot_token_here with the token you received from BotFather.
Next, modify your bot.py file to load the token from the .env file instead of hardcoding it.
Open the file:
nano bot.pyAdd the following lines near the top of the script:
import osfrom dotenv import load_dotenvload_dotenv()TOKEN = os.getenv("TELEGRAM_TOKEN")Then replace:
app = ApplicationBuilder().token("YOUR_TELEGRAM_BOT_TOKEN").build()with:
app = ApplicationBuilder().token(TOKEN).build()With this change, your bot will read the token from the .env file rather than storing it directly in the source code.
If you use Git to manage your project, it's important to prevent sensitive files from being committed to a repository.
Run:
echo .env >> .gitignoreThis adds .env to your .gitignore file, ensuring your bot token is not accidentally uploaded to GitHub or another remote repository.
Step 7: Keep the Bot Running 24/7 with Systemd
So far, you've been running the bot manually using:
python3 bot.pyWhile this works for testing, the bot will stop running if you close the terminal, disconnect from your VPS, or restart the server.
To keep the bot running continuously, it's recommended to use systemd, the service manager used by modern Linux distributions. With systemd, your bot can start automatically when the server boots and restart automatically if it crashes.
Create a systemd service file:
sudo nano /etc/systemd/system/telegram-bot.serviceAdd the following configuration:
[Unit]Description=Telegram BotAfter=network-online.targetWants=network-online.target[Service]User=usernameWorkingDirectory=/home/username/telegram-botExecStart=/home/username/telegram-bot/botenv/bin/python bot.pyRestart=alwaysRestartSec=5[Install]WantedBy=multi-user.targetBefore saving the file, replace username with your VPS username and update the paths if your project is located elsewhere.
This configuration contains three sections:
-
[Unit] — Defines basic information about the service and specifies that it should start only after network connectivity is available.
-
[Service] — Specifies how the bot should run, including the user account, working directory, executable, and restart behavior.
-
[Install] — Specifies when the service should start, enabling it to launch automatically at system boot.
If you're using Nano, press Ctrl + X, then Y, and press Enter to save the file and exit.
Next, reload systemd so it can detect the new service:
sudo systemctl daemon-reloadEnable the service to start automatically when the server boots:
sudo systemctl enable telegram-botStart the service:
sudo systemctl start telegram-botFinally, verify that the service is running correctly:
sudo systemctl status telegram-bot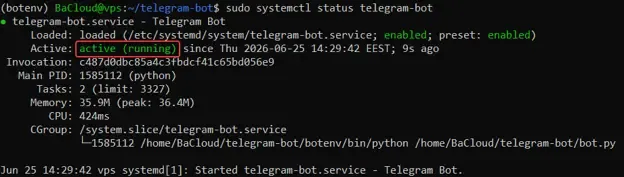
If everything is configured correctly, you should see the service active and running, as shown in the image above.
Your Telegram bot is now configured to start automatically at boot and restart automatically if it encounters an error.
Conclusion
You have successfully hosted a Telegram bot on an Ubuntu 26.04 VPS. By creating a virtual environment, deploying your bot in Python, securing your bot token with a .env file, and configuring a systemd service, your bot can run continuously without requiring an active terminal session.
If you're also interested in setting up a Discord bot, check out our next tutorial: How to Host a Discord Bot on a BaCloud VPS — a great next project if you're expanding into Discord.