

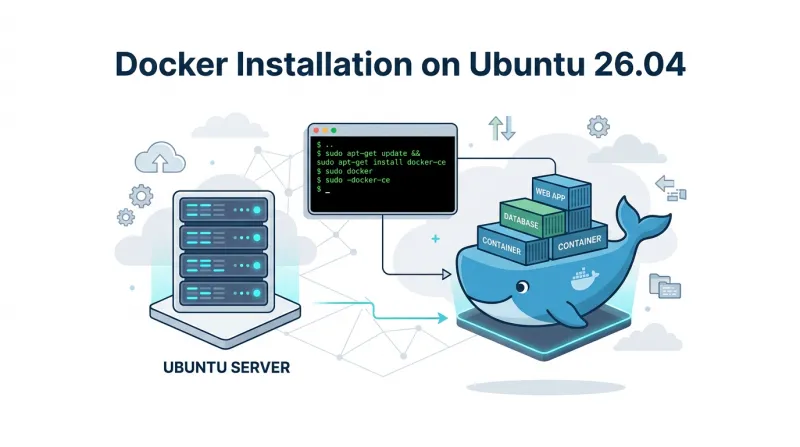
 Docker has become a core tool in modern software development and DevOps workflows by allowing applications and their dependencies to run consistently across different environments. With lightweight containers, developers can build, test, deploy, and scale applications more efficiently.
In this guide, we'll walk through installing and setting up Docker on Ubuntu 26.04 and verifying that everything is working correctly.
Prerequisites
Before you begin, ensure you have the following:
-
Ubuntu 26.04 installed
-
A user account with sudo privileges
-
A stable internet connection
Once these are set up, you’re ready to install Docker.
Step 1: Remove Old or Conflicting Docker Packages
Before installing Docker Engine, remove any conflicting Docker-related packages already installed on your system.
Run the following command to remove conflicting packages:
sudo apt remove docker.io docker-compose docker-compose-v2 docker-doc podman-docker containerd runc This helps prevent package conflicts and ensures Docker components are installed from Docker's official repository.
Note: It is normal for some or all of these packages not to be installed. If so, Ubuntu will simply report that there is nothing to remove, and you can continue with the installation.
Step 2: Update the Package Index and Install Required Dependencies
This ensures your system has the latest information about available packages before installing Docker’s required dependencies.
Run the following command to update your package index and upgrade existing packages:
sudo apt update && sudo apt upgrade -yNext, install essential dependencies for secure package downloads and SSL certificate verification:
sudo apt install -y curl ca-certificates-
curl – Used to download files from external sources.
-
ca-certificates – Verifies SSL certificates for secure connections.
With your system updated and dependencies installed, you're ready to install Docker.
Step 3: Add Docker's Official Repository
With the required dependencies installed, the next step is to add Docker's official APT repository to your system. This ensures you install the latest Docker packages maintained by Docker instead of the versions available in Ubuntu's default repositories.
First, create the directory used to store Docker's repository signing key.
sudo install -m 0755 -d /etc/apt/keyringsNext, download Docker's official GPG key to verify the authenticity of packages from the repository.
sudo curl -fsSL https://download.docker.com/linux/ubuntu/gpg \-o /etc/apt/keyrings/docker.ascAfter downloading the key, update its permissions so the package manager can access it.
sudo chmod a+r /etc/apt/keyrings/docker.ascNow, add Docker's official repository to your system by creating a new repository configuration file.
sudo tee /etc/apt/sources.list.d/docker.sources <<EOFTypes: debURIs: https://download.docker.com/linux/ubuntuSuites: $(. /etc/os-release && echo "${UBUNTU_CODENAME:-$VERSION_CODENAME}")Components: stableArchitectures: $(dpkg --print-architecture)Signed-By: /etc/apt/keyrings/docker.ascEOFFinally, update the package index so Ubuntu recognizes the newly added Docker repository.
sudo apt updateStep 4: Install Docker Engine
Now that the official Docker repository has been added, you can install Docker Engine and its core components.
Run the following command to install Docker:
sudo apt install docker-ce docker-ce-cli containerd.io docker-buildx-plugin docker-compose-plugin -yThe installation includes the following components:
-
docker-ce – The Docker Engine used to build and run containers.
-
docker-ce-cli – The Docker command-line interface for managing Docker.
-
containerd.io – The container runtime responsible for running containers.
-
docker-buildx-plugin – Enables advanced image building features through the docker buildx command.
-
docker-compose-plugin – Provides Docker Compose V2 using the docker compose command for defining and managing multi-container applications.
With Docker and its components installed, you're ready to verify that the installation completed successfully.
Step 5: Verify the Docker Installation
After installing Docker, verify that the service is running correctly and that all components have been installed successfully.
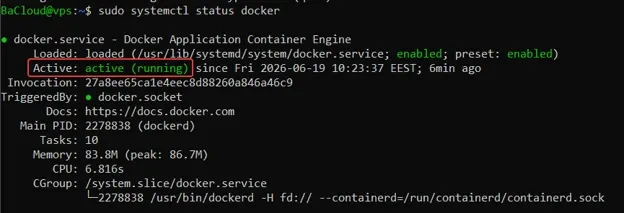
Confirm that the Docker service is active and running.
sudo systemctl status dockerYou should see output similar to the following, with the service shown as active (running):
Verify that Docker Engine has been installed successfully.
docker --versionYou should see output similar to the following, displaying the installed Docker version:
![]()
Confirm that the Docker Compose plugin is available.
docker compose versionYou should see the installed Docker Compose version:
![]()
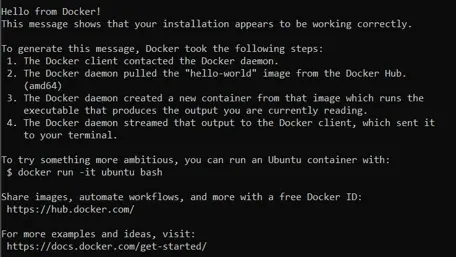
Download and run Docker's official hello-world image to verify that Docker is functioning correctly.
sudo docker run hello-worldIf the installation is successful, Docker will download the hello-world image (if it isn't already available), create and start a container, and display a confirmation message indicating that Docker is working correctly.
With Docker verified, you can proceed to configure it for use without sudo in the next step.
Step 6: Configure Docker to Run Without sudo (Optional)
By default, Docker commands require sudo privileges. To run Docker commands as a regular user, add your account to the docker group.
This grants your user permission to run Docker commands without using sudo.
sudo usermod -aG docker $USERActivate the new group membership without logging out of your current session.
newgrp dockerConfirm that you can run Docker commands without sudo.
docker psIf the configuration is successful, the command displays a list of running containers. If no containers are running, the output will simply show an empty list without any permission errors.
Step 7: Enable Docker to Start at Boot
To ensure Docker starts automatically whenever your Ubuntu system boots, enable the Docker service and its container runtime.
Configure Docker to start automatically during system startup.
sudo systemctl enable dockerConfigure the container runtime to start automatically at boot.
sudo systemctl enable containerdConfirm that the Docker service is enabled.
systemctl is-enabled dockerIf the service has been enabled successfully, the command returns:
enabledWith Docker configured to start automatically at boot, your installation is now ready for everyday use.
Step 8: Run Your First Docker Container
Now that Docker is installed and configured, let's run a container to verify that everything is working as expected. In this example, you'll deploy an Nginx web server.
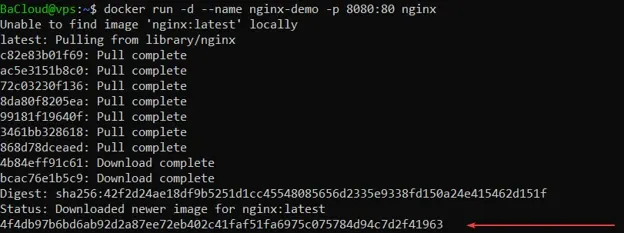
Download the Nginx image (if it is not already available) and start a container in detached mode.
docker run -d --name nginx-demo -p 8080:80 nginxIf the command is successful, Docker returns the container's unique ID.
Verify that the container is running by listing the currently running containers.
docker psYou should see the nginx-demo container in the list with a status of Up.
![]()
Access the application. Open a web browser and navigate to the following address:
http://SERVER_IP:8080Replace SERVER_IP with your server's IP address. If you are running Docker on your local machine, you can use:
http://localhost:8080You should see the default Welcome to nginx! Page:

Stop the running Nginx container.
docker stop nginx-demoRemove the stopped container from your system.
docker rm nginx-demoYour first Docker container has now been successfully deployed, accessed, and removed.
Basic Docker Commands
Now that you've successfully run your first Docker container, it's helpful to become familiar with some basic Docker commands for managing containers and images.
-
List running containers – Display all currently running containers.
docker ps-
List downloaded images – View all Docker images stored on your system.
docker images-
Download an image – Pull the latest Ubuntu image from Docker Hub.
docker pull ubuntu-
View container logs – Display the logs generated by a running or stopped container.
docker logs CONTAINER_IDReplace CONTAINER_ID with the ID or name of the container you want to inspect.
-
Access a running container – Open an interactive Bash shell inside a running container.
docker exec -it CONTAINER_ID bashReplace CONTAINER_ID with the ID or name of the running container.
-
Stop a container – Gracefully stop a running container.
docker stop CONTAINER_IDReplace CONTAINER_ID with the ID or name of the container.
-
Remove a container – Delete a stopped container from your system.
docker rm CONTAINER_IDReplace CONTAINER_ID with the ID or name of the container.
These commands provide the foundation for managing Docker containers and images and are useful for everyday Docker administration.
Conclusion
You have successfully installed Docker Engine on Ubuntu 26.04 using Docker's official repository. You also verified the installation, configured Docker to run without sudo, enabled the service to start automatically at boot, and deployed your first Docker container.
With Docker and its core components in place, your Ubuntu 26.04 system is now ready for containerized application development, testing, and deployment. From here, you can begin building your own Docker images, running multi-container applications with Docker Compose, and incorporating Docker into your DevOps and CI/CD workflows.
For more in-depth tutorials, visit the BaCloud blog, where you’ll find helpful guides.