

If your team regularly relies on video meetings, hosting your own conferencing platform can provide greater flexibility while keeping the service under your control.
Jitsi Meet is an open-source video conferencing platform you can self-host on your own server. In this tutorial, we will deploy Jitsi Meet on a BaCloud VPS running Ubuntu 26.04 using the official Docker deployment with Docker Compose. The setup will configure Jitsi Meet with a public domain and HTTPS-enabled access.
Prerequisites
Before continuing, make sure you have:
-
A BaCloud VPS running Ubuntu 26.04.
-
A domain or subdomain pointing to the VPS's public IP address.
-
SSH access and a user account with sudo privileges.
-
Sufficient CPU, memory, and network resources for the expected number of concurrent meeting participants.
Step 1: Update Ubuntu
Before installing Docker, update the Ubuntu package lists and install any available package updates to ensure the server has the latest updates from the configured repositories.
Run the following command:
sudo apt update && sudo apt upgrade -yAfter the update completes, the VPS is ready for the Docker installation step.
Step 2: Install Docker Engine and Docker Compose
Before deploying Jitsi Meet, Docker Engine and Docker Compose must be installed on your Ubuntu server.
If Docker is not already installed, follow our How to Install and Set Up Docker on Ubuntu 26.04 guide before continuing.
After the installation is complete, verify that Docker Engine is available:
docker --version
Then verify that Docker Compose is installed:
docker compose versionIf both commands return version information, Docker Engine and Docker Compose are available and ready for the Jitsi Meet deployment.
Step 3: Configure the Firewall
Allow the network traffic required for SSH access, web access, and Jitsi Meet media communication.
Run the following commands:
sudo ufw allow OpenSSHsudo ufw allow 80/tcpsudo ufw allow 443/tcpsudo ufw allow 10000/udpsudo ufw enableThese rules allow:
-
22/TCP — SSH administration
-
80/TCP — HTTP access and Let's Encrypt certificate validation
-
443/TCP — HTTPS access
-
10000/UDP — Audio and video media traffic
Verify that the firewall rules are active:
sudo ufw statusThe output should show the required ports as allowed before continuing with the Jitsi Meet deployment.
When using Docker, be aware that published container ports can interact with firewall rules differently than traditional services. Verify that the required ports are accessible and that unnecessary ports remain restricted.
Step 4: Download the Official Jitsi Meet Docker Release
Download the Jitsi Meet Docker files directly to the server. For this tutorial, we will use the stable-11248-2 release of the official Jitsi Meet Docker deployment.
Create a directory for the deployment:
mkdir ~/jitsi-meetcd ~/jitsi-meetDownload the release archive from GitHub:
wget https://github.com/jitsi/docker-jitsi-meet/archive/refs/tags/stable-11248-2.tar.gzAfter the download completes, extract the archive:
tar -xzf stable-11248-2.tar.gzEnter the extracted release directory:
cd docker-jitsi-meet-stable-11248-2The required Jitsi Meet Docker files are now available on the VPS. Continue the deployment from this release directory and do not mix configuration files from different Jitsi versions.
Step 5: Configure Jitsi Meet
Create the environment file from the template included with the selected Jitsi release:
cp env.example .envGenerate the service passwords required by the deployment:
./gen-passwords.shOpen the environment file for editing:
nano .envUpdate the following values:
Set the public URL for your Jitsi Meet installation:
Find the PUBLIC_URL line in .env, remove the # at the beginning to uncomment it, and replace the example domain with your Jitsi domain:
PUBLIC_URL=https://meet.example.comUpdate the HTTP and HTTPS ports:
These values configure Jitsi Meet to use the standard web ports for HTTP and HTTPS access. They should match the firewall rules configured earlier.
HTTP_PORT=80HTTPS_PORT=443Configure Let's Encrypt certificate settings:
Find the Let's Encrypt section in .env and enable certificate generation by removing the # symbols from the required settings:

ENABLE_LETSENCRYPT=1LETSENCRYPT_DOMAIN=meet.example.comLETSENCRYPT_EMAIL=alice@atlanta.netReplace the domain and email address with your own values.
Review the configuration storage path:
CONFIG=~/.jitsi-meet-cfgKeep this value unless you want to store the persistent configuration in a different location.
Configure the Jitsi Videobridge public IP if required:
Find the JVB_ADVERTISE_IPS line in .env. Remove the # at the beginning of the line to uncomment it, then replace the example addresses with the public IP address of your VPS.
Change:
JVB_ADVERTISE_IPS=192.168.1.1,1.2.3.4,192.168.178.1#12000,fe80::1#12000To:
JVB_ADVERTISE_IPS=YOUR_SERVER_PUBLIC_IPReplace YOUR_SERVER_PUBLIC_IP with the public IPv4 address assigned to your VPS. This ensures that Jitsi Videobridge advertises the correct address for audio and video traffic.
Do not change JITSI_IMAGE_VERSION or other release-specific settings. Keep these values aligned with the selected Jitsi release.
After saving the file, restrict access because it contains service credentials:
chmod 600 .envThe Jitsi environment file is now configured and ready for the persistent directory setup.
Step 6: Create the Required Configuration Directories
In the previous step, you configured the CONFIG location in the .env file. Before starting Jitsi Meet, create the required configuration and storage directories.
Run the following commands:
mkdir -p ~/.jitsi-meet-cfg/{web,prosody/config,prosody/prosody-plugins-custom,jicofo,jvb,jigasi,jibri,transcriber}mkdir -p ~/.jitsi-meet-cfg/storage/{jibri,prosody,transcripts,web}mkdir -p ~/.jitsi-meet-cfg/tmp/{web-crontabs,web-load-test}The required directories are now created. Apply the required permissions to the writable storage and temporary directories:
chmod 777 ~/.jitsi-meet-cfg/storage/{jibri,prosody,transcripts,web}chmod 777 ~/.jitsi-meet-cfg/tmp/{web-crontabs,web-load-test}These directories store the persistent configuration and writable data used by the Jitsi Meet services. The deployment files remain inside the Jitsi release directory.
Step 7: Pull Images and Start Jitsi Meet
Before starting the Jitsi Meet services, validate the Docker Compose configuration:
docker compose config --quietIf no errors are returned, the Compose configuration is valid and you can continue with the deployment.
Pull the required Jitsi Meet container images:
docker compose pullThis downloads the images specified by the selected Jitsi release.
Start the Jitsi Meet services in detached mode:
docker compose up -dThe -d option starts the containers in the background while keeping them running after you close the SSH session.
Check that the containers are running:
docker compose psThe services should show a running state. If any container fails to start, review the service logs:
docker compose logs --tail 100The Jitsi Meet deployment is now running. Next, verify access through the configured HTTPS domain.
Step 8: Verify HTTPS Access
After the containers start successfully, open the Jitsi Meet URL configured in PUBLIC_URL using a web browser.
For example:
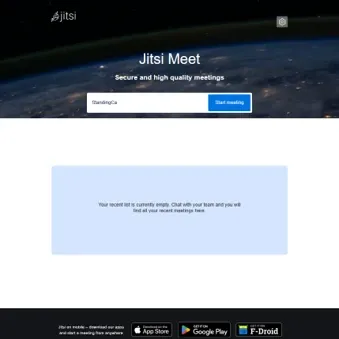
Confirm that:
-
The Jitsi Meet landing page loads successfully.
-
The browser shows a valid HTTPS certificate.
-
There are no certificate warnings.
-
The page loads without mixed-content errors.
If the page does not load or the certificate was not issued, check that:
-
The domain points to the VPS public IP address.
-
Ports 80/TCP and 443/TCP are reachable from the internet.
-
The Let's Encrypt settings in .env are correct.
-
The Jitsi containers are running without errors.
Step 9: Test a Video Conference
After confirming the Jitsi Meet page loads successfully, create a test meeting to verify that audio, video, and participant connections work correctly.
Open your Jitsi Meet URL in a browser:
Enter a meeting name and select Start meeting.
When prompted, allow the browser to access your microphone and camera.
To test participant connectivity, share the meeting URL with additional participants or open the meeting from another device and join using the same link.
Confirm that:
-
Participants can join the meeting successfully.
-
Microphones and cameras work correctly.
-
Audio and video are exchanged between participants.
-
Participants can see and hear each other.
A working web interface alone does not confirm that the full Jitsi deployment is functioning correctly. The Jitsi Videobridge handles media traffic, so an actual conference test verifies that audio and video traffic can reach the media service.
Testing with three participants is recommended because two-person meetings may use peer-to-peer communication and may not fully test the Jitsi Videobridge path.
Step 10: Manage and Update Jitsi Meet
After deploying Jitsi Meet, you can use Docker Compose to monitor, troubleshoot, stop, restart, and update the deployment.
Check the status of the Jitsi Meet containers
Run the following command:
docker compose psThis command displays the current status of each Jitsi Meet container and confirms whether the services are running.
View service logs
Run the following command to view the Jitsi Videobridge logs:
docker compose logs jvbReplace jvb with another service name, such as web, prosody, or jicofo, to view logs for that service.
Reviewing service logs can help identify configuration errors and troubleshoot startup issues.
Stop the Jitsi Meet deployment
Run the following command:
docker compose downThis command stops the Jitsi Meet containers while keeping your existing configuration and persistent data.
Start the deployment again
Run the following command:
docker compose up -dThis command starts the Jitsi Meet containers in the background using the existing configuration.
Update Jitsi Meet
When a newer stable release becomes available, download the updated release of the official docker-jitsi-meet project and follow the upgrade instructions provided with that release.
Keep the existing .env file and persistent configuration directory during updates so that your deployment settings and generated credentials are preserved.
Do not run gen-passwords.sh again during a routine upgrade. This script generates new service passwords, and changing them during an existing deployment can prevent Jitsi services from communicating correctly.
After completing maintenance or an update, verify that all containers are running before allowing users to reconnect.
Conclusion
You have now deployed Jitsi Meet on Ubuntu 26.04 using Docker Compose, configured HTTPS access, and verified that the required services are working correctly.
With your self-hosted Jitsi Meet instance running, you can manage your own video conferencing platform while keeping control over your server, configuration, and data.
For more in-depth tutorials, visit the BaCloud blog, where you’ll find helpful guides.