


Many everyday tasks involve switching between applications, copying information, or repeating the same actions. As these tasks grow, automating them can save time, reduce errors, and keep workflows running consistently.
n8n is an open-source workflow automation platform that lets you connect applications and automate processes using a visual workflow editor. Because you can self-host it, you retain full control over your workflows, credentials, and data while running it on infrastructure you manage.
In this guide, you'll deploy n8n on a BaCloud VPS running Ubuntu 26.04 LTS using Docker Compose. You'll configure PostgreSQL for persistent data storage, set up Nginx as a reverse proxy, secure the deployment with HTTPS using Let's Encrypt, and verify that both the n8n interface and webhooks function correctly.
Prerequisites
Before you begin, make sure you have the following:
-
An Ubuntu 26.04 LTS VPS
-
A non-root user with sudo privileges
-
SSH access to the server
-
At least 2 vCPUs and 4 GB of RAM recommended
-
A domain name pointing to the VPS
-
An active internet connection
Step 1: Update Ubuntu
Before installing Docker and the required dependencies, update the server packages to ensure the system is running the latest available versions.
Update the package list:
sudo apt updateUpgrade the installed packages:
sudo apt upgrade -yThis keeps the server prepared for the installation steps that follow.
Step 2: Install Docker Engine and Docker Compose
Before deploying n8n, Docker Engine and Docker Compose must be installed on your Ubuntu server.
If Docker is not already installed, follow our How to Install and Set Up Docker on Ubuntu 26.04 guide before continuing.
After Docker installation is complete, verify that Docker Engine is available:
docker --version
Then verify that Docker Compose is installed:
docker compose versionIf both commands return version information, Docker is installed correctly and you can continue with the n8n deployment.
Step 3: Create the n8n Project Directory
Create a dedicated directory to store the n8n deployment files.
Create the project directory:
mkdir -p ~/n8nMove into the newly created directory:
cd ~/n8nThis directory will contain the Docker Compose configuration and environment file used to deploy n8n.
Step 4: Configure the n8n Environment Variables
Before creating the environment file, generate a random encryption key for n8n.
Run the following command:
openssl rand -hex 32Copy the generated value. Use it for the N8N_ENCRYPTION_KEY variable in the environment file.
Create the environment file:
nano .envAdd the following configuration:
POSTGRES_DB=n8nPOSTGRES_USER=n8nPOSTGRES_PASSWORD=your_secure_passwordDB_TYPE=postgresdbDB_POSTGRESDB_HOST=postgresDB_POSTGRESDB_PORT=5432DB_POSTGRESDB_DATABASE=n8nDB_POSTGRESDB_USER=n8nDB_POSTGRESDB_PASSWORD=your_secure_passwordN8N_HOST=n8n.example.comN8N_PROTOCOL=httpsWEBHOOK_URL=https://n8n.example.com/N8N_EDITOR_BASE_URL=https://n8n.example.com/GENERIC_TIMEZONE=UTCN8N_ENCRYPTION_KEY=your_generated_encryption_keyReplace n8n.example.com with the domain you will use for your n8n installation.
The URL variables must use the complete HTTPS address, including https://, because n8n uses them to generate webhook URLs and internal links when running behind a reverse proxy.
Generate the N8N_ENCRYPTION_KEY once and keep it unchanged for the lifetime of the installation. n8n uses this key to encrypt stored credentials, and changing it can make previously saved credentials inaccessible.
After saving the file, restrict access to protect the stored configuration values:
chmod 600 .envThe hostname and webhook URL configured here should match the domain you will later configure with Nginx and HTTPS.
Step 5: Create the Docker Compose Configuration
Docker Compose allows you to define the n8n deployment, including the application, database, networking, and persistent storage configuration, in a single configuration file.
Create the Compose file:
nano compose.yamlInside this file, define the n8n application and PostgreSQL database services.
The configuration will include:
-
n8n application container.
-
PostgreSQL database container.
-
A dedicated Docker network for communication between services.
-
Persistent Docker named volumes for application and database data.
Add the following configuration:
services: postgres: image: postgres:17 container_name: postgres restart: unless-stopped environment: POSTGRES_DB: ${POSTGRES_DB} POSTGRES_USER: ${POSTGRES_USER} POSTGRES_PASSWORD: ${POSTGRES_PASSWORD} volumes: - postgres_data:/var/lib/postgresql/data healthcheck: test: ["CMD-SHELL", "pg_isready -U ${POSTGRES_USER} -d ${POSTGRES_DB}"] interval: 10s timeout: 5s retries: 5 networks: - n8n n8n: image: docker.n8n.io/n8nio/n8n:2.37.10 container_name: n8n restart: unless-stopped depends_on: postgres: condition: service_healthy ports: - "127.0.0.1:5678:5678" environment: DB_TYPE: ${DB_TYPE} DB_POSTGRESDB_HOST: ${DB_POSTGRESDB_HOST} DB_POSTGRESDB_PORT: ${DB_POSTGRESDB_PORT} DB_POSTGRESDB_DATABASE: ${DB_POSTGRESDB_DATABASE} DB_POSTGRESDB_USER: ${DB_POSTGRESDB_USER} DB_POSTGRESDB_PASSWORD: ${DB_POSTGRESDB_PASSWORD} N8N_HOST: ${N8N_HOST} N8N_PROTOCOL: ${N8N_PROTOCOL} WEBHOOK_URL: ${WEBHOOK_URL} N8N_EDITOR_BASE_URL: ${N8N_EDITOR_BASE_URL} GENERIC_TIMEZONE: ${GENERIC_TIMEZONE} N8N_ENCRYPTION_KEY: ${N8N_ENCRYPTION_KEY} volumes: - n8n_data:/home/node/.n8n networks: - n8nvolumes: n8n_data: postgres_data:networks: n8n:This configuration creates two services:
-
n8n — runs the workflow automation platform.
-
PostgreSQL — provides persistent database storage for n8n.
Use pinned image versions instead of the latest tag to prevent unexpected changes during future deployments or updates. This lets you upgrade deliberately by reviewing the target release before changing the image version.
The n8n service is bound only to the local VPS interface:
ports: - "127.0.0.1:5678:5678"This allows Nginx to forward HTTPS requests to n8n without exposing port 5678 directly to the internet.
The deployment uses Docker named volumes:
volumes: n8n_data: postgres_data:These volumes preserve n8n application data and PostgreSQL database data after container restarts or updates.
Step 6: Start n8n and PostgreSQL
After configuring the Docker Compose file, start the n8n application and PostgreSQL database containers. This verifies the deployment starts correctly before you continue with the reverse proxy and HTTPS configuration.
Start the containers in detached mode:
docker compose up -dThe -d option runs the containers in the background and returns control to the terminal after startup.
Verify that both containers are running:
docker compose ps
The output should show the n8n and postgres services as running.
If a container does not start correctly, check the logs for the affected service.
To review the n8n container logs, run:
docker compose logs n8nTo review the PostgreSQL database logs, run:
docker compose logs postgresResolve any startup errors before continuing with the remaining configuration steps.
Step 7: Verify the Docker Deployment
After starting the containers, verify that Docker created the required resources and that n8n is responding correctly before configuring the reverse proxy.
First, confirm that the persistent Docker volumes were created:
docker volume ls
You should see output similar to the image above, indicating that Docker has successfully created the persistent volumes for the n8n and PostgreSQL services.
Because n8n is bound only to the local interface on port 5678, test that the application responds from the VPS itself:
curl http://127.0.0.1:5678A response from n8n confirms that the container is running correctly and reachable locally.
At this stage, n8n is available only on the VPS and is not yet accessible through the public domain. Next, configure Nginx as the reverse proxy and enable HTTPS access.
Step 8: Verify DNS Configuration
Before configuring Nginx and HTTPS, confirm that your n8n domain name resolves correctly to your VPS. This ensures that the reverse proxy and Let's Encrypt certificate setup can complete successfully.
Verify DNS resolution for your n8n hostname. Replace n8n.example.com with the actual hostname you will use for your installation:
dig +short dondaso.duckdns.orgThe returned IP address should match your VPS's public IP address.
If the address doesn't match, verify your DNS record and wait for changes to propagate before continuing.
Step 9: Configure Nginx as a Reverse Proxy
After confirming n8n is running locally, configure Nginx as the public entry point for the application. Nginx will receive incoming requests from your domain and forward them to the n8n container running on the VPS.
Install Nginx:
sudo apt install nginx -yCreate an Nginx server block for your n8n hostname:
sudo nano /etc/nginx/sites-available/n8nAdd the following configuration, replacing n8n.example.com with your actual domain:
server { listen 80; server_name n8n.example.com; location / { proxy_pass http://127.0.0.1:5678; proxy_set_header Host $host; proxy_set_header X-Real-IP $remote_addr; proxy_set_header X-Forwarded-For $proxy_add_x_forwarded_for; proxy_set_header X-Forwarded-Proto $scheme; proxy_http_version 1.1; proxy_set_header Upgrade $http_upgrade; proxy_set_header Connection "upgrade"; }}Enable the Nginx configuration:
sudo ln -s /etc/nginx/sites-available/n8n /etc/nginx/sites-enabled/Test the Nginx configuration for syntax errors:
sudo nginx -tIf the test completes successfully, reload Nginx to apply the changes:
sudo systemctl reload nginxAt this point, requests to your n8n domain should be forwarded to the local n8n service through Nginx. Configure HTTPS in the next step using Let's Encrypt.
Step 10: Enable HTTPS with Let's Encrypt
After configuring Nginx as a reverse proxy, secure the n8n installation with an SSL certificate from Let's Encrypt. This lets users access n8n securely through HTTPS and ensures webhook requests use an encrypted connection.
Install Certbot and the Nginx plugin:
sudo apt install certbot python3-certbot-nginx -yRequest an SSL certificate for your n8n hostname. Replace n8n.example.com with your actual domain:
sudo certbot --nginx -d n8n.example.comDuring the setup, Certbot will verify the domain, configure the Nginx HTTPS settings, and can automatically redirect HTTP requests to HTTPS.
Test the Nginx configuration after Certbot makes the changes:
sudo nginx -tIf the configuration test is successful, reload Nginx:
sudo systemctl reload nginxThe n8n web interface should now be securely accessible through the domain you configured. For example:
https://n8n.example.comStep 11: Configure the Firewall
After enabling HTTPS, ensure that the firewall allows only the services required for remote access and web traffic. Since Nginx acts as the public entry point, you don't need to expose the n8n application port directly.
If UFW is installed and enabled, allow SSH access:
sudo ufw allow OpenSSHAllow HTTP and HTTPS traffic through Nginx:
sudo ufw allow 'Nginx Full'Verify the active firewall rules:
sudo ufw statusThe firewall should allow SSH and Nginx web traffic.
Do not open port 5678 publicly. The n8n service remains bound to the local interface, while Nginx handles external HTTPS requests.
Step 12: Complete the n8n Initial Setup
After configuring HTTPS, access the n8n web interface through the domain configured earlier.
Open the following address in your browser:
https://n8n.example.comReplace n8n.example.com with your own configured hostname.
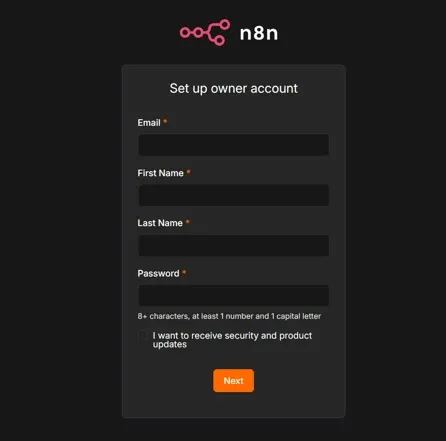
Complete the initial setup process and create the n8n owner account.
After signing in, verify that:
-
The n8n editor loads successfully.
-
You can access the n8n interface without errors.
-
The owner account setup completes successfully.
At this stage, n8n is fully accessible through your domain with HTTPS enabled. Workflow and webhook testing will be performed in the next step.
Step 13: Test a Workflow and Webhook
After completing the initial setup, verify that n8n can execute workflows and receive external webhook requests.
Test a Manual Workflow
First, create a simple workflow to confirm the n8n editor and workflow execution engine work correctly.
From the n8n dashboard:
-
Select Build Workflow.
-
Click Add first step.
-
Select Trigger Manually from the available trigger options.
n8n will add the Manual Trigger node to the workflow.
The Manual Trigger lets you start the workflow manually from the editor without an external event.
-
Click the + button after the Manual Trigger node to add the next step.
-
Search for Edit Fields and select the Edit Fields node.
-
Add a test field:
-
Name: Test
-
Value: n8n is working on BaCloud
-
Click Execute Workflow.
The workflow should execute successfully and display the output data from the Edit Fields node.
Example successful output:
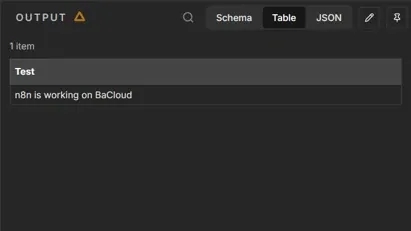
This confirms that the n8n editor and workflow execution engine are working correctly.
After confirming that the manual workflow executes successfully, create a separate workflow to test webhook functionality. Keeping the workflows separate makes it easier to verify each part of the deployment.
Test a Webhook Workflow
Next, create a simple webhook workflow to verify that n8n can receive requests through the public HTTPS domain.
From the n8n dashboard:
-
Select Build Workflow.
-
Click Add first step.
-
Search for and select Webhook.
-
Configure the Webhook node:
-
HTTP Method: GET
-
Path: test
The Webhook node will generate a test webhook URL.
-
Click Listen for test event in the Webhook node.
-
Open the displayed test webhook URL in a browser.
The workflow should trigger and display the received request data in the execution output.
Example successful output:
Output1 itemheaders host: n8n.example.com x-forwarded-proto: httpsparams {}query {}body {}The exact request details will vary depending on the client making the request.
This confirms that the n8n public URL is configured correctly, Nginx is forwarding HTTPS requests to n8n and external webhook requests can reach the n8n instance.
Step 14: Verify Data Persistence
After confirming that n8n is running correctly, verify that your data remains available after container restarts and recreation.
First, restart the running services:
docker compose restartAfter the restart completes, open the n8n interface and verify that your:
-
Owner account
-
Workflows
-
Credentials
-
Configuration
are still available.
Next, perform a stronger persistence test by removing and recreating the containers.
Stop and remove the containers:
docker compose downStart the deployment again:
docker compose up -dOpen the n8n interface again and confirm that your data is still available.
Because n8n and PostgreSQL data are stored in persistent Docker volumes, recreating the containers does not remove the existing application data.
Step 15: Back Up n8n and PostgreSQL
After completing the deployment, create a backup strategy to protect your workflows, credentials, and database data.
Back up the PostgreSQL database using PostgreSQL's backup tools, such as pg_dump.
Avoid copying the PostgreSQL data directory directly while the database is running, as this is not a replacement for a proper database backup.
Also protect the n8n persistent data and the N8N_ENCRYPTION_KEY value used in your environment configuration. The encryption key is required to decrypt stored credentials, so losing it can make encrypted data unusable.
Store backups separately from the VPS, such as on another server or external storage, so they remain available if the VPS becomes unavailable.
Step 16: Update and Maintain n8n
Keep the n8n deployment updated by reviewing new releases, testing changes, and keeping backups available before making updates.
Before updating n8n:
-
Back up the deployment.
-
Review the target n8n release and any relevant release notes.
-
Update the n8n image version in compose.yaml.
After changing the image version, download the updated image:
docker compose pullRecreate the containers using the updated image:
docker compose up -dVerify that the services are running correctly:
docker compose psIf you need to troubleshoot after an update, review the n8n container logs:
docker compose logs --tail=50 n8nAfter confirming that the updated deployment is working correctly, you can optionally remove unused Docker images:
docker image pruneThis removes unused images no longer associated with running containers and can help free up disk space.
Conclusion
In this guide, you transformed a fresh Ubuntu 26.04 LTS server into a self-hosted n8n automation platform with persistent storage and secure access configured.
With the deployment complete, you can now create workflows, connect external services, and automate tasks while maintaining control over your data and infrastructure.
For more in-depth tutorials, visit the BaCloud blog, where you’ll find helpful guides.