


Large language models can run directly on your own hardware, allowing you to use AI without relying on a cloud service. Whether you're experimenting locally, building AI-powered applications, or deploying models on a server, running them yourself gives you greater control over your data, the models you use, and your deployment environment.
Ollama provides the runtime and API for downloading, managing, and running large language models, while Open WebUI provides a browser-based interface for interacting with those models.
In this guide, you will deploy Ollama and Open WebUI on a BaCloud server running Ubuntu 26.04 using Docker Compose. Ollama will run as a Docker container alongside Open WebUI, allowing both services to communicate through an internal Docker network. You will also learn how to prepare the deployment for secure remote access using HTTPS.
Prerequisites
Before you begin, ensure you have the following:
-
An Ubuntu 26.04 LTS server
-
A user with sudo privileges
-
SSH access to the server
-
Internet access to download required software, Docker images, and Ollama models
-
Sufficient CPU, RAM, and storage for the models you intend to run
The resources required depend on the models you intend to run. Smaller models can run on CPU-based servers, while larger models may require significantly more system resources or supported GPUs.
Step 1: Update Ubuntu
Before installing Ollama and Docker, update the server's package index to ensure you're installing the latest available packages.
sudo apt updateNext, upgrade any installed packages to their latest versions.
sudo apt upgrade -yIf the upgrade installs a new kernel or other system updates that require a restart, reboot the server before continuing.
sudo rebootStep 2: Install Docker Engine and Docker Compose
Open WebUI and Ollama will both run as Docker containers. Before deploying them, Docker Engine and Docker Compose must be installed on your Ubuntu server.
If Docker is not already installed, follow our How to Install and Set Up Docker on Ubuntu 26.04 guide before continuing.
After the installation is complete, verify that Docker Engine is installed successfully:
docker --version
Then check the Docker Compose version:
docker compose versionIf both commands return version information, Docker is installed correctly and you're ready to deploy Ollama and Open WebUI.
Step 3: Create the Project Directory
Create a dedicated project directory to store the Docker Compose configuration and other deployment files for Open WebUI and Ollama.
Create the project directory:
mkdir -p ~/open-webuiMove into the directory:
cd ~/open-webuiAll configuration files created in the following steps will be stored in this directory.
Step 4: Configure Ollama and Open WebUI with Docker Compose
Docker Compose allows you to define and manage multiple containers using a single configuration file. In this step, you'll configure both the Ollama and Open WebUI containers, along with the persistent storage they require.
Create the Docker Compose configuration file:
nano compose.yamlAdd the following configuration:
services: ollama: image: ollama/ollama:latest container_name: ollama restart: unless-stopped volumes: - ollama:/root/.ollama open-webui: image: ghcr.io/open-webui/open-webui:v0.6.31 container_name: open-webui restart: unless-stopped ports: - "3000:8080" environment: - OLLAMA_BASE_URL=http://ollama:11434 volumes: - open-webui:/app/backend/data depends_on: - ollamavolumes: ollama: open-webui:This configuration:
-
Deploys Ollama and Open WebUI as separate Docker containers.
-
Creates persistent Docker volumes to store Ollama models and Open WebUI application data.
-
Maps port 3000 on the Ubuntu server to port 8080 inside the Open WebUI container.
-
Configures Open WebUI to communicate with the Ollama service over Docker's internal network.
-
Starts the Ollama container before Open WebUI during deployment.
Because both containers are part of the same Docker Compose project, Docker automatically creates a private network that allows the containers to communicate using their service names. As a result, Open WebUI can reach the Ollama API using:
http://ollama:11434No additional network configuration is required, and the Ollama API remains accessible only within the Docker network unless you explicitly expose it.
Step 5: Start the Services
Start the Ollama and Open WebUI containers in the background:
docker compose up -dThe -d option runs the containers in detached mode, allowing them to continue running after you close the SSH session.
Verify that both containers started successfully:
docker compose psYou should see output similar to:

If a container does not start correctly, check the service logs:
docker compose logsYou can also view logs for a specific service:
docker compose logs ollamaor:
docker compose logs open-webuiAt this point, both services should be running, with Ollama providing the AI model API and Open WebUI providing the browser-based interface.
Step 6: Download an AI Model
Before using Open WebUI, download an AI model that Ollama can run. In this guide, you'll use Gemma 3 as an example.
Download the model:
docker exec -it ollama ollama pull gemma3The download may take several minutes depending on your internet connection and the size of the model.
After the download completes, verify that the model is installed:
docker exec -it ollama ollama listYou should see output similar to:

Next, test the model by running it directly from the Ollama container:
docker exec -it ollama ollama run gemma3When the interactive prompt appears, enter a question or prompt to verify that the model generates a response.
If the model responds successfully, Ollama is ready to serve requests from Open WebUI.
When you're finished, exit the interactive session by typing:
/byeStep 7: Access Open WebUI
After the containers are running, open Open WebUI in your web browser:
http://SERVER_IP:3000Replace SERVER_IP with the public IP address of your Ubuntu server.
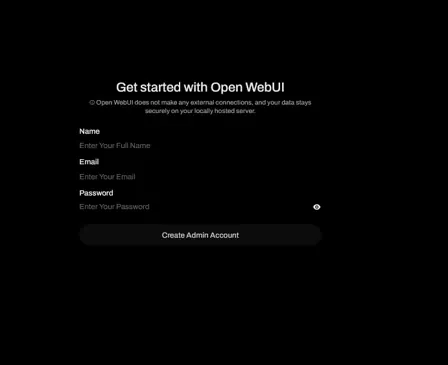
When you open Open WebUI for the first time, you'll be greeted by a welcome screen. Click Get Started to begin the initial setup.

Next, create the administrator account by entering your name, email address, and a password.
After the account is created, Open WebUI loads the chat interface, similar to the image below:
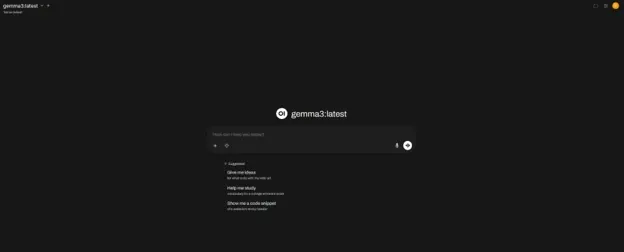
If your Ollama model was downloaded successfully in the previous step, it should be available for selection automatically.
Select the model and send a simple prompt. If the model generates a response, Open WebUI is successfully connected to Ollama and your deployment is ready to use.
Step 8: Configure HTTPS with Nginx (Optional)
After confirming that Open WebUI is working, you can configure HTTPS for secure remote access.
For production deployments, Nginx can be used as a reverse proxy in front of Open WebUI. Nginx will handle incoming HTTPS connections and forward requests to the Open WebUI container.
Ollama will remain private inside the Docker network and will not be exposed directly to the internet.
Before continuing, ensure that:
-
You have a domain name pointing to your server's public IP address.
-
Ports 80 and 443 are allowed through your firewall.
Install Nginx:
sudo apt install nginx -yVerify that Nginx is running:
sudo systemctl status nginxIf Nginx started successfully, the service status should show Active: active (running).
Create an Nginx configuration file for Open WebUI:
sudo nano /etc/nginx/sites-available/open-webuiAdd the following configuration:
server { listen 80; server_name dondaso.duckdns.org; location / { proxy_pass http://127.0.0.1:3000; proxy_http_version 1.1; proxy_set_header Host $host; proxy_set_header X-Real-IP $remote_addr; proxy_set_header X-Forwarded-For $proxy_add_x_forwarded_for; proxy_set_header X-Forwarded-Proto $scheme; proxy_set_header Upgrade $http_upgrade; proxy_set_header Connection "upgrade"; }}Replace yourdomain.com with your actual domain name.
Enable the Open WebUI site:
sudo ln -s /etc/nginx/sites-available/open-webui /etc/nginx/sites-enabled/Test the Nginx configuration:
sudo nginx -tIf the configuration is correct, the command should return syntax is ok and test is successful.
Reload Nginx:
sudo systemctl reload nginxOpen WebUI should now be accessible through your domain:
http://yourdomain.comNext, install Certbot to enable HTTPS:
sudo apt install certbot python3-certbot-nginx -yRequest an SSL certificate:
sudo certbot --nginx -d yourdomain.comFollow the prompts to complete the certificate installation.
After Certbot completes the setup, access Open WebUI securely:
https://yourdomain.comAt this point, the deployment is complete. Users can access Open WebUI securely over HTTPS, while Ollama remains private and accessible only to Open WebUI via the Docker network.
Step 9: Configure Firewall
If UFW is enabled on your server, allow the required ports for remote access.
Allow SSH access to prevent losing your connection:
sudo ufw allow OpenSSHAllow HTTP and HTTPS traffic for Nginx:
sudo ufw allow 'Nginx Full'Check the current firewall rules:
sudo ufw statusYou should see SSH and Nginx traffic allowed.
Ollama does not need to be exposed publicly. Do not open:
11434/tcpThe Ollama API should remain private and accessible only to Open WebUI via the Docker network.
Step 10: Update the Deployment
To update Ollama and Open WebUI to newer container images, first download the latest versions defined in your compose .yaml file.
Pull the updated images:
docker compose pullAfter the images are downloaded, recreate the containers using the updated images:
docker compose up -dDocker Compose will replace the existing containers while keeping the persistent volumes intact. Your Ollama models and Open WebUI configuration data will remain available.
Verify that the containers are running:
docker compose psThe services should show a running status.
Step 11: Backup Data
Open WebUI and Ollama store important data in Docker volumes. These volumes persist even if the containers are removed or recreated.
The deployment creates the following Docker volumes:
ollamaThis volume stores the Ollama models downloaded to your server.
open-webuiThis volume stores Open WebUI data, including users, settings, conversations, and application configuration.
To view the Docker volumes created by the deployment, run:
docker volume lsYou should see the volumes associated with the Open WebUI deployment.
Include these volumes in your regular server backup strategy so you can restore your AI models, users, settings, and application data if the server fails.
Step 12: Verify the Deployment After Reboot
A final reboot test confirms that the services start automatically and that persistent data remains available after a system restart.
Restart the server:
sudo rebootReconnect to the server through SSH after it has restarted.
Check that the containers are running:
docker compose psConfirm that:
-
The Ollama container is running.
-
The Open WebUI container is running.
-
Your downloaded models are still available.
-
Open WebUI is accessible through your configured URL.
To verify that the models are still available, run:
docker exec -it ollama ollama list
Conclusion
You now have a self-hosted AI environment running on your Ubuntu 26.04 server. Ollama provides the local model runtime, while Open WebUI gives you a simple web interface for managing and interacting with your AI models.
From here, you can add more models, adjust resources as needed, and expand the deployment based on your specific use case.
For more in-depth tutorials, visit the BaCloud blog, where you’ll find helpful guides.