

 If you're using shared hosting or a managed platform, you've probably never had to think about reverse proxies because your hosting provider handles that part for you. Things change when you run your own application on a VPS or dedicated server. A Node.js, Python, Java, Go, or .NET application may run on its own port, such as 3000, 5000, or 8080. That works fine inside the server, but it is not how visitors expect to access a website.
Visitors expect to use a domain name over HTTP or HTTPS. They should not have to know which internal port your application uses. The application also should not be exposed directly to the public internet if you can avoid it. A reverse proxy receives public web traffic, forwards requests to the application running on the internal port, and provides a single place to manage routing, HTTPS, and basic traffic control.
NGINX is one of the most common tools for this job. This guide walks you through configuring NGINX as a reverse proxy on a Linux server, step by step.
What is a Reverse Proxy?
A reverse proxy is a server that receives incoming HTTP and HTTPS requests from web browsers, mobile apps, APIs, and other clients and passes them to the appropriate server, application, or service. Instead of users connecting directly to your website, API, or application server, they connect to the reverse proxy first. The reverse proxy determines where the request should go, receives the response, and returns it to the user.
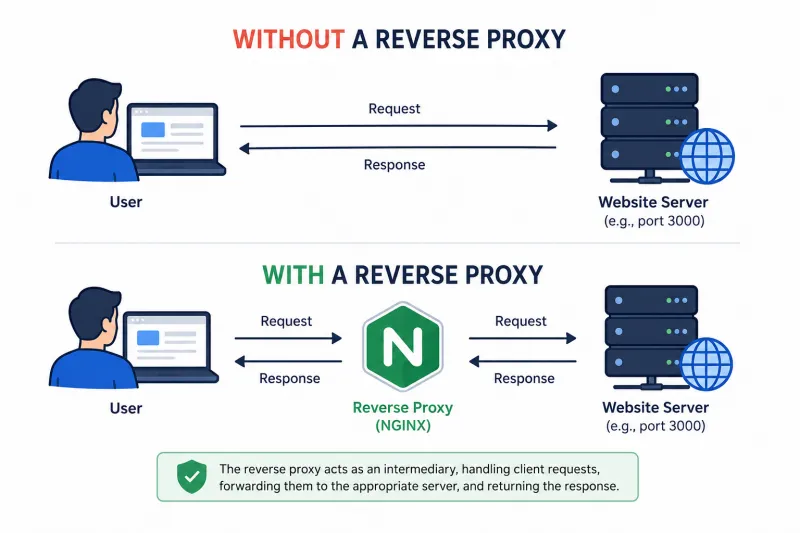
Imagine someone visits your website. If a reverse proxy is not deployed, the browser communicates directly with the web server hosting the site.
Without a reverse proxy: User > Website Server
If a reverse proxy is deployed, traffic reaches it first. The reverse proxy forwards the request to the appropriate server, receives the response, and sends it back to the user.
With a reverse proxy: User > Reverse Proxy > Website Server
From the user's perspective, nothing changes. They still visit the same website using the same domain name and see the same content. Most users never know a reverse proxy exists because all communication happens through the website's normal address.
Why do you want a Reverse Proxy?
A reverse proxy also provides several operational benefits:
A single entry point: Your website, API, and internal applications can all share the same domain and public IP address, even when they run on different servers or ports.
SSL in one place: HTTPS certificates can be configured on the reverse proxy instead of managing separate certificates across multiple applications and services.
Better performance: Frequently requested content can be cached, responses can be compressed, and static files such as images, CSS, and JavaScript can be delivered more efficiently.
More security: Application servers remain hidden from direct internet traffic, reducing exposure to attacks and unwanted requests.
Load balancing: A reverse proxy can be configured to distribute traffic across multiple servers, which helps prevent a single server from becoming overloaded during traffic spikes.
Who actually needs a Reverse Proxy
Not every website requires you to configure a reverse proxy yourself. If you're using shared hosting, managed WordPress hosting, or a platform-as-a-service provider, there's a good chance your hosting provider already runs one for you.
Things change when you choose a VPS, cloud instance, or dedicated server. At that point, you're responsible for managing how traffic reaches your applications and services.
A reverse proxy is especially useful if any of the following apply to your environment:
-
You're running a Node.js, Python, Go, Java, or .NET application. These applications typically listen on custom ports such as 3000, 5000, or 8080. They are not usually exposed directly to the internet.
-
Your application listens on a custom port. Your Node.js application may be running on port 3000, but visitors access the site through HTTPS on port 443. A reverse proxy receives requests on port 443 and forwards them to the application running on port 3000.
-
You're hosting multiple websites or applications on the same server. Each service may use a different port or process. A reverse proxy routes requests to the correct destination.
-
You're running services inside Docker containers. Containers often run on internal Docker networks rather than public addresses. A reverse proxy provides a single public entry point.
-
You want HTTPS across multiple applications. Managing certificates separately for every application is difficult. A reverse proxy centralizes SSL management.
-
You need to distribute traffic across multiple servers. Sending all requests to a single server can create a bottleneck. A reverse proxy can spread traffic across multiple application instances.
If you're managing your own server and any of these scenarios sound familiar, you'll likely need a reverse proxy.
Why NGINX?
NGINX is one of the most widely used reverse proxy servers and web servers. It is not the only option, but it is often the first choice for VPS and dedicated server deployments.
Other tools can perform the same role:
-
Apache supports reverse proxying through the mod_proxy module.
-
HAProxy is widely used for high-performance load balancing.
-
Caddy is known for its simple configuration and automatic HTTPS.
-
Traefik is popular in containerized and Kubernetes environments.
NGINX is comfortably in the middle. It combines reverse proxying, SSL termination, static file delivery, caching, and load balancing in a single package.
For example, a typical VPS running a Node.js application often uses NGINX to:
-
Accept traffic on ports 80 and 443.
-
Handle HTTPS certificates.
-
Forward requests to the application running on port 3000.
-
Serve static files directly.
-
Distribute traffic across multiple application instances when needed.
Another advantage is documentation. NGINX has been used in production environments for years, which means troubleshooting guides, examples, and community support are easy to find.
If your goal is to deploy a secure, reliable reverse proxy in front of an application running on a VPS or dedicated server, NGINX is usually the best place to start.
Before you start
Before configuring NGINX as a reverse proxy, make sure you have:
-
A Linux server you control, such as a VPS, cloud instance, or dedicated server.
-
Root or sudo access.
-
A backend application is already running. For example, a Node.js application listening on http://127.0.0.1:3000.
-
A domain name points to your server's public IP address through a DNS A record.
This guide uses Ubuntu, but the steps are nearly identical on Debian and other common Linux distributions.
Before proceeding, confirm that your application is running and accessible locally. NGINX can only forward requests to an application that is already running.
Step 1: Install NGINX
Update your package list and install NGINX:
sudo apt update
sudo apt install nginx -y
Start NGINX and configure Linux to launch the service automatically after future reboots:
sudo systemctl start nginx
sudo systemctl enable nginx
Once the installation is complete, open your server's IP address in a browser. If the default NGINX welcome page appears, NGINX is installed and accepting web traffic successfully.
Step 2: Create a Reverse Proxy Configuration
NGINX stores website configurations in /etc/nginx/sites-available/. To make a configuration active, you must enable it in /etc/nginx/sites-enabled/. We'll do that in the next step.
Create a new configuration file for your domain:
sudo nano /etc/nginx/sites-available/example.com
Paste the following configuration, replacing example.com with your domain name and 3000
with the port your application is listening on:
server {
listen 80;
server_name example.com www.example.com;
location / {
proxy_pass http://127.0.0.1:3000;
proxy_http_version 1.1;
proxy_set_header Host $host;
proxy_set_header X-Real-IP $remote_addr;
proxy_set_header X-Forwarded-For $proxy_add_x_forwarded_for;
proxy_set_header X-Forwarded-Proto $scheme;
}
}
The most important directives are:
-
listen 80 - Accepts incoming HTTP traffic on the standard web port.
-
server_name - Defines which domain names this configuration should respond to.
-
proxy_pass - Forwards requests to the application running on 127.0.0.1:3000. If your application listens on a different port, update this value accordingly.
-
X-Real-IP and X-Forwarded-For - Pass the visitor's actual IP address to the application. Without these headers, many applications only see requests coming from the reverse proxy.
-
X-Forwarded-Proto - Inform the application whether the original request used HTTP or HTTPS. Many frameworks use this information when generating redirects, URLs, and security-related settings.
Step 3: Enable the Site and Test the Configuration
Enable the configuration by creating a symbolic link from sites-available to sites-enabled:
sudo ln -s /etc/nginx/sites-available/example.com /etc/nginx/sites-enabled/
Before applying the configuration, check it for syntax errors:
sudo nginx -t
If the output shows syntax is ok and the test is successful, reload NGINX to apply the changes:
sudo systemctl reload nginx
A reload applies the new configuration without terminating the NGINX service or interrupting active connections.
Visit your domain in a browser. If everything is configured correctly, NGINX should receive the request and forward it to the application running on your configured port.
Step 4: Add HTTPS with a Free SSL Certificate
Most websites should use HTTPS. One of the most common reasons for deploying a reverse proxy is to manage SSL certificates in a single place rather than configuring them separately for every application.
Install Certbot and the NGINX plugin:
sudo apt install certbot python3-certbot-nginx -y
sudo certbot --nginx -d example.com -d www.example.com
Certbot reads your existing NGINX configuration, requests a free SSL certificate from Let's Encrypt, and updates the configuration to serve traffic over HTTPS on port 443.
During the process, Certbot can also automatically redirect HTTP traffic on port 80 to HTTPS.
Once complete, visitors can access your site securely using https://. SSL certificates are renewed automatically, so there is usually no need for manual renewal.
Step 5: Optional Improvements
At this point, your reverse proxy is working. Depending on your environment, you may want to add a few additional configs.
-
Route traffic to multiple applications - If you're hosting an API and a website on the same server, NGINX can send /api/ requests to one application and all other requests to another.
-
Load balance across multiple servers - If several servers are running the same application, NGINX can distribute requests among them rather than sending all traffic to a single server.
-
Enable compression - Gzip compression reduces the size of HTML, CSS, JavaScript, and other responses before they are sent to visitors.
-
Configure caching: frequently requested content can be served directly by NGINX, reducing the number of requests your application handles.
Apply changes one at a time and test the configuration after each update:
sudo nginx -t
The test command verifies the configuration before it is applied. Running it after each change helps catch syntax errors before they affect your site.
Common Reverse Proxy Errors and How to Fix Them
If you see a 502 Bad Gateway error, NGINX is receiving requests but cannot connect to the application configured in the proxy_pass directive. Verify that the application is running and listening on the correct port. For example, if proxy_pass points to 127.0.0.1:3000, confirm that your application is actually running on port 3000.
A 504 Gateway Timeout error usually means NGINX connected to the application, but the application took too long to respond. This can happen when the application is overloaded, waiting on a database query, or processing a long-running request. Increasing the proxy_read_timeout value may help, but it's also worth checking the application logs to identify the underlying cause.
Run Your Reverse Proxy on Bacloud
A reverse proxy is only as reliable as the server running underneath it. If you're deploying NGINX on your own infrastructure, you'll need a VPS or dedicated server that gives you full control over the operating system, network configuration, and application stack.
Bacloud, a hosting and data center provider based in Lithuania, offers Linux VPS plans built on NVMe and SSD storage with dedicated resources. You can deploy Ubuntu, Debian, CentOS, CloudLinux, and other Linux distributions commonly used for NGINX deployments.
Every VPS includes full root access, IPv4 and IPv6 connectivity, and management through the SolusVM control panel.
If you prefer assistance with server administration, Bacloud also provides 24/7 support for setup and maintenance tasks. As your application grows, the same infrastructure can scale from a VPS to a dedicated server while keeping the same NGINX deployment.