

GRUB is the bootloader that controls which operating system or kernel version starts when your computer boots. Ubuntu manages these settings automatically by default, but additional control can be useful in dual-boot environments or when customizing boot behavior.
Grub Customizer is a graphical utility that simplifies GRUB management without requiring manual configuration file editing. You can use it to change the default boot entry, reorder menu items, and adjust boot menu settings.
In this guide, we’ll walk you through installing Grub Customizer on Ubuntu 26.04, verifying the installation, and performing basic customization.
Prerequisites
Before starting, make sure you have the following:
-
A system running Ubuntu 26.04
-
A user account with sudo privileges to run administrative commands
-
An active internet connection to download the required packages
Note: Grub Customizer requires a graphical desktop environment to launch its interface. If you are using Ubuntu Server without a desktop environment, install one before proceeding. For guidance, see our article: How to Install and Set Up a Graphical Interface Desktop (GUI) on an Ubuntu VPS
Step 1: Update Package Index
Before installing Grub Customizer, refresh the local package index to ensure APT retrieves the latest package information from configured repositories.
sudo apt update Refreshing package metadata helps prevent package lookup and repository synchronization issues during installation.
Step 2: Add the Grub Customizer PPA
Grub Customizer is not included in Ubuntu’s default repositories, so you need to add the maintainer’s Launchpad PPA.
Run the following command to add the repository:
sudo add-apt-repository ppa:danielrichter2007/grub-customizerWhen prompted, press Enter to confirm and continue.
After adding the repository, refresh the package index so APT can retrieve package information from the newly added source.
sudo apt update Step 3: Install Grub Customizer
With the repository added and the package index updated, you can now install Grub Customizer using APT.
Run the following command:
sudo apt install grub-customizer -y This command installs Grub Customizer along with any required dependencies.
Step 4: Verify the Installation
After installation, confirm that Grub Customizer is installed on the system.
Run the following command:
grub-customizer --version![]()
If the installation was successful, you should see output similar to the one above showing the installed Grub Customizer version.
Step 5: Launching Grub Customizer
Now that Grub Customizer is installed, let’s open it. You have two options:
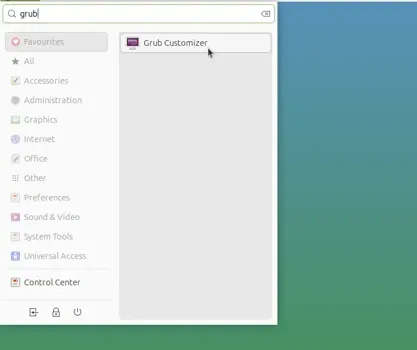
Option 1: From the application menu
-
Open the Activities menu (top left).
-
Search for Grub Customizer and click the icon.
Option 2: From the terminal
If you prefer using the terminal, simply run:
grub-customizerWhen you open Grub Customizer for the first time, Ubuntu will prompt you to enter your password.
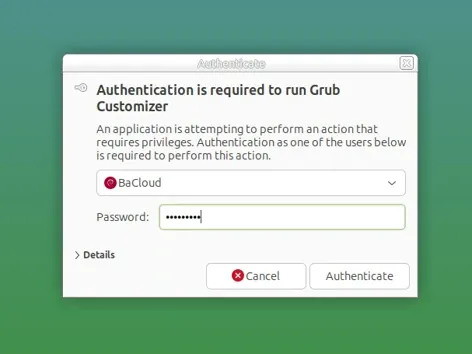
This is required because GRUB manages the bootloader, which is a core system component.
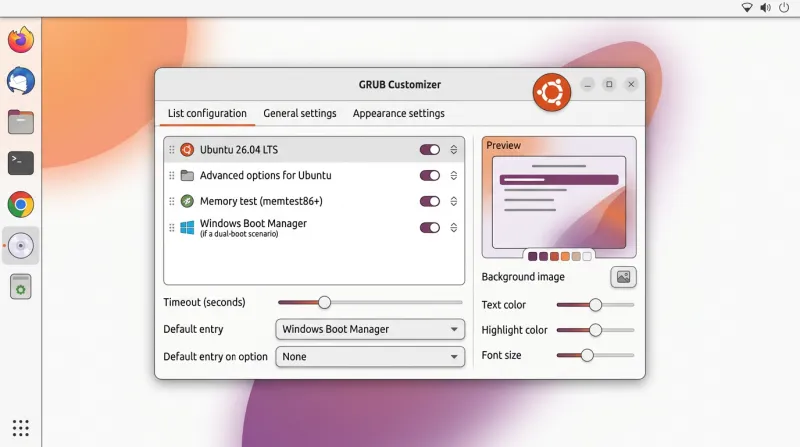
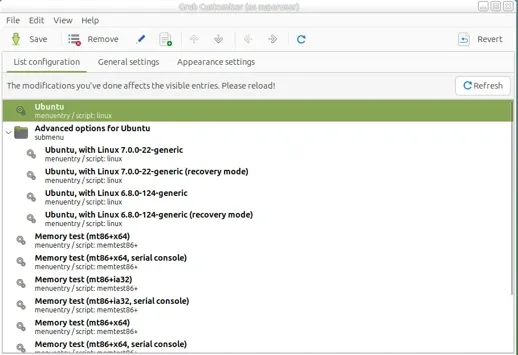
Once launched, you’ll see three main tabs like in the image below:

-
List Configuration – Displays all boot entries (Ubuntu kernels, Windows if dual-booting, recovery mode, etc.). You can reorder or hide items here.
-
General Settings – Lets you choose the default operating system and adjust the boot menu timeout (how long GRUB waits before auto-booting).
-
Appearance Settings – Allows you to change the look of the boot menu, such as the background image, text color, and fonts.
Some versions also show an Advanced Settings tab. This is where kernel parameters and other low-level options live. Beginners should avoid this unless they have a specific reason.
Basic Usage Examples
Grub Customizer makes it easy to adjust common bootloader settings without touching system files. Here are two safe examples for beginners:
Set the default OS
-
Open the General Settings tab.
-
Under Default Entry, you’ll see a dropdown list of boot options.
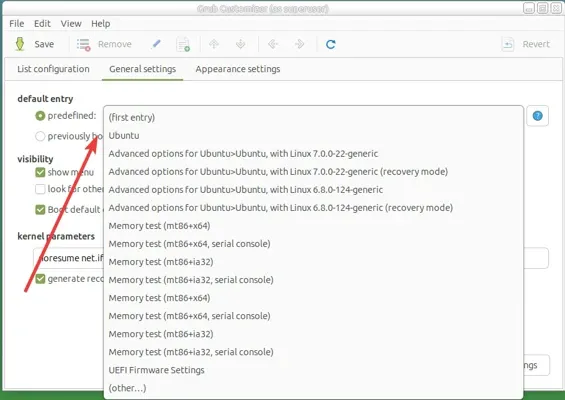
-
If you only have Ubuntu, you’ll see entries like Ubuntu, Advanced options for Ubuntu (generic), and Recovery mode.
-
If you dual-boot with Windows (or another OS), it will also appear in this list.
-
Select the system you want to boot automatically and click Save to apply the change. For example, choose Windows and click Save if you want it to start by default, rather than Ubuntu.
Alternatively, you can use the List Configuration tab to change boot order manually:
-
Click the entry you want as the default (e.g., Windows).
-
Use the ↑ Up arrow button to move it to the top of the list.
-
Click Save to apply changes.
Change the boot timeout
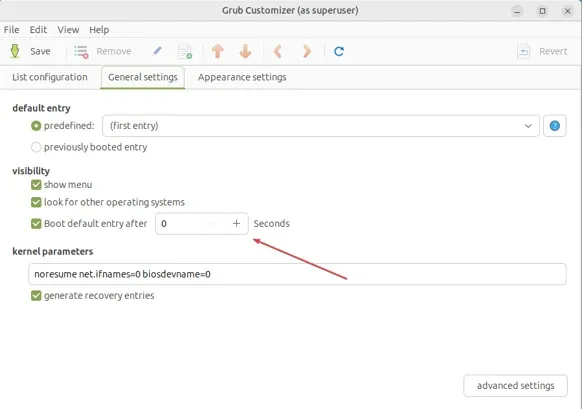
-
Still in General Settings, adjust the Boot default entry after the value.
-
Example: change it from 10 seconds to 3 seconds so the menu doesn’t delay startup.
After making your changes, click Save, then reboot once to confirm everything works as expected.
Resetting or Removing Grub Customizer
If something goes wrong, you can either remove the app or fully purge it (remove the app + its config). Follow the steps below.
Option 1: Remove only the application
Use this when you want to uninstall the Grub Customizer program but also keep the GRUB settings you made. Simply run:
sudo apt remove grub-customizerThen update GRUB to apply the changes
sudo update-grubOption 2 — Full removal (including config files)
This removes both the application and its configuration files, restoring GRUB to its default state: Simply run:
sudo apt purge grub-customizerThen update GRUB to apply the changes
sudo update-grubConclusion
In this guide, you installed Grub Customizer on Ubuntu 26.04, verified the installation, and explored its main features. You also learned how to customize common GRUB settings, such as the default boot entry and boot menu timeout, through an easy-to-use graphical interface.
With Grub Customizer, you can manage GRUB settings without manually editing configuration files, making it a convenient tool for customizing boot behavior on Ubuntu systems and dual-boot setups.
For more in-depth tutorials, visit the BaCloud blog, where you’ll find helpful guides.