

Running standard FTP today is an unnecessary risk. Stolen or compromised credentials remain one of the top initial access vectors in breaches, accounting for roughly 41% of confirmed incidents, and unencrypted file transfers leave that login material exposed in plain text.
If you’re running an Ubuntu VPS, you already have the tools to address this. Since SFTP is built on SSH, it provides encrypted file transfer without the overhead of additional services.
In this guide, we’ll configure SFTP using your existing SSH daemon to ensure data is encrypted in transit and users are restricted to their own directories. No unnecessary packages, just a secure, controlled setup.
What SFTP Is and How It Differs from FTP and FTPS
Secure File Transfer Protocol (SFTP) is a file transfer protocol that runs over Secure Shell (SSH). It uses the same encrypted connection and authentication methods as SSH, allowing users to transfer files without running a separate file transfer service.
File Transfer Protocol (FTP) transfers data and credentials in plain text and uses separate connections for commands and file data. It does not provide encryption by default.
FTP Secure (FTPS) adds Transport Layer Security (TLS) encryption to FTP but retains the same multi-connection model as traditional FTP.
SFTP differs in that it operates entirely through a single SSH connection, integrates directly with existing SSH user accounts, and requires no additional ports or services beyond SSH.
Prerequisites
Before setting up the SFTP server, ensure the following requirements are met:
-
A VPS running Ubuntu 22.04 LTS or 24.04 LTS
-
Root or sudo privileges to install packages and modify system configuration
-
Working SSH access to the server for remote management
sudo apt updateThis command updates the local package index so the system can retrieve the most recent software versions.
Install the OpenSSH Server
Install the OpenSSH server package if it is not already installed.
sudo apt install openssh-server -yThis command installs the OpenSSH server, which provides both SSH remote access and SFTP functionality.
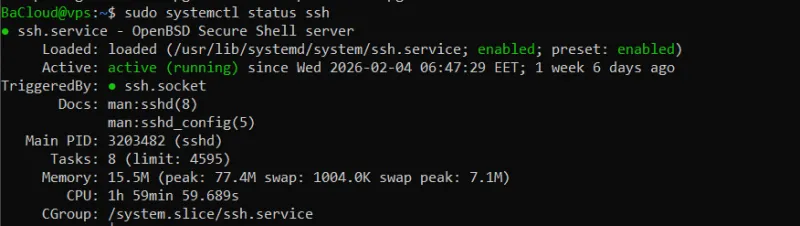
Confirm the SSH Service is Running
After installation, verify that the SSH service is active.
sudo systemctl status sshThis command displays the current status of the SSH service. You should see an active (running) status indicating the service is operational.
If the service is not running, start and enable it using:
sudo systemctl start ssh
sudo systemctl enable ssh-
start launches the service immediately
-
enable ensures the service starts automatically on system boot
Verify SFTP Support
SFTP functionality is controlled by the SSH subsystem configuration. Confirm it is enabled by checking the SSH configuration file.
sudo grep Subsystem /etc/ssh/sshd_configThis command searches the SSH configuration file and displays the line that handles SFTP connections.
You may see output similar to one of the following:
Subsystem sftp internal-sftpor
Subsystem sftp /usr/lib/openssh/sftp-serverBoth configurations support SFTP. However, for chroot-based SFTP environments, the internal SFTP subsystem is recommended because it integrates directly with the SSH service and works more reliably with directory restrictions.
Update the SFTP Subsystem (If Required)
If your output shows /usr/lib/openssh/sftp-server, update it to use the internal subsystem.
-
Open the SSH Configuration File:
sudo nano /etc/ssh/sshd_config
This command opens the SSH configuration file in the Nano editor.
-
Find the Subsystem Configuration Line
Inside the file, look for this line:
Subsystem sftp /usr/lib/openssh/sftp-server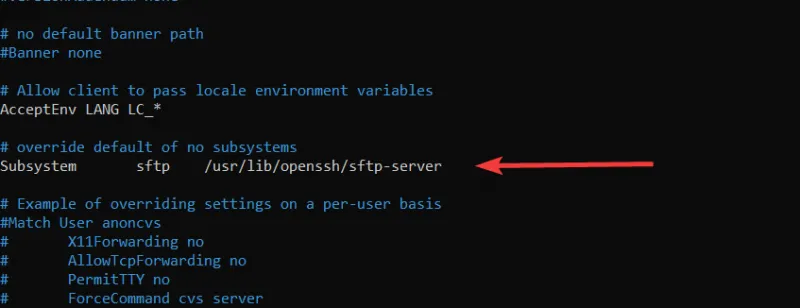
-
Replace the Line With
Subsystem sftp internal-sftpThis change enables the built-in SFTP handler, which is required for secure chroot directory restrictions.
After saving the changes, confirm that the correct subsystem is now configured:
sudo grep Subsystem /etc/ssh/sshd_configYou should now see:
Subsystem sftp internal-sftpThis confirms that the internal SFTP subsystem is enabled and ready for chroot-based SFTP configuration.
Create a Dedicated SFTP User
This step creates an isolated user account that will be restricted to SFTP access only.
Create a New SFTP User
Create a new system user that will be used exclusively for SFTP file transfers.
sudo adduser sftpuserThis command creates a new user named sftpuser and prompts you to set a password and optional user details. You can replace sftpuser with any username that fits your environment.
Set or Update the User Password
If you need to set or change the password later, run:
sudo passwd sftpuserThis command assigns or updates the password for the SFTP user, which will be used during authentication.
Create an SFTP Users Group (Recommended)
Creating a dedicated group allows you to manage multiple SFTP users more easily and apply shared restrictions.
sudo groupadd sftpusersThis command creates a new group named sftpusers that will be used to manage SFTP-only accounts.
Add the User to the SFTP Group
Assign the newly created user to the SFTP group.
sudo usermod -aG sftpusers sftpuserThis command adds sftpuser to the sftpusers group without removing them from any existing groups.
Prepare the SFTP Directory Structure (Chroot Setup)
This step creates a restricted directory environment that prevents the SFTP user from accessing other parts of the server.
Create the Base Chroot Directory
Create the main directory that will act as the jailed root for the SFTP user.
sudo mkdir -p /sftp/sftpuserThis command creates a directory structure where /sftp/sftpuser will serve as the root directory that the user sees after logging in.
Set Required Root Ownership
For chroot environments to work securely, the base directory must be owned by the root user.
sudo chown root:root /sftp/sftpuserThis command assigns ownership of the directory to the root user and group, which is required for SSH chroot security enforcement.
Apply Secure Permissions to the Base Directory
Set strict permissions to prevent the SFTP user from modifying the root jail directory.
sudo chmod 755 /sftp/sftpuserThis command allows the user to access the directory but prevents them from modifying its ownership or structure.
Create a Writable Upload Directory
Since the base chroot directory cannot be writable by the user, create a subdirectory where file uploads will be stored.
sudo mkdir -p /sftp/sftpuser/uploadsThis command creates an uploads directory inside the jailed environment where the SFTP user can store files.
Assign Ownership of the Upload Directory to the SFTP User
Allow the SFTP user to write files inside the uploads directory.
sudo chown sftpuser:sftpusers /sftp/sftpuser/uploadsThis command grants the SFTP user and group permission to manage files inside the uploads folder.
Set Upload Directory Permissions
Apply permissions that allow file uploads while maintaining security.
sudo chmod 755 /sftp/sftpuser/uploadsThis command ensures the user can read, write, and access files in the uploads directory.
Configure SSH for SFTP-Only Access
This step modifies the SSH configuration to restrict the user to SFTP file transfers and enforce directory isolation.
This configuration relies on the internal SFTP subsystem enabled earlier in this guide.
Open the SSH Daemon Configuration File
Edit the SSH server configuration file to apply SFTP restrictions.
sudo nano /etc/ssh/sshd_configThis command opens the SSH daemon configuration file using the Nano text editor, allowing you to modify authentication and access settings.
Add a Match Block for the SFTP User or Group
Scroll to the bottom of the configuration file and add the following block:
Match Group sftpusers ChrootDirectory /sftp/%u ForceCommand internal-sftp X11Forwarding no AllowTcpForwarding no PermitTunnel noThis configuration applies specific restrictions to all users in the sftpusers group.
Explanation of the Configuration Options
ChrootDirectory
ChrootDirectory /sftp/%uThis setting locks each SFTP user inside their own directory. The %u variable automatically maps to the username (for example, /sftp/sftpuser).
ForceCommand internal-sftp
ForceCommand internal-sftpThis forces the user to use SFTP only and prevents them from accessing a normal SSH shell.
Disable X11 Forwarding
X11Forwarding noThis disables graphical forwarding features that are unnecessary for file transfers and could introduce security risks.
Disable TCP Port Forwarding
AllowTcpForwarding noThis prevents the user from creating network tunnels through the server.
Disable Tunneling
PermitTunnel noThis blocks the creation of VPN-style tunnels through the SSH connection.
Validate and Restart the SSH Service
This step verifies that the SSH configuration is correct and safely applies the new SFTP restrictions.
Test the SSH Configuration Syntax
Before restarting the SSH service, validate the configuration file to ensure there are no syntax errors.
sudo sshd -tThis command checks the SSH configuration file for errors without restarting the service. If the configuration is valid, the command will return no output. If errors exist, it will display details that must be corrected before proceeding.
Restart the SSH Service
Once the configuration is verified, restart the SSH service to apply the changes.
sudo systemctl restart sshThis command reloads the SSH service and applies the updated SFTP restrictions.
Verify the SSH Service Status (Optional)
Confirm that the service restarted successfully and is running normally.
sudo systemctl status sshThis command displays the current service status. You should see an active (running) state, which indicates that the SSH service is functioning correctly.
Test the SFTP Connection
This step verifies that the SFTP user can connect successfully and is properly restricted to their assigned directory.
Connect Using the SFTP Client
From your local machine or another server, attempt to connect to the VPS using the SFTP client.
sftp sftpuser@your_server_ipReplace your_server_ip with the public IP address or hostname of your server. This command initiates an SFTP session and prompts you to enter the user’s password.
If the login is successful, you will enter the SFTP interactive prompt.
Verify the User is Restricted to the Chroot Directory
After logging in, check the current working directory.
pwdThis command displays the directory path visible to the user. The output should show the root of the jailed environment (typically /), which represents the user’s assigned SFTP directory.
You can also list available directories using:
lsThis command shows files and folders accessible to the user. The user should only see the allowed directories (such as the uploads folder).
Test File Upload
Upload a test file to confirm that the user has write permissions inside the uploads directory.
Create a Test File (Local Machine)
Before uploading, create a simple test file on your local system:
echo "SFTP test file" > testfile.txtThis command creates a file named testfile.txt in your current local directory.
Upload the Test File
Inside the SFTP session, upload the file to the server:
put testfile.txt uploads/This command uploads testfile.txt from your local system into the server’s uploads directory.
Test File Download
Verify that files can also be downloaded from the server.
get uploads/testfile.txtThis command downloads the specified file from the server to your local system.
Exit the SFTP Session
After testing, close the SFTP connection.
exitThis command terminates the active SFTP session and returns you to the normal terminal prompt.
Conclusion
You have successfully set up a secure SFTP server on an Ubuntu VPS using OpenSSH. By creating a dedicated SFTP user, configuring a chroot directory, and applying SSH restrictions, you ensured that file transfers remain isolated while preventing shell access and unnecessary forwarding features.
This configuration is commonly used for secure file sharing, backups, and deployment workflows. You can expand this setup by adding more users, enabling SSH key authentication, or integrating it into automated DevOps processes.
For more in-depth tutorials, visit the BaCloud blog, where you’ll find helpful guides.