
So you’ve run into the DNS_PROBE_FINISHED_NXDOMAIN error, and now your browser refuses to load the website you’re trying to reach.
This error typically indicates that your computer was unable to find the IP address for the domain due to a DNS lookup failure. It’s a common issue that can appear out of nowhere, but thankfully, there are several reliable ways to fix it.
In this guide, we’ll explain what the error means and walk you through step-by-step solutions.
What Is DNS_PROBE_FINISHED_NXDOMAIN?
When you visit a website, your browser first checks the Domain Name System (DNS) to find the IP address linked to the domain name. Just like looking up a contact in your phonebook.
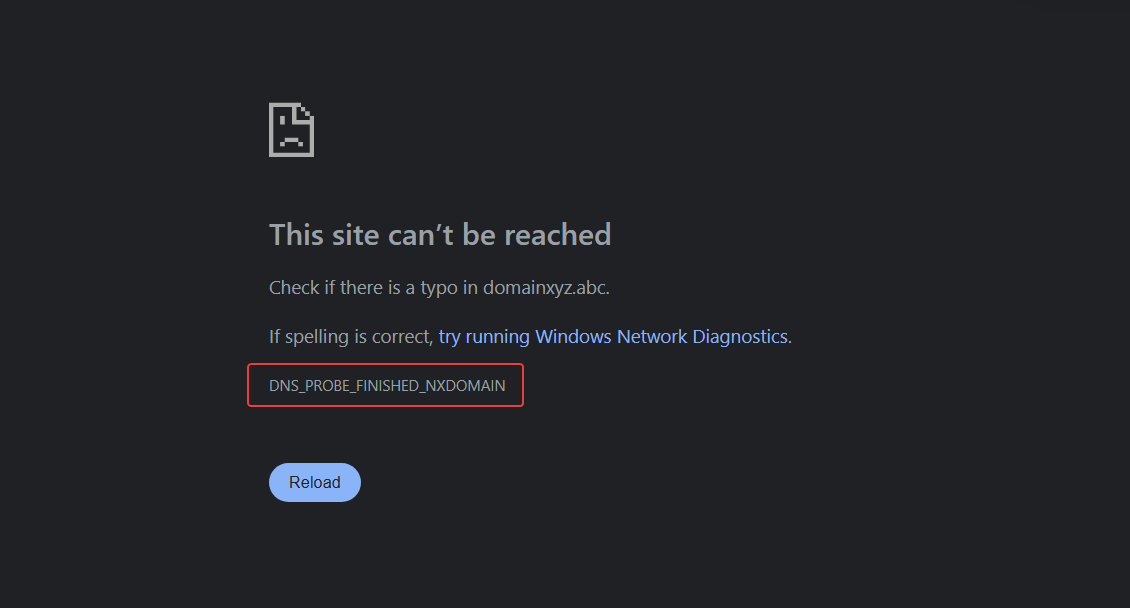
The error DNS_PROBE_FINISHED_NXDOMAIN means that DNS lookup failed. In simple terms, your browser couldn’t find the website’s address, so it gave up trying to load the page.
Here’s what the error might look like in Chrome:
Why This Happens
This error typically indicates a local issue on your device or network, rather than a problem with the website itself. Common causes include:
-
Incorrect or unreachable DNS servers
-
Corrupted or outdated DNS cache
-
A misconfigured hosts file
-
Interference from VPNs, antivirus software, or proxies
-
Router or network-level DNS problems
Most of these issues are easy to fix. We’ll start with a few quick checks in the next section.
Quick Fixes to Try First
Before getting into the more technical stuff, it’s worth trying a few simple fixes that can resolve the DNS_PROBE_FINISHED_NXDOMAIN error in seconds.
-
Restart your browser: Close and reopen your browser completely. Sometimes, a temporary glitch in the browser session is all it takes to cause DNS errors.
-
Restart your device: A full reboot can clear out background issues with your network stack or DNS cache.
-
Try a different browser or device: This helps determine whether the issue is isolated to one browser or system. If the site works elsewhere, the problem is local.
-
Restart your router (power cycle): Unplug your router for 10–15 seconds and plug it back in. This refreshes your network connection and may reset faulty DNS behavior.
If none of these quick fixes work, it’s time to move on to more targeted solutions.
-
Release and Renew IP Address
Outdated or misconfigured local network settings cause many DNS issues. One of the quickest ways to resolve this is by releasing and renewing your IP address, which resets your device’s connection to the network. It’s also common to flush your DNS cache during this process to ensure no stale DNS records are interfering.
Windows
-
Open Command Prompt as Administrator
-
Run these commands:
|
ipconfig /release |
This command drops your current IP address
|
ipconfig /flushdns |
This command clears cached DNS records. You should see a confirmation message: “Successfully flushed the DNS Resolver Cache.”
|
ipconfig /renew |
This command requests a new IP from your router or DHCP server
Note: You may not see confirmation messages for the release or renew steps unless there’s an error. That’s normal behavior.
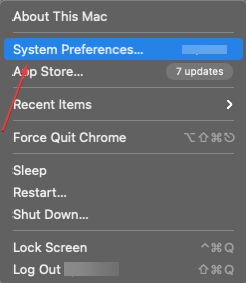
macOS
To release and renew your IP address on macOS:
-
Go to System Preferences → Network
-
Select your active network (e.g., Wi-Fi), then click Advanced
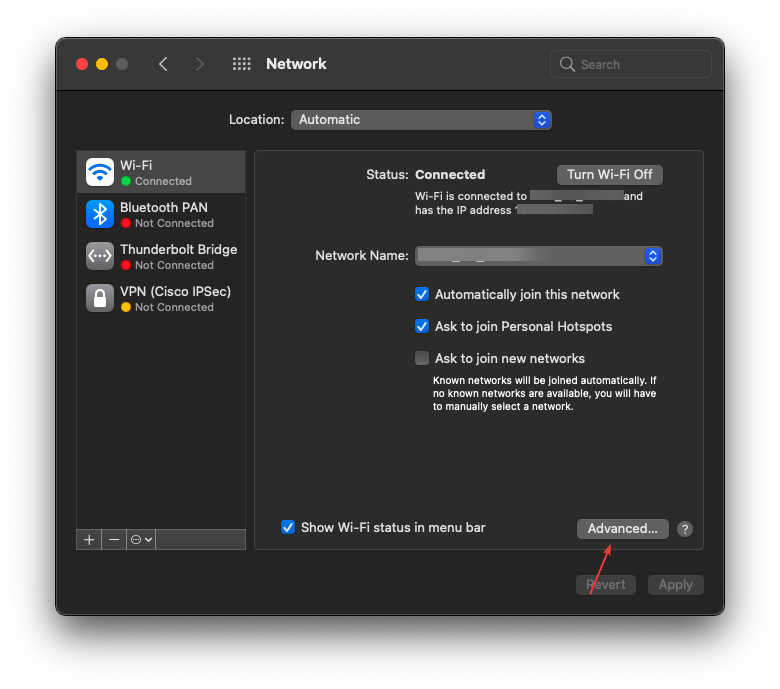
-
Go to the TCP/IP tab and click Renew DHCP Lease
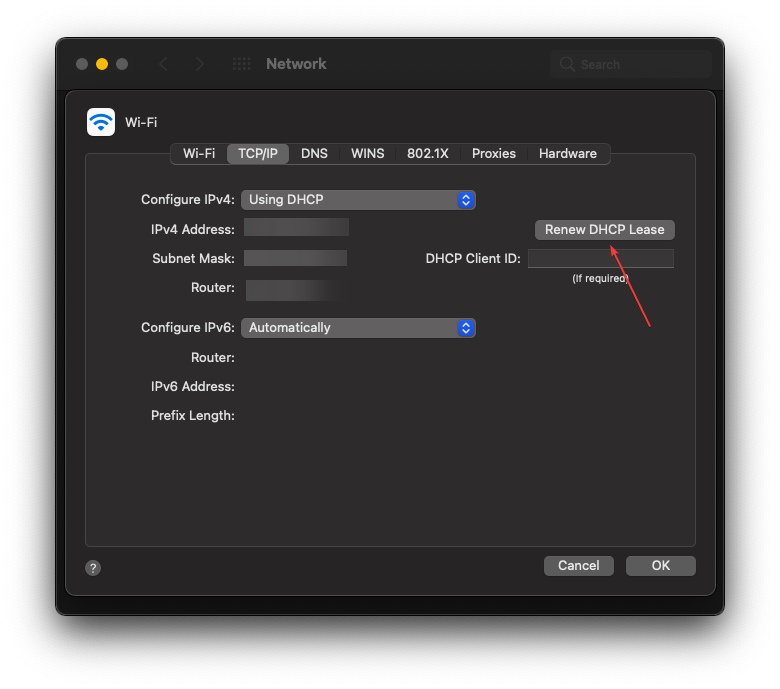
This forces your Mac to request a fresh IP address from your router, which can resolve network-level issues causing the DNS error.
To flush DNS on macOS:
-
Open Terminal:
-
Run:
|
sudo dscacheutil -flushcache; sudo killall -HUP mDNSResponder |
-
Enter your password when prompted (no characters will show as you type)
There’s no success message, but the command silently clears the DNS cache.
After completing these steps, try reloading the website. If the error persists, continue to the next fix: changing your DNS servers
-
Change Your DNS Server
Sometimes, your system’s default DNS servers (usually from your ISP) are unreliable or slow. Changing them to a trusted public DNS provider can often fix the DNS_PROBE_FINISHED_NXDOMAIN error.
We recommend one of the following:
-
Google DNS: 8.8.8.8, 8.8.4.4
-
Cloudflare DNS: 1.1.1.1, 1.0.0.1
You only need to pick one provider. The steps below show you how to apply your chosen DNS settings on different platforms.
Windows
-
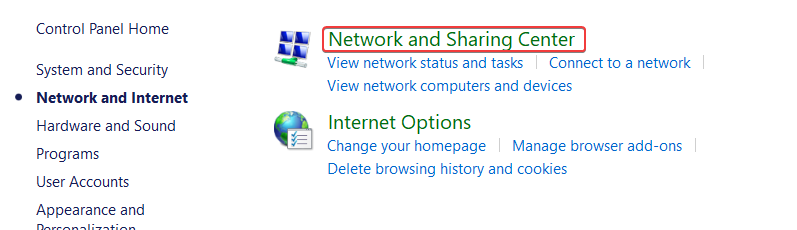
Open Control Panel → Network and Sharing Center
-
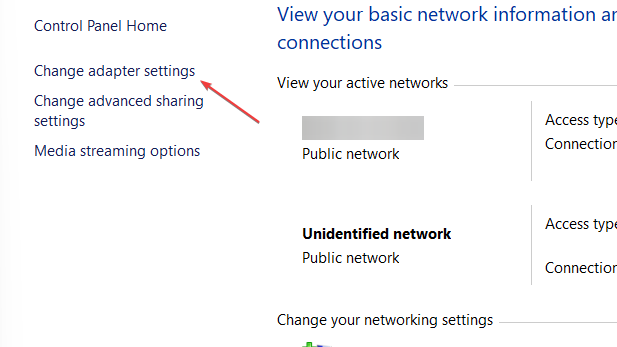
Click Change adapter settings
-
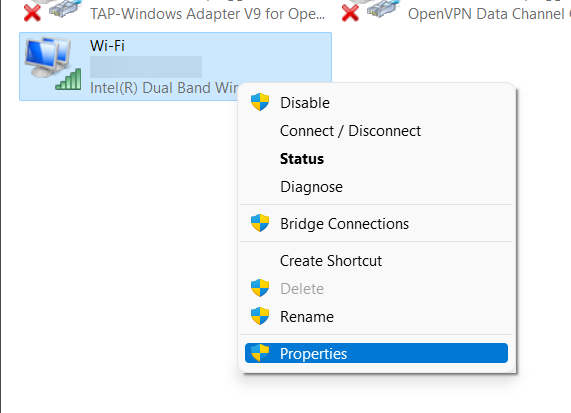
Right-click your active network and select Properties
-
Double-click Internet Protocol Version 4 (TCP/IPv4)

-
Select 'Use the following DNS server addresses' and enter both a primary and a secondary DNS.
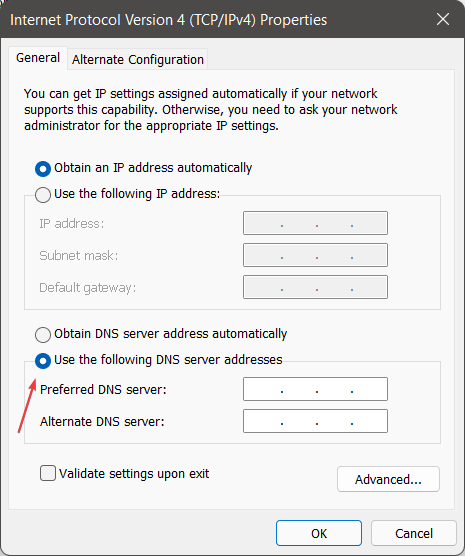
For example: 8.8.8.8 (primary) and 8.8.4.4 (secondary).
-
Click OK to save and restart your connection
macOS
-
Go to System Preferences → Network
-
Select your active network (e.g., Wi-Fi), then click Advanced
-
Go to the DNS tab

-
Before making changes, note any existing DNS entries in case you want to restore them later
-
Click the + icon under the DNS Servers section
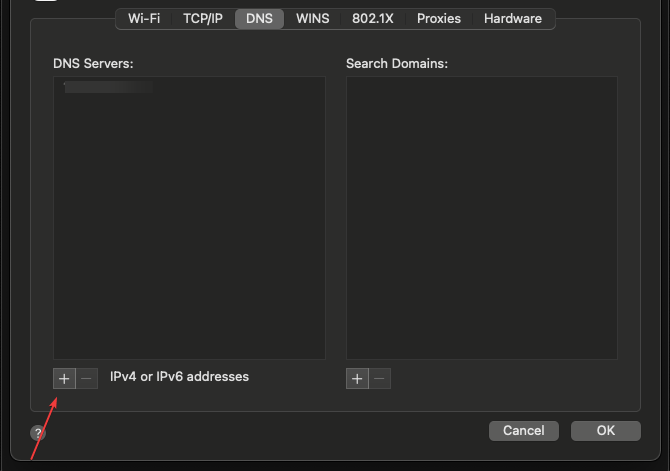
Then enter:
-
1.1.1.1
-
8.8.8.8 (or whichever provider you prefer)
-
Remove old entries if needed, then click OK
Once you've updated your DNS settings, try reloading the site. If the error persists, your system might still be referencing outdated DNS data. We’ll address that next.
-
Check Your Local Hosts File
Your computer uses a local file called the hosts file to map domain names to IP addresses manually. If a domain is listed here, especially pointing to 127.0.0.1, it will override DNS and may block access to the site entirely.
You’ll want to check the file and remove (or comment out) any entries that may be interfering.
Windows
-
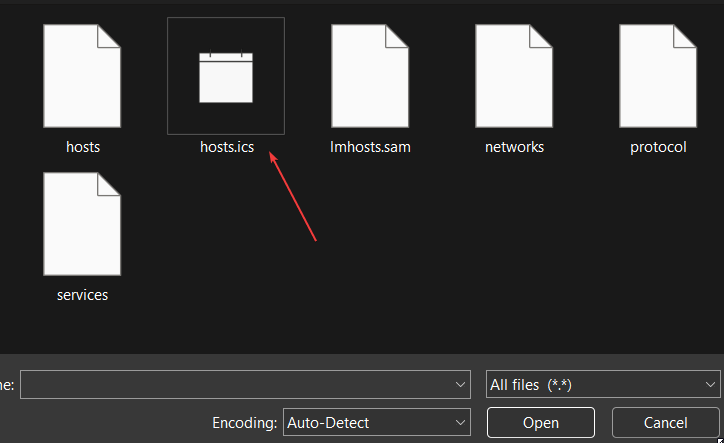
Press Windows + R, type notepad, then right-click Notepad and select Run as administrator
-
In Notepad, go to File → Open
-
Navigate to:
|
C:\Windows\System32\drivers\etc |
-
Nothing will appear initially. Change the file type filter to All Files, then open the file named hosts
-
Look for any lines like:
|
127.0.0.1 example.com |
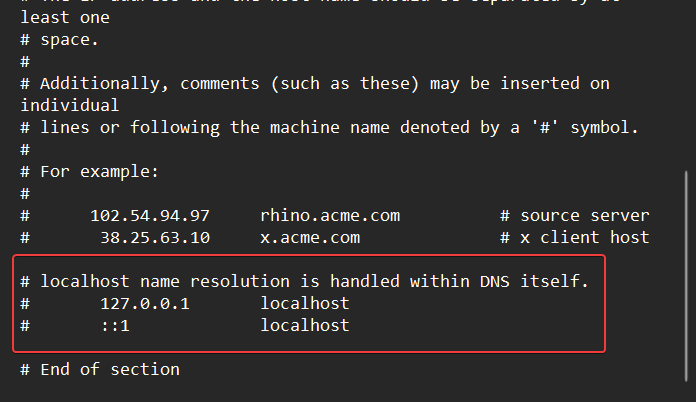
-
If you see an entry for the site you're trying to visit, either delete it or comment it out by adding # at the beginning of the line
-
Save the file and restart your browser
macOS
-
Open your terminal
-
Run:
|
sudo nano /etc/hosts |
-
Look for lines like:
|
127.0.0.1 example.com |
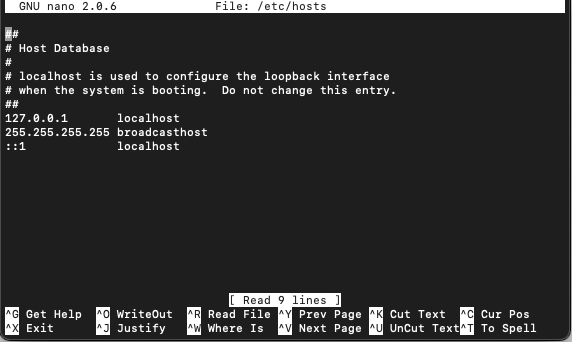
-
If present, delete or comment them out with #:
|
#127.0.0.1 example.com |
-
Save and exit (Ctrl + O, then Enter, then Ctrl + X in nano)
-
Restart your browser and try loading the site again
Note: Changes to the hosts file take effect immediately, but your browser or DNS cache may still need to be cleared for the fix to apply.
-
Reset Chrome Flags
Experimental features (called “flags”) in Chrome can sometimes interfere with how the browser handles DNS, proxies, or network protocols.
If you’ve ever tweaked these settings or even if you haven’t, resetting them can help rule out hidden issues.
How to reset Chrome flags:
-
Open Chrome.
-
In the address bar, type: chrome://flags and press Enter.
-
At the top of the page, click Reset all.

-
Close and reopen Chrome.
This is helpful if you’ve previously modified DNS-related or proxy-related flags.
-
Clear Browser Cache and Extensions
Sometimes, cached data or browser extensions can interfere with DNS resolution or prevent sites from loading properly. Clearing your browser cache and temporarily disabling certain extensions may help resolve the DNS_PROBE_FINISHED_NXDOMAIN error.
You can usually find these options under:
-
Chrome: Settings → Privacy and Security → Clear browsing data
-
Firefox: Settings → Privacy & Security → Clear Data
-
Edge: Settings → Privacy, search, and services → Clear browsing data
To disable extensions, open your browser’s extensions page and temporarily turn off any tools that might reroute traffic, such as ad blockers or DNS-related privacy tools.
-
Check VPN, Proxy, or Antivirus Settings
Sometimes, network-related tools like VPNs, proxies, or antivirus software can interfere with DNS resolution, especially if they override your system's DNS settings or block certain lookups.
To rule this out:
-
Temporarily disable your VPN or disconnect from any active tunnel
-
Turn off proxy settings, either in your browser or system network settings
-
Check your antivirus or security software for DNS filtering or network protection features, and disable them briefly
After making these changes, try loading the site again. If the error disappears, one of these tools is likely the cause, and you can re-enable them one at a time to identify which one.
-
Advanced Fixes
If the error persists after basic DNS and browser-level troubleshooting, you can try a few deeper network resets. These are safe but more advanced, and often effective at resolving stubborn DNS issues.
Reset TCP/IP Stack (Windows Only)
This command resets key networking components to their default state.
-
Open Command Prompt as Administrator
-
Run the following commands one by one:
|
netsh int ip reset |
-
Restart your computer
Restart DNS Client Service (Windows Only)
Restarting the DNS Client can help resolve lingering DNS issues by clearing and refreshing DNS-related services in the background.
Option 1: Using the Services Manager
-
Press Windows + R, type services.msc, and press Enter
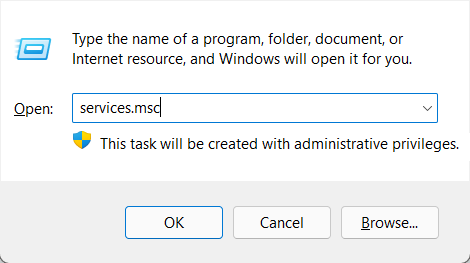
-
Scroll to DNS Client, right-click it, and select Restart
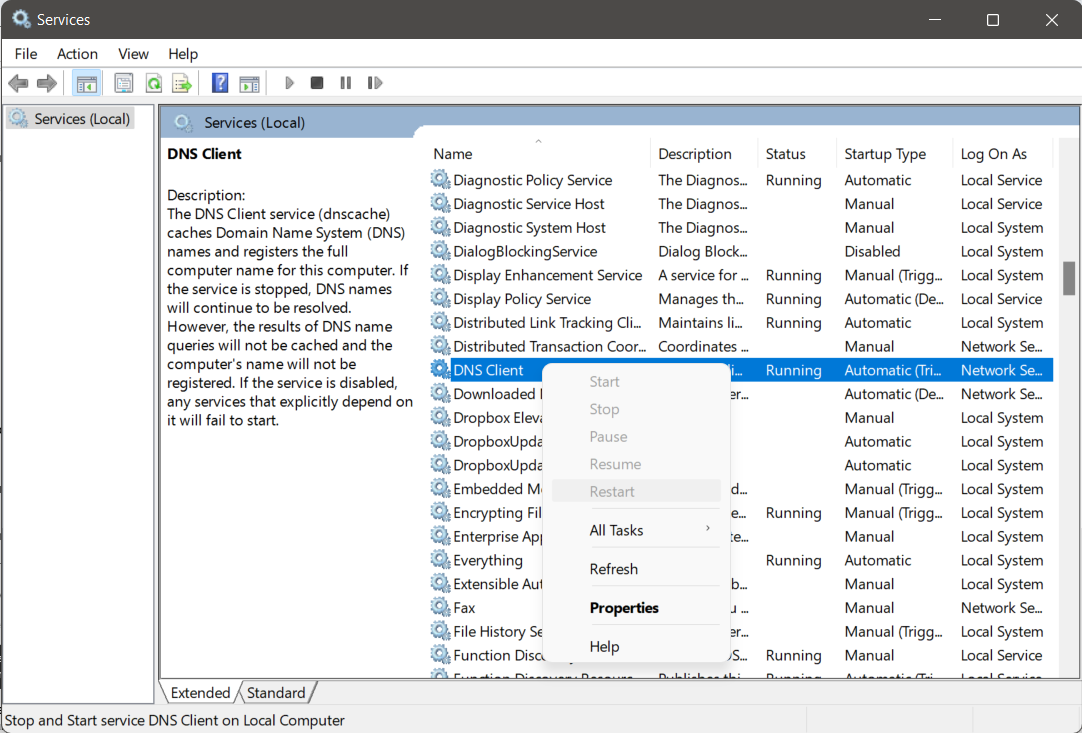
On many systems, the Restart option may be grayed out or unavailable; this is normal. If so, you can try the alternative method below.
Option 2: Using Command Prompt (Administrator)
If the restart option is disabled in the Services window:
-
Open Command Prompt as Administrator
-
Run the following commands:
|
net stop dnscache |
Note: If you see a message saying "The requested pause, continue, or stop is not valid for this service," it means the system protects the DNS Client and can’t be restarted manually. In that case, continue with the rest of the guide. It's safe to skip this step.
Factory Reset Your Router (Last Resort)
If network-level DNS settings are still causing issues, resetting your router to its factory defaults may help, especially if DNS overrides or misconfigurations have been applied.
-
Press the physical Reset button (usually with a pin) for 10–30 seconds
OR
-
Log in to your router’s admin panel, locate the Reset or Restore section, and follow the instructions to return to factory settings
Note: A factory reset will erase custom Wi-Fi names, passwords, and settings. Use this step only if you're comfortable reconfiguring your network.
Conclusion
Most DNS-related errors, such as DNS_PROBE_FINISHED_NXDOMAIN, are typically caused by temporary issues, including misconfigured settings, outdated DNS records, or browser-level changes.
In this guide, you flushed DNS caches, updated DNS servers, reviewed the hosts file, and checked key system services, covering all the essential fixes.
If one method didn’t work, another likely will. And if nothing helps, performing a full network reset or contacting your ISP may resolve the issue.
For more in-depth tutorials, visit the BaCloud blog, where you’ll find helpful guides.