

OpenVPN is one of the most trusted and widely used VPN solutions for creating secure, encrypted connections across the internet. Whether you want to protect personal data, enable secure remote access, or run your private network, OpenVPN offers full control and flexibility.
In this step-by-step guide, you’ll learn how to install and configure OpenVPN on an Ubuntu 24.04 VPS.
Prerequisites
Before you begin, ensure you have the following:
- A VPS — We’ll use a Bacloud VPS running Ubuntu 24.04 for this guide
- Your VPS's public IP address – We’ll use this to connect later
- An OpenVPN client installed on the device you’ll connect from (e.g., OpenVPN Connect for Windows/macOS, or the mobile app for iOS/Android)
This guide assumes you’re comfortable using SSH and basic terminal commands.
Step 1: Update System Packages
Before installing OpenVPN, it’s important to ensure your Ubuntu 24.04 system is up to date. To update your system, run the following command:
sudo apt update && sudo apt upgrade -yThis may take a few minutes, depending on how many updates are available. Once complete, your server will be in a clean and secure state, ready for installing OpenVPN.
Step 2: Install OpenVPN and Easy-RSA
With your system updated, the next step is to install the OpenVPN server software along with Easy-RSA. To install both packages, run the following command:
sudo apt install openvpn easy-rsa -y- openvpn is the main VPN software package that you’ll configure to handle encrypted connections.
- easy-rsa helps generate the necessary certificate authority (CA), server, and client certificates.
The -y flag automatically confirms installation prompts, so the packages are installed without interruption.
Once this step is complete, both OpenVPN and Easy-RSA will be available on your system and ready to be configured.
Step 3: Set Up Easy-RSA and Initialize the PKI
To secure OpenVPN connections, you need to generate cryptographic keys and certificates. Easy-RSA is a simple tool that helps you create a Certificate Authority (CA), which will be used to sign your server and client certificates.
1. Create a working directory for Easy-RSA
First, make a new directory where you’ll store and manage all certificate-related files:
make-cadir ~/easy-rsa
cd ~/easy-rsa
2. Initialize the Public Key Infrastructure (PKI)
This sets up the necessary folder structure for key and certificate management:
./easyrsa init-pkiStep 4: Build the Certificate Authority (CA)
The Certificate Authority (CA) is the heart of your OpenVPN security setup. It is used to sign certificates for both the server and clients. You only need to create it once.
To build your CA, run the following command from inside your Easy-RSA directory:
./easyrsa build-caYou’ll be prompted to enter a passphrase and a Common Name (CN) – You can use something descriptive like bacloud-ca.
Keep your CA’s private key (ca.key) safe. It should never be shared or exposed publicly.
Step 5: Create and Sign the Server Certificate
Your OpenVPN server needs its certificate and private key to securely authenticate with clients. In this step, you'll generate a key pair, sign the certificate using your CA, and create Diffie-Hellman parameters for secure key exchange.
1. Generate the Server Key and Certificate Signing Request (CSR)
From inside your Easy-RSA directory, run:
./easyrsa gen-req server nopassThe nopass option means the private key won't be encrypted, allowing OpenVPN to start without prompting for a password.
2. Sign the Server Certificate
Now use your Certificate Authority (CA) to sign the server's CSR:
./easyrsa sign-req server serverWhen prompted. Type yes to confirm the request, and enter the CA passphrase you set earlier.
3. Generate Diffie-Hellman Parameters
Diffie-Hellman parameters are used to securely exchange keys during the VPN handshake. Run:
./easyrsa gen-dhThis step may take a few minutes, depending on your server’s performance.
Step 6: Create and Sign a Client Certificate
Each VPN client (device or user) requires a unique certificate and private key to establish a secure connection to the VPN. You’ll now generate and sign a certificate for one client.
Replace client1 with a name that identifies the user or device (e.g., bacloud-pc, phone01). This makes it easier to manage and revoke client certificates later if needed.
1. Generate the Client Key and Certificate Signing Request (CSR)
Run the following command from inside your Easy-RSA directory:
./easyrsa gen-req client1 nopassThe nopass option means the client won't be prompted for a password when using this certificate; useful for mobile or unattended clients.
2. Sign the Client Certificate
Now import and sign the request using your Certificate Authority:
./easyrsa sign-req client client1When prompted, confirm that this is a client certificate by typing yes, then enter the CA passphrase.
You’ll repeat this process for each additional client that needs VPN access. Every client should have its certificate and key for better security and revocation control.
Step 7: Create the OpenVPN Server Configuration
Now that your certificates and keys are ready, it’s time to configure the OpenVPN server to use them. You'll start by copying a sample configuration file, then edit it to match your setup.
1. Create the OpenVPN Server Config Directory
Before copying the configuration, make sure the destination directory exists:
sudo mkdir -p /etc/openvpn/serverThis ensures OpenVPN has the correct place to store the server configuration file.
2. Copy the Sample Configuration File
Now, extract and copy the default OpenVPN server configuration:
sudo cp /usr/share/doc/openvpn/examples/sample-config-files/server.conf* /etc/openvpn/server/server.confThis creates the main configuration file at:
/etc/openvpn/server/server.conf3. Edit the Server Configuration
Now open the configuration file in a text editor:
sudo nano /etc/openvpn/server/server.confLocate the following lines in the config file.
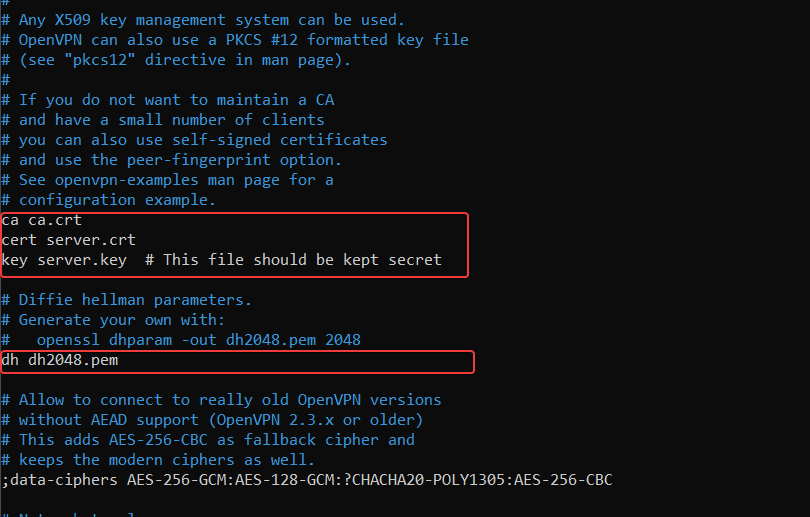
If they are commented out (start with a #) or point to different paths, edit them to match these exactly:
ca /etc/openvpn/server/ca.crt
cert /etc/openvpn/server/server.crt
key /etc/openvpn/server/server.key
dh /etc/openvpn/server/dh.pem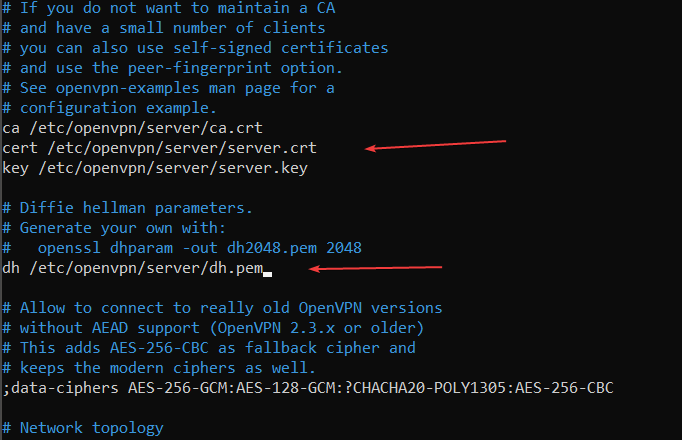
If any of these lines are missing, add them yourself. These lines tell OpenVPN where to find your server’s certificate files. They must be correct for the server to start successfully. Afterwards, save and exit.
Step 8: Copy Certificates and Keys to the Server Directory
Now that your server certificates and keys are ready, you need to copy them into OpenVPN’s server configuration directory so that the VPN can access them.
Run the following commands one at a time:
sudo cp ~/easy-rsa/pki/ca.crt /etc/openvpn/server/
sudo cp ~/easy-rsa/pki/issued/server.crt /etc/openvpn/server/
sudo cp ~/easy-rsa/pki/private/server.key /etc/openvpn/server/
sudo cp ~/easy-rsa/pki/dh.pem /etc/openvpn/server/
These files include:
- ca.crt – your Certificate Authority’s public certificate
- server.crt – the signed certificate for your VPN server
- server.key – your server’s private key (keep this secure)
- dh.pem – Diffie-Hellman parameters for secure key exchange
Secure the Private Key
To protect the private key from unauthorized access, set its permissions so that only the root user can read it:
sudo chmod 600 /etc/openvpn/server/server.keyThis step is critical for server security. Never leave private key files world-readable.
Step 9: Start and Enable the OpenVPN Service
Now that your server configuration is ready, it’s time to start the OpenVPN service and ensure it runs automatically at boot.
1. Start the OpenVPN Service
Run the following command to start the VPN server:
sudo systemctl start openvpn-server@server2. Enable OpenVPN to Start on Boot
This ensures the VPN server automatically starts after a reboot:
sudo systemctl enable openvpn-server@server3. Check the Service Status
To verify that OpenVPN is running:
sudo systemctl status openvpn-server@serverIf everything is working correctly, you should see an output similar to the one below:
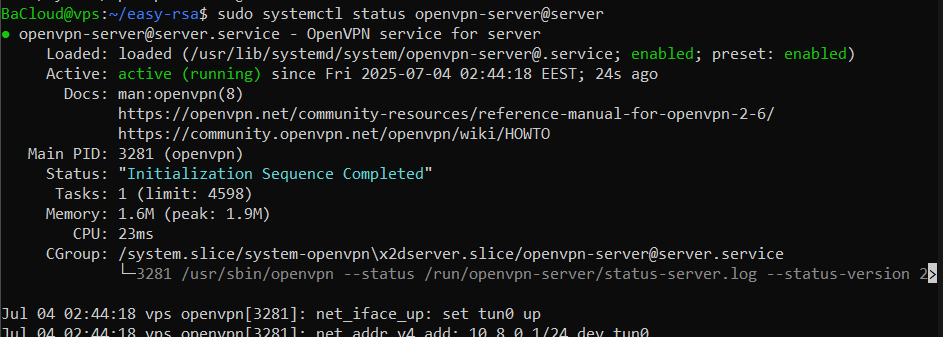
This means your VPN server is up and running.
Step 10: Enable IP Forwarding
By default, Ubuntu does not forward traffic between interfaces. To allow your VPN server to route traffic from connected clients to the internet, you need to enable IP forwarding.
1. Edit the system configuration file:
Use a text editor to open the sysctl.conf file:
sudo nano /etc/sysctl.conf2. Locate and modify the IP forwarding setting:
Find the line that reads:
#net.ipv4.ip_forward=1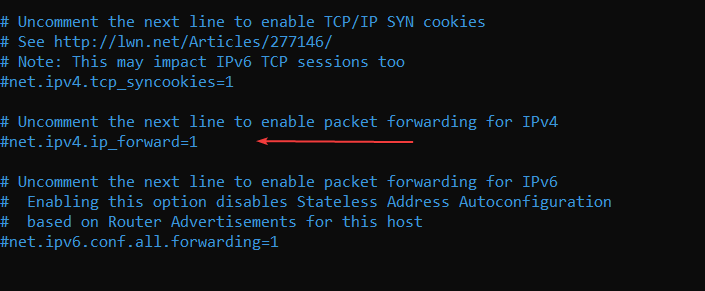
Uncomment it by removing the # (or add the line if it doesn't exist), so it looks like this:
net.ipv4.ip_forward=1This setting tells the system to allow packet forwarding for IPv4; necessary for routing VPN traffic.
3. Apply the changes immediately:
Reload the system settings so the change takes effect without a reboot:
sudo sysctl -pAt this point, your server is configured to forward traffic from VPN clients toward the internet.
Step 11: Set Up Firewall Rules
To allow VPN clients to access the internet, you need to enable Network Address Translation (NAT) so traffic can be routed through your server’s public interface.
1. Identify Your Public Network Interface
First, identify the name of your server’s public network interface (commonlyeth0,ens3, orenp0s3):
ip aLook for the interface that holds your public IP address — you'll use that in place of eth0 in the next step.
2. Add Firewall Rules to Enable NAT and Forwarding
Now that you know your public interface name (for example, eth0), run the following commands one by one to configure the firewall:
sudo iptables -t nat -A POSTROUTING -s 10.8.0.0/24 -o eth0 -j MASQUERADEThis allows traffic from the VPN subnet 10.8.0.0/24 to be translated and routed through your server’s public IP.
sudo iptables -A FORWARD -m conntrack --ctstate RELATED,ESTABLISHED -j ACCEPTAllows return traffic to VPN clients.
sudo iptables -A FORWARD -s 10.8.0.0/24 -j ACCEPTAllows VPN clients to send traffic out.
3. Enable IP Forwarding in UFW Defaults
First, install UFW (Uncomplicated Firewall) if it’s not already installed on your VPS
sudo apt install ufw -yEdit UFW’s default settings to allow packet forwarding:
sudo nano /etc/default/ufwFind this line:
DEFAULT_FORWARD_POLICY="DROP"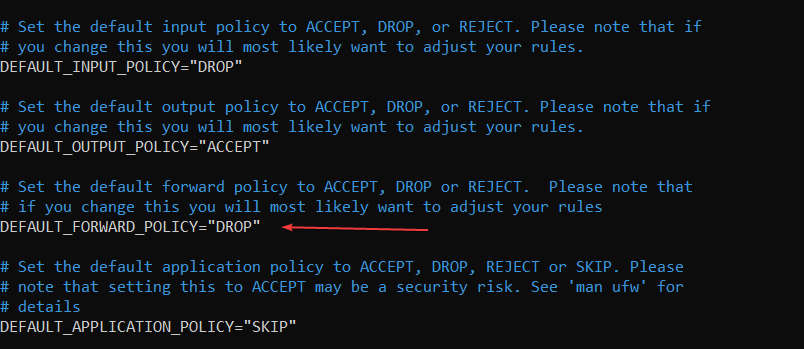
Change it to:
DEFAULT_FORWARD_POLICY="ACCEPT"Save and close the file.
4. Add NAT Configuration to UFW
Edit UFW’s before.rules file to make the NAT rule persistent:
sudo nano /etc/ufw/before.rulesAt the very top of the file, above the line that says*filter, add this block (again, replaceeth0with your interface name):
*nat
:POSTROUTING ACCEPT [0:0]
-A POSTROUTING -s 10.8.0.0/24 -o eth0 -j MASQUERADE
COMMIT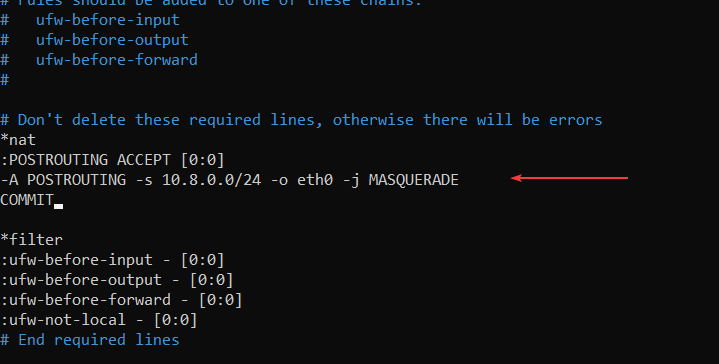
Save and close the file.
5. Allow OpenVPN & SSH Through the Firewall
To secure your server and control which traffic is allowed, you’ll use UFW (Uncomplicated Firewall).
1. Reset UFW to a Clean State
This step clears any old or broken firewall rules and avoids common issues on minimal VPS setups:
sudo ufw resetThis ensures you’re starting fresh with a known-good configuration.
You’ll see a prompt: Command may disrupt existing SSH connections. Proceed with operation (y|n)? Type y and press Enter
2. Allow SSH and OpenVPN Traffic
Now allow SSH (port 22) and OpenVPN (port 1194 over UDP) through the firewall:
sudo ufw allow 22/tcp
sudo ufw allow 1194/udp
3. Enable the Firewall
Turn on UFW to activate the rules:
sudo ufw enableYou’ll see a prompt again: Command may disrupt existing SSH connections. Proceed with operation (y|n)? Type y and press Enter. If everything is working correctly, you should see: The firewall is active and enabled on system startup.
If you get disconnected, simply reconnect.
6. Make NAT Rules Persistent
To ensure the NAT rule remains after a reboot, install the iptables-persistent package:
sudo apt install iptables-persistentWhen prompted, select 'Yes' to save the current rules. Your VPN server can now route client traffic to the internet using NAT.
Step 12: Generate an .ovpn File and Connect a Client
With your OpenVPN server running, the final step is to create a client configuration file that contains all the necessary information to establish a secure connection. This .ovpn file bundles the connection settings and client credentials into a single, portable file.
1. Copy Certificate and Key Contents
On your VPS, run the following commands to view and copy the contents of the client’s certificate and key files:
cat ~/easy-rsa/pki/ca.crt
cat ~/easy-rsa/pki/issued/client1.crt
cat ~/easy-rsa/pki/private/client1.key
Copy the entire output of each, including:
-----BEGIN CERTIFICATE-----
...
-----END CERTIFICATE-----
Paste each one into a temporary text editor for now (such as Notepad++).
2. Create the Client Configuration File (.ovpn)
Now, create the OpenVPN configuration file:
nano ~/client1.ovpnPaste the following template into the file. Replace your_server_ip with the public IP address or domain name of your VPS.
client
dev tun
proto udp
remote your_server_ip 1194
resolv-retry infinite
nobind
persist-key
persist-tun
remote-cert-tls server
cipher AES-256-CBC
auth SHA256
verb 3

redirect-gateway def1

<ca>
# Paste contents of ca.crt here
</ca>

<cert>
# Paste contents of client1.crt here
</cert>

<key>
# Paste contents of client1.key here
</key>
Replace the placeholders (# Paste contents of...) with the actual certificate and key text you copied earlier.
Once you're done, press Ctrl + X to exit and Enter to save.
3. Transfer the .ovpn File to the Client Device
Once you've created the .ovpn file on your VPS, you need to transfer it to the device where you'll be using the VPN client.
Using scp
From your local machine, run:
scp username@your_vps_ip:~/client1.ovpn /path/to/local/folder/Replace:
- username with your VPS username (e.g., root)
- your_vps_ip with your VPS's public IP address
- /path/to/local/folder/ with where you want to save the file locally
4. Import and Connect Using OpenVPN Client (Windows / macOS)
Once you've transferred the client1.ovpn file to your client device, and use an OpenVPN client to connect.
- Download and install OpenVPN Connect from the official site: https://openvpn.net/client-connect-vpn-for-windows/
- Open the app and click "Import Profile"
- Browse to the .ovpn file you transferred and import it
- Click "Connect". You'll be prompted for permission to establish the VPN tunnel.
5. Verify the VPN Connection
After you've connected with the .ovpn file, run the following command on your local device (not the VPS) to verify the VPN is working:
curl ifconfig.meIf successful, it will show your VPS’s public IP address, meaning your internet traffic is now securely routed through the VPN.
Conclusion
Your OpenVPN server is now fully set up and will securely route traffic from connected clients through your VPS. You can repeat the client certificate steps for additional devices and enjoy encrypted, private access wherever you are.
For more in-depth tutorials, visit the BaCloud blog, where you’ll find helpful guides.