

 If your Ubuntu server is accessible over the internet, it will eventually receive automated login attempts from bots scanning for vulnerable systems. While strong passwords, SSH keys, and firewalls are essential, repeatedly handling these unauthorized login attempts can still expose services to unnecessary risk.
Fail2Ban is a free, open-source intrusion prevention tool that monitors authentication and service logs for repeated failed login attempts. When suspicious activity is detected, it automatically bans the offending IP address for a configurable period, helping reduce brute-force attacks against services such as SSH.
In this guide, you'll install and configure Fail2Ban on Ubuntu 26.04 LTS, enable protection for SSH, and learn how to verify, monitor, and manage its operation.
Prerequisites
Before you begin, ensure you have the following:
-
A BaCloud VPS running Ubuntu 26.04 LTS
-
SSH access to the VPS
-
A user with sudo privileges
-
An active internet connection
Tip: Keep the BaCloud VNC Console available while configuring and testing Fail2Ban. If your IP address is accidentally banned, you can use the VNC Console to access the VPS and remove the ban.
Step 1: Update the System
Before installing Fail2Ban, update the package index to ensure APT has the latest package information.
Run:
sudo apt updateNext, upgrade the installed packages:
sudo apt upgrade -yKeeping the system up to date ensures Fail2Ban and its dependencies are installed alongside the latest available security and package updates.
Step 2: Install Fail2Ban
With the system updated, install Fail2Ban from the Ubuntu 26.04 LTS package repositories.
Run:
sudo apt install fail2ban -yOnce the installation completes, verify that Fail2Ban was installed successfully.
Run:
fail2ban-client --version
The output should display the installed version of Fail2Ban, as shown in the image above. This confirms that the command-line client is available.
Next, verify that the Fail2Ban service started successfully.
Run:
sudo systemctl status fail2banYou should see the service status listed as active (running). This confirms that Fail2Ban is installed and currently running on the server.
Press Q to exit the service status view and return to the command prompt.
Step 3: Configure Fail2Ban
Fail2Ban stores its default jail configuration in /etc/fail2ban/jail.conf. For server-specific settings, create a local configuration file to override the default settings. This keeps your custom settings separate from the package-provided defaults and makes the configuration easier to maintain.
Create and open the local configuration file:
sudo nano /etc/fail2ban/jail.localCopy and paste the following configuration into the file:
[DEFAULT]bantime = 1hfindtime = 10mmaxretry = 5ignoreip = 127.0.0.1/8 ::1[sshd]enabled = trueThis configuration:
-
Keeps an IP address banned for one hour.
-
Counts failed login attempts within a 10-minute window.
-
Bans an IP after five failed attempts within that window.
-
Excludes the local loopback addresses from Fail2Ban processing.
-
Enables the SSH (sshd) jail to monitor failed SSH authentication attempts.
Save the file and exit the editor.
Note: Fail2Ban also supports additional configuration files in /etc/fail2ban/jail.d/. These are useful for organizing individual jails or configuration overrides into separate files, particularly in more advanced deployments. For this guide, using jail.local keeps the configuration simple and easy to manage.
Validate the Configuration
Before applying the changes, test the configuration to make sure Fail2Ban can parse it successfully.
Run:
sudo fail2ban-client -tYou should see OK: configuration test is successful in the output. This confirms that the configuration is valid and that Fail2Ban can load it without syntax or configuration errors.
Restart Fail2Ban
Once the configuration passes the test, restart the Fail2Ban service to apply the changes.
Run:
sudo systemctl restart fail2banIf the command completes without an error, the new configuration has been applied successfully.
Next, enable Fail2Ban to start automatically when the server boots.
Run:
sudo systemctl enable fail2banFail2Ban is now configured to start automatically with the system.
With the configuration applied, the next step is to verify that the SSH jail is active and monitoring SSH authentication attempts.
Step 4: Verify the SSH Jail
With Fail2Ban configured and restarted, verify that the SSH jail is loaded and active.
First, list the currently active Fail2Ban jails.
Run:
sudo fail2ban-client statusYou should see sshd listed under Jail list, indicating that the SSH jail is enabled and loaded.

Next, check the status of the SSH jail:
sudo fail2ban-client status sshdYou should see output similar to the one below, indicating that the sshd jail is active:
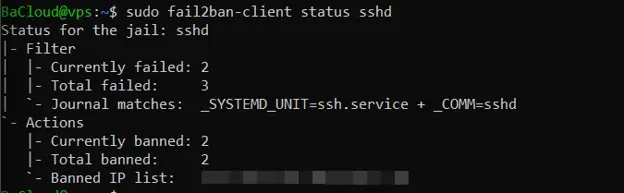
The exact values may vary depending on SSH activity on your VPS. The important confirmation is that the command returns the sshd jail status along with its filter and action statistics.
At this point, Fail2Ban is actively monitoring SSH authentication attempts and can ban IP addresses that exceed the configured maxretry threshold.
Step 5: Monitor Fail2Ban Activity
Fail2Ban records service activity in the system journal, including startup events, jail activity, authentication failures, and ban actions. Reviewing these logs can help confirm that Fail2Ban is operating as expected and troubleshoot configuration issues.
Run:
sudo journalctl -u fail2ban
Review the output for entries showing that:
-
Fail2Ban started successfully.
-
The sshd jail was loaded.
-
Failed SSH authentication attempts are being detected.
-
IP addresses are being banned or unbanned.
-
Configuration or filter errors are reported.
The journal output can become extensive over time. To view only recent Fail2Ban entries, you can instead run:
sudo journalctl -u fail2ban -n 50This displays the most recent 50 entries, making it easier to review current activity.
Step 6: Manage Banned IP Addresses
If a legitimate administrator's IP address is accidentally banned, you can manually remove the ban.
To unban an IP address, replace IP_ADDRESS with the address you want to remove from the ban list, then run:
sudo fail2ban-client set sshd unbanip IP_ADDRESSFor example:
sudo fail2ban-client set sshd unbanip 203.0.113.10A successful response confirms that the IP address has been removed from the ban list.
If needed, you can verify that the IP address has been removed by checking the SSH jail status again with the fail2ban-client status sshd command introduced in step 4.
Step 7: Verify Fail2Ban Is Detecting Failed Login Attempts
After configuring Fail2Ban, you can verify that the SSH (sshd) jail detects and responds to repeated failed authentication attempts.
If you choose to test the configuration, perform the test from a controlled environment or a separate test machine. Avoid intentionally generating repeated failed SSH login attempts from your primary management device, as your IP address may be temporarily banned.
After the configured maxretry threshold is reached within the findtime window, check the SSH jail status:
sudo fail2ban-client status sshdIf the test is successful, the source IP address should appear in the Banned IP list, and the Currently banned count should increase accordingly.
You can also review the Fail2Ban service logs to confirm that the failed login attempts were detected and the IP address was banned:
sudo journalctl -u fail2banA successful test confirms that the SSH jail detects repeated failed authentication attempts and applies bans according to the configured maxretry, findtime, and bantime settings.
Step 8: Verify Fail2Ban After a Reboot
To confirm that Fail2Ban starts correctly after a system restart, reboot the VPS:
sudo rebootAfter the VPS comes back online, reconnect through SSH and verify that the Fail2Ban service is running:
sudo systemctl status fail2banIn the output, confirm that the service status is active (running).
Next, verify that Fail2Ban has loaded its configured jails:
sudo fail2ban-client statusConfirm that the sshd jail appears under Jail list.
This confirms that Fail2Ban starts automatically after a reboot and that the configured SSH jail is loaded correctly.
Conclusion
Fail2Ban is now configured on your BaCloud VPS to monitor SSH authentication attempts and automatically ban IP addresses that exceed the configured threshold. You also verified the SSH jail and confirmed that Fail2Ban starts correctly after a reboot.
Fail2Ban adds an important layer of protection against automated brute-force attacks, but it should complement other security measures such as SSH key-based authentication, firewall rules, and regular system updates.
For more in-depth tutorials, visit the BaCloud blog, where you’ll find helpful guides.