


OpenVPN is a widely used VPN solution for securing remote connections and encrypting network traffic. It's commonly deployed on VPSs and cloud servers to provide secure access to private networks and services.
In this guide, we'll walk you through installing and configuring OpenVPN on an Ubuntu 26.04 VPS.
Prerequisites
Before you begin, ensure you have the following:
-
A BaCloud VPS running Ubuntu 26.04.
-
Your VPS's public IPv4 address (or a domain name pointing to the server), which you'll use to connect to the VPN.
-
An OpenVPN-compatible client installed on the device you'll connect from (such as OpenVPN Connect or the OpenVPN Community client).
-
This guide assumes you're comfortable using SSH and basic Linux terminal commands.
Step 1: Update the System
Before installing OpenVPN, it's a good practice to update your Ubuntu system to ensure you have the latest package information, security patches, and software updates.
First, refresh the package lists:
sudo apt updateNext, upgrade all installed packages to their latest available versions:
sudo apt upgrade -yOnce the update is complete, your Ubuntu 26.04 VPS is ready for the OpenVPN installation.
Step 2: Install OpenVPN and Easy-RSA
With your system up to date, the next step is to install OpenVPN along with Easy-RSA. OpenVPN provides the VPN server software, while Easy-RSA is used to create and manage the Public Key Infrastructure (PKI) required for generating certificates and keys.
Install both packages by running:
sudo apt install openvpn easy-rsa -yOnce the installation is complete, verify that OpenVPN is installed correctly by checking its version:
openvpn --versionIf the installation was successful, the command will display the installed OpenVPN version, along with information on supported features and cryptographic libraries.
Step 3: Set Up Easy-RSA and Initialize the PKI
Easy-RSA uses a Public Key Infrastructure (PKI) to create and manage the certificates and keys used by OpenVPN. In this step, you'll create a dedicated Easy-RSA working directory and initialize the PKI.
First, create a working directory for Easy-RSA by copying the default Easy-RSA files to your home directory:
mkdir -p ~/easy-rsacp -r /usr/share/easy-rsa/* ~/easy-rsa/Next, navigate to the Easy-RSA directory:
cd ~/easy-rsaInitialize the PKI by running:
./easyrsa init-pkiAfter the command completes, a new pki directory will be created. This directory stores your certificate authority (CA), certificates, private keys, and other files required to manage your OpenVPN deployment.
Your PKI is now ready to create the certificate authority in the next step.
Step 4: Build the Certificate Authority (CA)
The Certificate Authority (CA) is the foundation of your OpenVPN deployment. It is responsible for issuing and signing the certificates used by the VPN server and its clients. Only certificates signed by your CA will be trusted, making it a critical component of your VPN's security.
Generate the Certificate Authority by running:
./easyrsa build-caWhen prompted, enter a secure passphrase to protect the CA's private key, then provide a Common Name (CN) for your Certificate Authority. You can use a descriptive name such as OpenVPN-CA or press Enter to accept the default value.
Once the process is complete, the CA certificate (ca.crt) and its private key (ca.key) will be stored in the pki directory.
Because the CA private key can be used to issue trusted certificates, it should be protected carefully. Restrict access to the key, avoid sharing it, and keep a secure backup in a safe location. If the CA private key is ever compromised, the trustworthiness of your entire VPN deployment is compromised.
Step 5: Generate the Server Certificate and Keys
Next, generate the certificate and private key that the OpenVPN server will use to authenticate itself to clients.
You'll create a certificate signing request (CSR), sign it using your Certificate Authority (CA), generate the Diffie-Hellman (DH) parameters used during the TLS key exchange, and create a tls-crypt key to help protect the VPN's control channel.
Generate the server private key and certificate signing request:
./easyrsa gen-req server nopassThe nopass option creates an unencrypted private key, allowing the OpenVPN server to start automatically without prompting for a passphrase after a system reboot.
Next, sign the server certificate with your CA:
./easyrsa sign-req server serverWhen prompted, type yes to confirm the signing request, then enter your CA passphrase to complete the signing process.
Generate the Diffie-Hellman parameters:
./easyrsa gen-dhDepending on your server's resources, this process may take a few moments to complete.
Finally, generate a tls-crypt key to encrypt and authenticate the OpenVPN control channel:
openvpn --genkey secret ta.keyAfter completing these steps, your OpenVPN server will have all the required cryptographic files, including the server certificate, private key, signed certificate, Diffie-Hellman parameters, and the tls-crypt key. These files will be used when configuring the OpenVPN server in the next step.
Step 6: Generate Client Certificates
Each device that connects to your OpenVPN server should have its own unique certificate and private key. This allows the server to identify individual clients and makes it easy to revoke access for a specific device without affecting others.
Generate a private key and certificate signing request (CSR) for your first client. In this example, the client is named client1:
./easyrsa gen-req client1 nopassThe nopass option creates an unencrypted private key, allowing the client to connect without prompting for a passphrase each time.
Next, sign the client certificate using your Certificate Authority (CA):
./easyrsa sign-req client client1When prompted, type yes to confirm the signing request, then enter your CA passphrase to complete the signing process.
After the certificate is signed, the client's certificate and private key will be stored in the pki directory and later included in the client's .ovpn configuration file.
For additional devices, repeat these steps using a unique name for each client (for example, laptop, phone, or tablet). Using separate certificates for each device improves security and allows you to revoke access for a single client without affecting the others.
Step 7: Configure the OpenVPN Server
With the certificates and keys in place, the next step is to configure the OpenVPN server. You'll create the server configuration file and specify the certificates, network settings, encryption options, and other parameters that control how the VPN operates.
First, create the OpenVPN server configuration directory if it doesn't already exist:
sudo mkdir -p /etc/openvpn/serverNext, create the server configuration file:
sudo nano /etc/openvpn/server/server.confAdd the following configuration:
port 1194proto udpdev tunca /etc/openvpn/server/ca.crtcert /etc/openvpn/server/server.crtkey /etc/openvpn/server/server.keydh /etc/openvpn/server/dh.pemtopology subnetserver 10.8.0.0 255.255.255.0ifconfig-pool-persist ipp.txtdata-ciphers AES-256-GCM:AES-128-GCM:CHACHA20-POLY1305data-ciphers-fallback AES-256-CBCauth SHA256tls-crypt /etc/openvpn/server/ta.keypush "redirect-gateway def1 bypass-dhcp"push "dhcp-option DNS 1.1.1.1"push "dhcp-option DNS 1.0.0.1"keepalive 10 120user nobodygroup nogrouppersist-keypersist-tunstatus /var/log/openvpn-status.loglog-append /var/log/openvpn.logverb 3Save and close the file.
This configuration instructs OpenVPN to:
-
Listen on UDP port 1194, the default port for OpenVPN.
-
Use the server certificate, private key, Certificate Authority (CA), and Diffie-Hellman parameters generated in the previous steps.
-
Assign VPN clients IP addresses from the 10.8.0.0/24 subnet.
-
Use modern negotiated data ciphers while maintaining compatibility with older clients through a fallback cipher.
-
Protect the TLS control channel using the tls-crypt key.
-
Route all client traffic through the VPN and push Cloudflare DNS servers (1.1.1.1 and 1.0.0.1) to connected clients.
-
Drop privileges after startup by running as the nobody user and nogroup group.
-
Preserve the encryption keys and tunnel interface across restarts for improved stability.
-
Record connection status and log activity for troubleshooting.
The next step is to copy the required certificates and keys into the OpenVPN configuration directory so the server can access them when it starts.
Step 8: Copy Certificates and Keys
Before OpenVPN can start, the server must be able to access the certificates and keys created in the previous steps. In this step, you'll copy the required files into the OpenVPN server configuration directory and set appropriate permissions to help protect the private keys.
Copy the Certificate Authority (CA) certificate, server certificate, server private key, Diffie-Hellman parameters, and tls-crypt key to the OpenVPN configuration directory:
sudo cp ~/easy-rsa/pki/ca.crt /etc/openvpn/server/sudo cp ~/easy-rsa/pki/issued/server.crt /etc/openvpn/server/sudo cp ~/easy-rsa/pki/private/server.key /etc/openvpn/server/sudo cp ~/easy-rsa/pki/dh.pem /etc/openvpn/server/sudo cp ~/easy-rsa/ta.key /etc/openvpn/server/Next, restrict access to the server's private key so that only the root user can read and modify it:
sudo chmod 600 /etc/openvpn/server/server.keyYou can also restrict access to the tls-crypt key, since it is used to protect the VPN's control channel:
sudo chmod 600 /etc/openvpn/server/ta.keyFinally, verify that the required files are present in the OpenVPN configuration directory:
ls -l /etc/openvpn/server/The output should list the following files:
-
ca.crt
-
server.crt
-
server.key
-
dh.pem
-
ta.key
With the certificates and keys in place, the OpenVPN server has everything it needs to authenticate clients and establish secure VPN connections. The next step is to enable IP forwarding so connected clients can route traffic through the VPN server
Step 9: Enable IP Forwarding
To allow VPN clients to access the internet through your OpenVPN server, you must enable IPv4 forwarding. This allows your Ubuntu server to forward network traffic between the VPN tunnel and the public network interface.
Open the system configuration file:
sudo nano /etc/sysctl.confLocate the following line:
#net.ipv4.ip_forward=1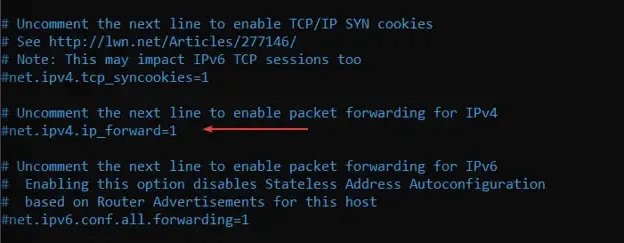
Uncomment it so it reads:
net.ipv4.ip_forward=1Save the file and exit the editor.
Apply the new setting without restarting the server:
sudo sysctl -pFinally, verify that IPv4 forwarding is enabled:
sysctl net.ipv4.ip_forwardIf IPv4 forwarding is enabled successfully, you should see output similar to:
net.ipv4.ip_forward = 1Your server is now configured to forward network traffic between connected VPN clients and the internet. In the next step, you'll configure the firewall and Network Address Translation (NAT) to allow VPN traffic to pass through the server.
Step 10: Configure the Firewall
To allow VPN clients to access the internet securely, you'll configure the firewall to permit OpenVPN traffic, enable Network Address Translation (NAT), and ensure SSH access remains available.
First, identify your server's public network interface by running:
ip route | grep defaultThe output will look similar to:
default via 203.0.113.1 dev eth0 proto staticIn this example, eth0 is the public network interface. Make a note of your interface name, as you'll use it in the next step.
Next, configure NAT by editing UFW's before.rules file:
sudo nano /etc/ufw/before.rulesAdd the following lines at the top of the file, before the *filter section. Replace eth0 with your server's public network interface if it is different.
*nat:POSTROUTING ACCEPT [0:0]-A POSTROUTING -s 10.8.0.0/24 -o eth0 -j MASQUERADECOMMIT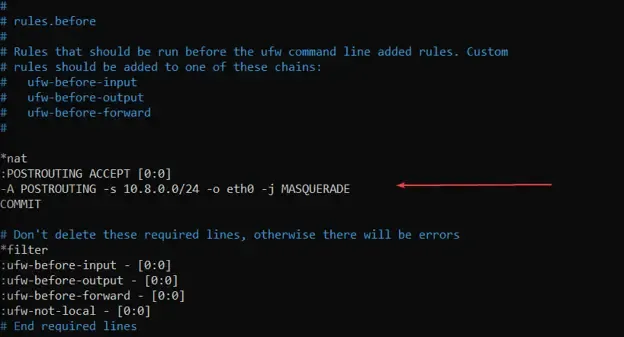
Next, allow forwarding by editing the UFW configuration file:
sudo nano /etc/default/ufwLocate the following line:
DEFAULT_FORWARD_POLICY="DROP"
Change it to:
DEFAULT_FORWARD_POLICY="ACCEPT"Save the file and exit the editor.
Now allow OpenVPN and SSH through the firewall:
sudo ufw allow 1194/udpsudo ufw allow 22/tcpEnable UFW if it isn't already enabled:
sudo ufw enableFinally, verify the firewall configuration:
sudo ufw statusThe output should show that both OpenSSH and 1194/udp are allowed.
Because the NAT rules are stored in UFW's before.rules file, they are automatically applied whenever UFW starts, making the configuration persistent across system reboots.
With the firewall configured, your OpenVPN server is ready to accept client connections while securely routing VPN traffic to the internet.
Step 11: Start and Enable the OpenVPN Service
With the server configuration, certificates, and firewall in place, you're ready to start the OpenVPN server. You'll also configure it to start automatically whenever the VPS boots.
Start the OpenVPN server instance:
sudo systemctl start openvpn-server@serverEnable the service to start automatically at boot:
sudo systemctl enable openvpn-server@serverAlternatively, you can start and enable the service with a single command:
sudo systemctl enable --now openvpn-server@serverFinally, verify that the OpenVPN service is running:
sudo systemctl status openvpn-server@serverIf the service started successfully, you should see output indicating that the service is active (running).
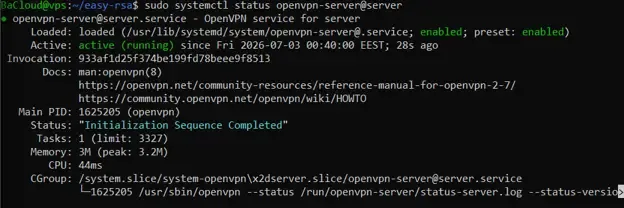
You can exit the status screen by pressing q.
At this point, your OpenVPN server is running and configured to start automatically on system reboot. In the next step, you'll create a client configuration file that allows devices to connect securely to the VPN.
Step 12: Create the Client Configuration File
To connect a device to your OpenVPN server, you'll need to create a client configuration file (.ovpn). This file contains the connection settings along with the certificates and keys required to authenticate the client.
First, create a new client configuration file:
nano ~/client1.ovpnAdd the following configuration, replacing YOUR_SERVER_IP with your VPS's public IP address or domain name:
|
client <ca>
# Paste contents of ta.key here |
Save and exit the file. At this point, the file has been created and saved
Now reopen the same file to insert the required certificates and keys:
nano ~/client1.ovpn In a separate terminal session, display the CA certificate:
cat ~/easy-rsa/pki/ca.crtCopy everything shown and paste it into the <ca> section:
-----BEGIN CERTIFICATE-----...-----END CERTIFICATE-----Display and copy the contents of the client certificate the same way into the <cert> section:
cat ~/easy-rsa/pki/issued/client1.crtDisplay and copy the contents of the client private key into the <key> section:
cat ~/easy-rsa/pki/private/client1.keyFinally, display and copy the contents of the tls-crypt key into the <tls-crypt> section:
cat ~/easy-rsa/ta.keyAfter embedding all four files, save and close client1.ovpn.
Transfer the configuration file to your device
Now you need to move client1.ovpn from your VPS to your local computer.
The safest and most common method is SCP (Secure Copy).
Run this command on your local computer (not the VPS):
scp your-username@YOUR_SERVER_IP:~/client1.ovpn .Replace YOUR_SERVER_IP with your VPS public IP address.
Example:
scp [email protected]:~/client1.ovpn .This will download the file into your current folder.
Your client configuration file is now ready to be imported into an OpenVPN-compatible client.
Step 13: Connect to the VPN
With the client configuration file ready, the final step is to import it into your OpenVPN client and establish a secure connection to your VPN server.
First, download and install OpenVPN Connect from the official website:
https://openvpn.net/client-connect-vpn-for-windows/
Open the application after installation.
Click “Import Profile” and select “File”.
Browse to the .ovpn file you transferred to your device and import it.
After importing, click “Connect”.
You may be prompted to grant permission to establish a VPN tunnel. Click Allow or Yes to proceed.
Step 14: Verify the VPN Connection
After connecting to the VPN, verify that everything is working correctly.
First, confirm that your OpenVPN client shows a Connected status.
Next, visit https://whatismyipaddress.com/ from the client device. The public IP address displayed should match your VPS's public IP address, confirming that your internet traffic is being routed through the VPN.
Conclusion
In this guide, you installed and configured OpenVPN on an Ubuntu 26.04 VPS, created the required certificates, configured the VPN server, and connected a client using a secure .ovpn profile.
As your VPN grows, you can generate additional client certificates for new users or devices while managing them through your existing Certificate Authority. To maintain a secure and reliable VPN, keep Ubuntu and OpenVPN up to date with the latest security patches.
For more in-depth tutorials, visit the BaCloud blog, where you’ll find helpful guides.