

Redis is widely adopted as an in-memory key-value store in modern application stacks, particularly for caching, session storage, queues, and real-time workloads. According to the Stack Overflow Developer Survey 2025, 28% of developers report using Redis.
Installing Redis on an Ubuntu VPS is straightforward, but securing it requires configuration beyond the default setup. In this guide, we’ll install Redis and apply essential hardening steps to ensure a secure and production-ready deployment.
Prerequisites
Before you begin, ensure the following:
-
A VPS running Ubuntu 22.04 or 24.04
-
A non-root user with sudo privileges
-
SSH access to the server
-
Uncomplicated Firewall enabled (Optional but recommended)
Install Redis on Ubuntu
Install Redis from Ubuntu’s official repositories and verify that the service is running correctly.
Update Package Index
Update the local package index to ensure you install the latest available Redis version:
sudo apt updateInstall Redis
Install the Redis server package:
sudo apt install redis-server -y-
redis-server installs the Redis service
-
-y automatically confirms the installation prompt
Verify Installation
After installation, confirm Redis is installed and running.
Check Redis version:
redis-server --versionYou should see an output similar to:
![]()
This confirms Redis is installed and the server binary is available on the system.
Check service status:
sudo systemctl status redisYou should see an output similar to:
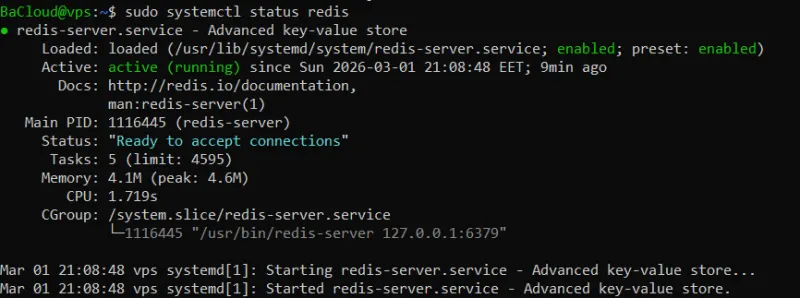
This confirms the Redis service is running, enabled at boot, and ready to accept connections.
Test connectivity:
redis-cli pingIf Redis is running correctly, you should see:
PONGThis confirms the Redis server is responding to client requests locally.
Secure Redis Network Binding
Restrict Redis to local access to prevent unintended external exposure.
Edit the Configuration File
Open the Redis configuration file:
sudo nano /etc/redis/redis.confThis file controls how Redis listens for connections and handles security settings.
Restrict Bind Address
Locate the bind directive here: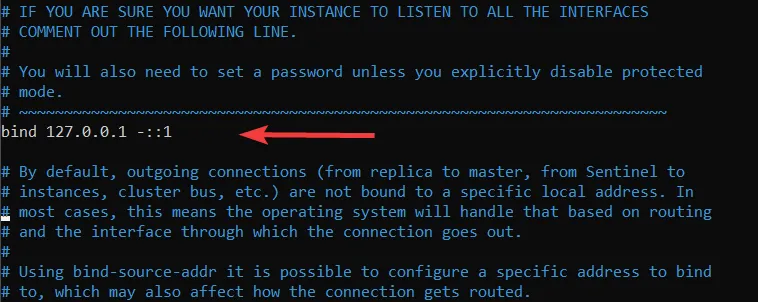
Ensure it is set to:
bind 127.0.0.1 ::1-
127.0.0.1 allows IPv4 localhost connections
-
::1 allows IPv6 localhost connections
This ensures Redis only listens on the local machine.
Never expose Redis directly to the public internet without strict firewall controls.
Enable Protected Mode
Ensure the following line is present:
protected-mode yesProtected mode prevents Redis from accepting external connections when no authentication is configured.
Restart Redis
After making changes, restart the service:
sudo systemctl restart redisThis applies the updated configuration settings.
Enable Authentication
Configure a password to prevent unauthorized access to your Redis instance.
Edit the Configuration File
Open the Redis configuration file:
sudo nano /etc/redis/redis.confSearch for the requirepass directive (it is commented out by default):
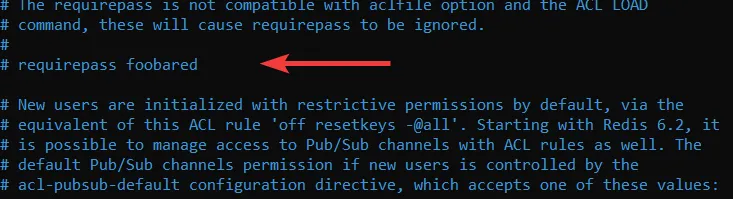
Remove the # and replace the example password with a strong one:
requirepass STRONG_PASSWORDReplace STRONG_PASSWORD with a long, unique password.
This enables authentication and requires clients to provide the password before executing commands.
Restart Redis
Apply the changes by restarting the service:
sudo systemctl restart redisThis reloads Redis with the updated authentication setting.
Verify Authentication Configuration
Connect to the Redis CLI:
redis-cliSince Redis is running locally and the default user is automatically applied, you may not see an authentication error at first. This is expected behavior for a secure local setup.
Authenticate using your password:
AUTH default STRONG_PASSWORDYou should see:
OKTest that Redis responds correctly after authentication:
PINGYou should receive:
PONGThis confirms that the configured password is accepted and that Redis responds correctly to authenticated requests.
Configure Firewall (UFW)
Set firewall rules to control access to Redis and prevent unauthorized connections.
Local-Only Access
If Redis should only be accessible from the local server:
sudo ufw deny 6379-
Blocks all incoming connections on port 6379
-
Ensures Redis is only reachable locally
Remote Access from a Trusted IP
If you need to allow a specific remote server to connect:
sudo ufw allow from YOUR_IP to any port 6379-
Replace YOUR_IP with the remote server’s IP address
-
Allows Redis connections only from that trusted IP
Verify Firewall Rules
Check the status of UFW and your active rules:
sudo ufw status-
This confirms that port 6379 is blocked or allowed according to your configuration
-
Ensures the firewall is actively protecting Redis
This ensures Redis is not exposed publicly unless explicitly allowed, keeping your VPS secure.
Optional Hardening (Recommended)
Disable high-risk administrative commands to prevent accidental data loss or malicious misuse.
Edit the Configuration File
Open the Redis configuration file:
sudo nano /etc/redis/redis.confScroll to the bottom of the file and add:
rename-command FLUSHALL ""rename-command FLUSHDB ""rename-command CONFIG ""rename-command SHUTDOWN ""What this does:
-
FLUSHALL → prevents deleting all databases
-
FLUSHDB → prevents clearing a single database
-
CONFIG → prevents runtime configuration changes
-
SHUTDOWN → prevents remote shutdown of the server
Setting the command name to an empty string disables it completely.
Restart Redis
Apply the changes:
sudo systemctl restart redisThis reloads Redis with the updated hardening settings.
These measures are optional but recommended for production environments where Redis should not allow administrative commands from client connections.
Verify Your Secure Setup
Perform a final validation to ensure Redis is running securely with all hardening measures applied.
Confirm Redis Service Is Active
Check that the Redis service is currently running:
sudo systemctl is-active redis-
Verifies the service is active
-
Confirms it did not fail after configuration updates
Expected output:
activeConfirm Redis Is Bound to Localhost Only
Verify which network interface Redis is listening on:
sudo ss -tulnp | grep 6379-
Displays the active listening address for port 6379
-
Ensures Redis is not exposed on all interfaces
You should see:

If you see 0.0.0.0:6379, Redis is publicly accessible and must be corrected.
Confirm Firewall Status
Check that the firewall is enabled and protecting the server:
sudo ufw status-
Confirms UFW is active
-
Verifies that port 6379 is not publicly allowed unless explicitly configured
You should see:
Status: activeThese checks confirm that Redis is running properly, securely bound, and protected by firewall rules.
Conclusion
In this guide, we've covered how to install Redis on Ubuntu and secure it by restricting access, enabling authentication, and applying essential hardening measures. With these steps complete, your Redis instance is now secure and ready for production use. Be sure to review and adjust your setup periodically to ensure it remains secure as your needs change.
For more in-depth tutorials, visit the BaCloud blog, where you’ll find helpful guides.