

In situations where you're troubleshooting a system issue, installing software, or following a tutorial, one of the first things you need to know is your Ubuntu version. Whether you're running a server or a desktop environment, knowing the exact release helps ensure compatibility and proper system maintenance.
In this guide, we’ll walk you through all the common and reliable methods for checking your Ubuntu version, both through the command line and the graphical interface.
1. Using lsb_release Command
The lsb_release command is one of the most straightforward and widely used methods to check your Ubuntu version. It's part of the Linux Standard Base (LSB) tools and provides essential details about your distribution in a clean, readable format.
To use it, open your terminal and run:
|
lsb_release -a |
You’ll see an output similar to this:
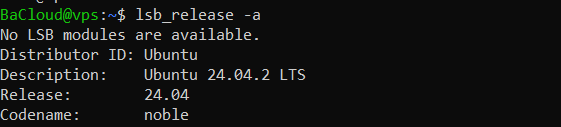
Here’s what each field means:
- Distributor ID – The base distribution (e.g., Ubuntu)
- Description – Full release name including version and LTS status
- Release – The version number (e.g., 24.04)
- Codename – The codename for the release (e.g., noble for 24.04)
This method is reliable across almost all Ubuntu versions.
2. Viewing /etc/os-release File
Another reliable way to check your Ubuntu version is by reading the contents of the /etc/os-release file. This file is part of the systemd standard and is present on all modern Linux distributions, including Ubuntu. It contains key information about the operating system in a simple key-value format.
To view the file, run:
|
cat /etc/os-release |
You’ll get an output like this:
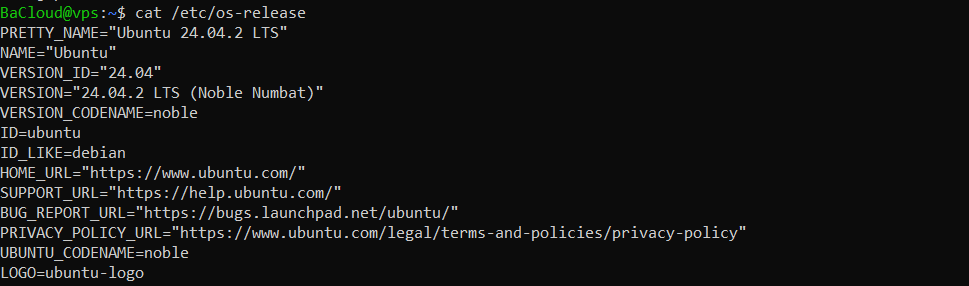
Key fields to pay attention to:
- NAME – The distribution name (e.g., "Ubuntu")
- VERSION – Full version string with codename
- VERSION_ID – Numeric version (e.g., "24.04")
- PRETTY_NAME – A human-readable version string, often used in scripts or logs
This method is particularly useful when writing automation scripts, as the values can be parsed directly from the file without running a command.
3. Using the hostnamectl Command
The hostnamectl command is primarily used to view or change the system hostname, but it also provides useful information about the operating system and kernel. It's convenient when you want a quick summary of your system’s environment without digging into multiple files.
To run it, enter:
|
hostnamectl |
Sample output might look like:
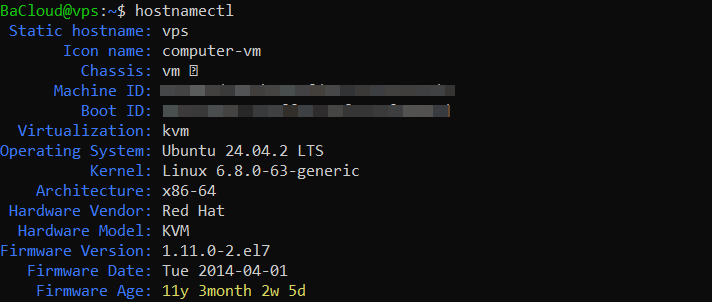
Key details to note:
- Operating System – Full OS name and version
- Kernel – Linux kernel version currently in use
- Architecture – CPU architecture (e.g., x86-64)
While it doesn't provide the release codename like lsb_release does, hostnamectl is still a convenient, built-in tool for quickly identifying key system details.
4. Checking /etc/issue File
The /etc/issue file contains a simple text banner that is typically displayed before the login prompt on terminal-based systems. It usually includes basic information about the operating system, such as the name and version.
To check its contents, run:
|
cat /etc/issue |
You might see output like:
![]()
The \n and \l are escape sequences that represent the newline character and the current tty line, respectively.
Note: This file is intended for informational purposes only and can be manually edited or customized by system administrators. In some cases, especially on cloud VMs or containers, it might be outdated, blank, or show a generic message.
As such, while it's a quick way to get a version hint, it's not the most reliable method, use it as a backup, not a primary source.
5. GUI Method (for Desktop Users)
If you're using Ubuntu with a graphical interface, the easiest way to check your version is through the system settings.
Follow these steps:
- Open the Settings app.
- In the sidebar, select System.
- Click on About.
You’ll see your Ubuntu version along with other key software and system information, similar to the image below:
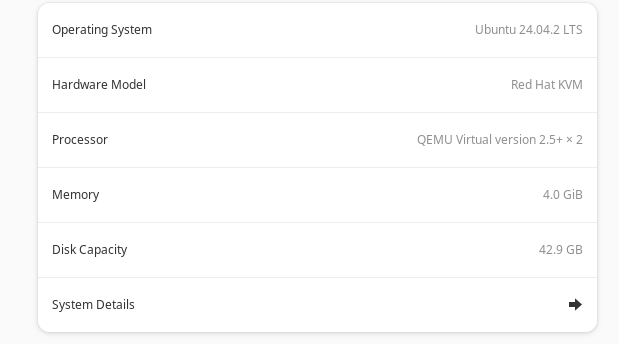
This is the most user-friendly option for desktop users who prefer navigating through the graphical interface.
6. Checking Version with neofetch
If you want a stylish and compact way to view your system information, including your Ubuntu version, neofetch is a fun and highly readable option.
First, install it by running:
|
sudo apt install neofetch |
Once installed, simply type:
|
neofetch |
This command displays your Ubuntu version alongside a concise summary of your system specifications, accompanied by an ASCII logo of your OS. Similar to the output below:
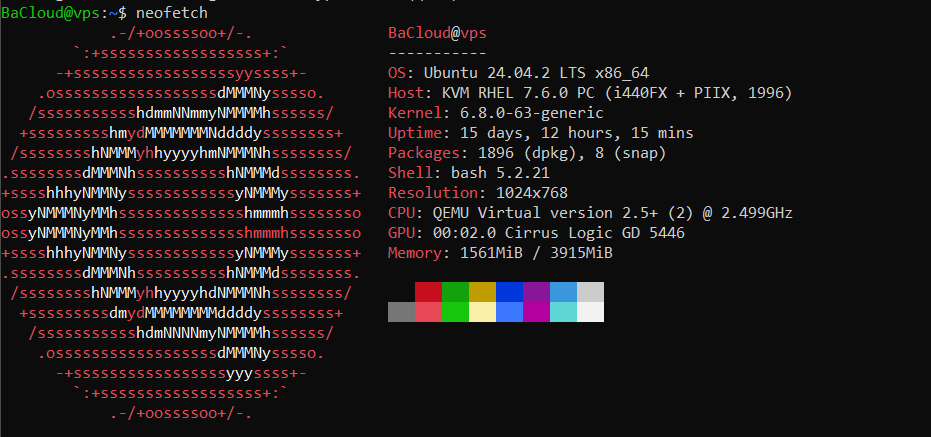
You’ll see useful details like:
- Ubuntu version and codename
- Kernel version
- Shell
- CPU and GPU
- RAM usage
- Terminal and display resolution (if applicable)
neofetch is especially popular among developers and Linux enthusiasts who enjoy sharing system screenshots or want a quick overview in the terminal.
7. Automating Version Checks in Scripts
If you're creating scripts to manage or automate systems, it's helpful to get the Ubuntu version automatically, especially on servers without a desktop interface.
You can do this by sourcing the /etc/os-release file, which contains key OS information.
Command:
|
source /etc/os-release && echo "$PRETTY_NAME" |
What this does:
- source /etc/os-release loads the OS details into environment variables.
- echo "$PRETTY_NAME" prints a clean, human-readable version name.
Example output:
![]()
This approach is reliable, doesn’t require installing anything, and works on almost all modern Ubuntu systems.
Conclusion
As we’ve shown, there are several ways to check your Ubuntu version, but the most reliable are lsb_release -a and cat /etc/os-release. Desktop users can also find this information under Settings > System > About.
Before installing new software or asking for support, it’s always a good idea to confirm your version first, it helps avoid compatibility issues and saves time troubleshooting.
For more in-depth tutorials, visit the BaCloud blog, where you’ll find helpful guides.