


PostgreSQL is one of the most popular databases in the world, used by over 55% of professional developers. Paired with Ubuntu 24.04 LTS, PostgreSQL 17 provides a stable, secure setup suitable for local development and production deployments.
In this guide, we’ll walk through installing PostgreSQL 17 on Ubuntu 24.04 and applying simple yet important security steps to keep your database protected on a VPS or server.
What Is PostgreSQL?
PostgreSQL is an open-source relational database used to store and manage application data, with a strong focus on reliability and data integrity. It supports advanced SQL features, transactional workloads, and modern data types like JSON, making it suitable for a wide range of applications.
PostgreSQL is commonly used in production environments where correctness, security, and long-term stability matter.
Prerequisites
Before you begin, make sure you have the following:
- Ubuntu 24.04 LTS is installed on your server or VPS
- A user account with sudo privileges
- Internet access to download packages from the PostgreSQL repository
- (Optional) UFW enabled, if you plan to manage firewall rules as part of this guide
Installing PostgreSQL 17 on Ubuntu 24.04
In this section, we’ll add the official PostgreSQL repository, install PostgreSQL 17, and verify the installation.
Add the Official PostgreSQL APT Repository
Ubuntu’s default repository often includes older PostgreSQL versions. To get PostgreSQL 17, we use the official PostgreSQL APT repository.
Import the PostgreSQL signing key
This ensures packages are verified and trusted by your system.
|
curl -fsSL https://apt.postgresql.org/pub/repos/apt/ACCC4CF8.asc | sudo gpg --dearmor -o /usr/share/keyrings/postgresql-archive-keyring.gpg |
Add the PostgreSQL repository
This enables apt to download PostgreSQL 17 packages directly from PostgreSQL’s official repository.
|
echo "deb [signed-by=/usr/share/keyrings/postgresql-archive-keyring.gpg] http://apt.postgresql.org/pub/repos/apt/ noble-pgdg main" | sudo tee /etc/apt/sources.list.d/pgdg.list |
Update package index
This refreshes your package list to include the new PostgreSQL repository.
|
sudo apt update |
Install PostgreSQL 17 Packages
Now install the server and client packages.
|
sudo apt install -y postgresql-17 postgresql-client-17 |
What gets installed
- postgresql-17: the database server package
- postgresql-client-17: client utilities such as psql
Automatic cluster initialization
Ubuntu automatically creates a PostgreSQL cluster (main) and starts the service during installation.
Verify Installation
Confirm PostgreSQL is running and accessible.
Check service status
|
sudo systemctl status postgresql |
You should see an output similar to this:
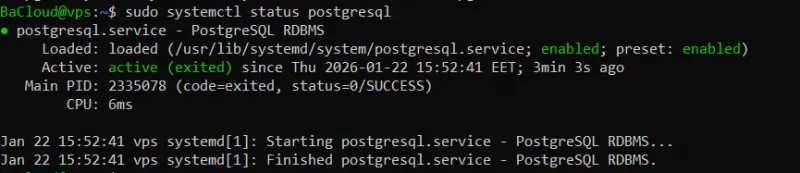
This confirms PostgreSQL is active and running.
Verify PostgreSQL version
|
psql --version |
You should see an output showing PostgreSQL 17, similar to the one below:

Confirm default data directory and port
PostgreSQL stores its database files in a data directory, and it listens for connections on a default port. Verifying these ensures the installation used the expected paths and network settings.
- Default data directory: /var/lib/postgresql/17/main
This is where PostgreSQL stores your database files and configuration for the main cluster.
Verify the data directory
Run this command to show the active cluster data directory:
|
sudo pg_lsclusters |
You should see output like:

- Default port: 5432
This is the network port PostgreSQL listens on for client connections.
Verify the port is listening
To confirm PostgreSQL is listening on the default port:
|
sudo ss -ltnp | grep 5432 |
If PostgreSQL is running correctly, you should see an entry similar to the output below:

This shows the service listening on port 5432.
PostgreSQL Service and Cluster Basics (Ubuntu-Specific)
Ubuntu manages PostgreSQL using a cluster-based layout, which affects how the service runs and where data is stored.
PostgreSQL Cluster Concept on Ubuntu
On Debian and Ubuntu systems, a cluster consists of a PostgreSQL version, a data directory, and a set of configuration files. A single server can host multiple PostgreSQL clusters running different versions or configurations.
Each cluster is managed independently, even though they share the same PostgreSQL service.
Default Cluster Name and Location
After installation, Ubuntu creates a default cluster automatically:
- Cluster name: main
- PostgreSQL version: 17
- Data directory: /var/lib/postgresql/17/main
- Configuration directory: /etc/postgresql/17/main
This default cluster is started automatically when PostgreSQL is installed.
Managing Clusters with pg_lsclusters
To view all PostgreSQL clusters on the system, use:
|
pg_lsclusters |
This command shows:
- PostgreSQL version
- Cluster name
- Listening port
- Cluster status
- Data directory
It’s the easiest way to confirm which clusters are running and how they’re configured.
Starting, Stopping, and Restarting PostgreSQL
Ubuntu uses systemd to manage PostgreSQL.
- Start PostgreSQL:
|
sudo systemctl start postgresql |
- Stop PostgreSQL:
|
sudo systemctl stop postgresql |
- Restart PostgreSQL:
|
sudo systemctl restart postgresql |
Restarting applies configuration changes and restarts all PostgreSQL clusters on the system.
For configuration changes that don’t require a full restart, PostgreSQL can be reloaded instead:
|
sudo systemctl reload postgresql |
Reloading applies changes safely without dropping active connections.
Secure the PostgreSQL Superuser Account
PostgreSQL creates a default administrative role named postgres. This role has full control over the database and should be protected carefully.
Switch to the postgres system user
On Ubuntu, PostgreSQL is managed by a dedicated system user called postgres. Switching to this user allows administrative access to the database.
|
sudo -i -u postgres |
You’ll now be logged in as the postgres system user.
Set a strong password for the postgres role
By default, local access uses peer authentication, which allows the postgres system user to connect without a password. Setting a password protects the role for password-based and remote access.
|
psql |
Inside the PostgreSQL prompt, run:
|
ALTER ROLE postgres WITH PASSWORD 'strong_password_here'; |
Replace strong_password_here with a secure password, then exit:
|
\q |
Why passwordless local access exists by default
Ubuntu uses peer authentication for local connections, meaning the operating system user must match the PostgreSQL role. This is convenient for administration but should not be relied on for application access or remote connections.
Create a Secure Application Role and Database
Applications should connect using a dedicated role with limited privileges, not the PostgreSQL superuser.
Create a Non-Superuser Role
Create a role that can log in but does not have administrative privileges. This limits what the application can do if its credentials are compromised.
|
createuser app_user |
This creates a role named app_user with no superuser, database creation, or role management privileges.
To set a password for the role:
|
psql -c "ALTER ROLE app_user WITH PASSWORD 'strong_password_here';" |
Replace strong_password_here with a secure password.
Assign Ownership Correctly
Create a database and assign ownership to the application role. This ensures the application only has access to its own database.
|
createdb app_db --owner=app_user |
The app_user role will have full control over app_db, but no access to other databases.
Avoid Using the postgres Role for Applications
The postgres role is a superuser and bypasses all permission checks. Using it for applications increases the risk of accidental data loss or security compromise.
Always use a dedicated, least-privileged role for application connections, and reserve the postgres role for administrative tasks only.
Secure Authentication (pg_hba.conf)
PostgreSQL uses the pg_hba.conf file to control which users can connect and how they authenticate.
Review Default Authentication Rules
Open the authentication configuration file:
|
nano /etc/postgresql/17/main/pg_hba.conf |
On a default Ubuntu installation, you will typically see local authentication rules like these:
|
# TYPE DATABASE USER ADDRESS METHOD |
Why defaults are unsafe for production
- peer authentication allows passwordless local access
- Any system user with a matching PostgreSQL role can connect
- This is convenient for administration but unsafe on production servers
-
Enforce SCRAM-SHA-256 Authentication
To secure PostgreSQL, replace passwordless or weak authentication methods with SCRAM-SHA-256.
Replace trust and peer where appropriate
BEFORE (default configuration):
|
local all postgres peer |
AFTER (secure configuration):
|
local all all scram-sha-256 |
This change removes passwordless access and requires all local users to authenticate using secure passwords.
Apply least-privilege connection rules
If you allow remote access, restrict connections to trusted IP addresses only.
Add the following rule below the local rules:
|
host all all trusted_ip/32 scram-sha-256 |
- Only the specified IP address can connect
- Secure password authentication is enforced
- All other IPs are denied by default
Replace trusted_ip with the actual client IP address or network range.
Reload PostgreSQL safely
Apply the changes without interrupting active connections:
|
systemctl reload postgresql |
Reloading applies authentication changes safely and avoids a full service restart.
Restrict Network Access
Limit where PostgreSQL listens for connections and control network-level access.
Configure listen_addresses
PostgreSQL only accepts connections on the network interfaces defined in its configuration.
Open the main PostgreSQL configuration file:
|
nano /etc/postgresql/17/main/postgresql.conf |
Find the listen_addresses setting.
Local-only access
If PostgreSQL should only accept connections from the local machine, set:
|
listen_addresses = 'localhost' |
This prevents any remote network connections.
Allow remote access
If your application connects from another server, specify the allowed interface or IP address:
|
listen_addresses = 'your_server_ip' |
This limits PostgreSQL to listening only on the specified address.
Avoid binding to all interfaces
Using the following setting allows PostgreSQL to listen on all network interfaces:
|
listen_addresses = '*' |
Avoid this unless absolutely required, as it exposes PostgreSQL on every available interface.
Firewall Rules (UFW)
A firewall provides an additional layer of protection by controlling which systems can reach PostgreSQL.
Allow port 5432 only from trusted IPs
If UFW is enabled, allow PostgreSQL connections only from trusted sources.
|
ufw allow from trusted_ip to any port 5432 |
This rule allows access to PostgreSQL only from the specified IP address.
Replace trusted_ip with the client IP or network range that should be allowed.
Verify firewall enforcement
Check the active firewall rules:
|
ufw status |
You should see a rule allowing port 5432 only from the trusted IP address.
Enable and Verify SSL Connections
SSL encrypts traffic between PostgreSQL and clients, protecting credentials and data in transit.
Confirm SSL Is Enabled by Default
On Ubuntu, PostgreSQL is configured to use SSL by default, with self-signed certificates.
Open the PostgreSQL configuration file:
|
nano /etc/postgresql/17/main/postgresql.conf |
Verify that the following setting is present and enabled:
|
ssl = on |
This setting ensures PostgreSQL accepts encrypted client connections.
Verify Encrypted Client Connections
To confirm that clients are using SSL, connect to PostgreSQL and check the connection status.
Switch to the PostgreSQL system user:
|
sudo -i -u postgres |
Connect to the database:
|
psql |
Once connected, run:
|
\conninfo |
If SSL is enabled, the output will indicate that the connection is using SSL encryption.
Avoid Insecure Non-SSL Access
To prevent unencrypted connections, ensure authentication rules require SSL for remote access.
In pg_hba.conf, use hostssl instead of host for remote rules:
|
hostssl all all trusted_ip/32 scram-sha-256 |
This enforces SSL encryption for all matching connections.
After making changes, reload PostgreSQL:
|
sudo systemctl reload postgresql |
Reloading applies the configuration safely without interrupting active connections.
Apply Minimal Security-Relevant Configuration
These settings improve visibility and reduce risk without affecting PostgreSQL's performance.
Enable Connection and Error Logging
Logging connection activity and errors helps detect unauthorized access and troubleshoot issues.
Open the PostgreSQL configuration file:
|
sudo nano /etc/postgresql/17/main/postgresql.conf |
Ensure the following settings are enabled:
|
log_connections = on |
- log_connections records each successful connection
- log_disconnections records when connections close
- log_min_error_statement logs statements that cause errors
These logs are written to PostgreSQL’s log directory and are useful for auditing and security reviews.
Set Safe Connection Limits
Limiting the number of connections helps prevent resource exhaustion and abuse.
In postgresql.conf, review or set:
|
max_connections = 100 |
This value defines the maximum number of concurrent client connections. Adjust it based on your workload and system capacity.
After applying these changes, reload PostgreSQL to apply the configuration
Conclusion
You now have PostgreSQL 17 installed on Ubuntu 24.04 with a secure baseline configuration, including controlled access, password-based authentication, restricted network exposure, SSL-encrypted connections, and basic logging for visibility.
This setup is suitable for development environments, internal services, and production servers where PostgreSQL is accessed by known applications or trusted clients, providing a solid foundation without unnecessary complexity.
For more in-depth tutorials, visit the BaCloud blog, where you’ll find helpful guides.