

When you run multiple websites on a single VPS, you need a reliable way to route traffic and secure each site with HTTPS.
Doing this directly with Nginx usually means editing configuration files and manually setting up SSL certificates. While this works, it requires repeating the same steps every time you add or modify a service.
Nginx provides a manager for this purpose: Nginx Proxy Manager. Running in Docker, it simplifies setup by providing a web interface to manage reverse proxies and automatically handle Let’s Encrypt SSL certificates.
Prerequisites
Before installing Nginx Proxy Manager with Docker on a VPS, make sure you have:
- A supported VPS OS: Ubuntu 20.04 or 22.04 (64-bit recommended)
- Root or sudo access on the VPS
- A public IPv4 address assigned to the server
- Required ports free: 80 (HTTP), 81 (NPM UI), 443 (HTTPS)
- No existing web servers running (Apache, Nginx, Caddy)
- Firewall configured to allow the above ports
Optional:
- Registered domain or subdomain pointing to your VPS (required for Let’s Encrypt SSL)
Step 1. Installing Docker & Docker Compose
Nginx Proxy Manager runs entirely in Docker and requires Docker and Docker Compose to be installed and running.
Before proceeding, ensure the following:
- Docker is installed from the official Docker repository
- Docker Compose is installed and available on the system
If either component is missing, install it using the guides below before continuing:
Once both components are installed and verified using the guides above, proceed to the next section.
Step 2. Directory Structure & Permissions
Nginx Proxy Manager runs inside Docker, but it needs to store configuration data and SSL certificates on the VPS itself.
Create the Required Directories
Create a dedicated directory for Nginx Proxy Manager and its data storage.
Run the following commands:
|
sudo mkdir -p /opt/nginx-proxy-manager/data |
After running these commands the directories are created on the server
Set Directory Permissions
Ensure Docker can write to these directories, run:
|
sudo chmod -R 755 /opt/nginx-proxy-manager |
This allows the container to store configuration files and SSL certificates correctly.
Step 3. Docker Compose Configuration for Nginx Proxy Manager
In this step, you will create the docker-compose.yml file that defines how Nginx Proxy Manager runs, which ports it exposes, and where its data is stored.
This configuration will:
- Use the official Nginx Proxy Manager image
- Expose HTTP, HTTPS, and the admin interface
- Mount the directories created in Step 2 for persistent storage
- Use SQLite as the default database
Create the Docker Compose File
Navigate to the Nginx Proxy Manager directory:
|
cd /opt/nginx-proxy-manager |
Create the Docker Compose file:
|
nano docker-compose.yml |
Docker Compose Configuration
Paste the following configuration into the file:
|
services: |
Save and exit the editor.
Step 4. Firewall Configuration
Nginx Proxy Manager requires ports 80, 81, and 443 to be accessible from the internet. In this step, you will configure the VPS firewall (UFW) and confirm the rules are applied correctly.
Check UFW Status
Run:
|
sudo ufw status |
You should see:
Status: active
If UFW is inactive, enable it:
|
sudo ufw enable |
Allow Required Ports
Allow the required ports explicitly:
|
sudo ufw allow 80 |
Verify Firewall Rules
Run the status command again:
|
sudo ufw status |
A correct configuration will show rules similar to:
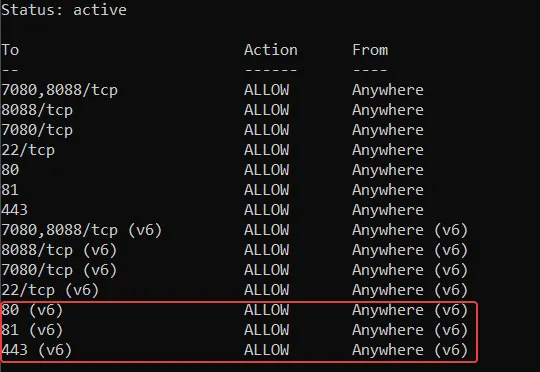
If ports 80, 81, and 443 are listed as ALLOW, as shown above, the firewall is correctly configured and you can proceed to the next step.
Step 5. Starting Nginx Proxy Manager
In this step, you will start Nginx Proxy Manager using Docker Compose and verify that the container is running correctly.
Start the Nginx Proxy Manager Container
Navigate to the directory where your docker-compose.yml file is located:
|
cd /opt/nginx-proxy-manager |
Start the container in detached mode:
|
docker compose up -d |

What this does:
- Creates the Nginx Proxy Manager container
- Mounts the previously created data and SSL directories
- Exposes ports 80, 81, and 443
- Runs the service in the background
Confirm the Container Is Running
Check the container status:
|
docker compose ps |
You should see an output similar to this:

This means the nginx-proxy-manager container is running.
Verify Access to the Admin Interface
From your local machine, open a browser and visit: http://your-server-ip:81
You should see the Nginx Proxy Manager login page, as shown in the image below.
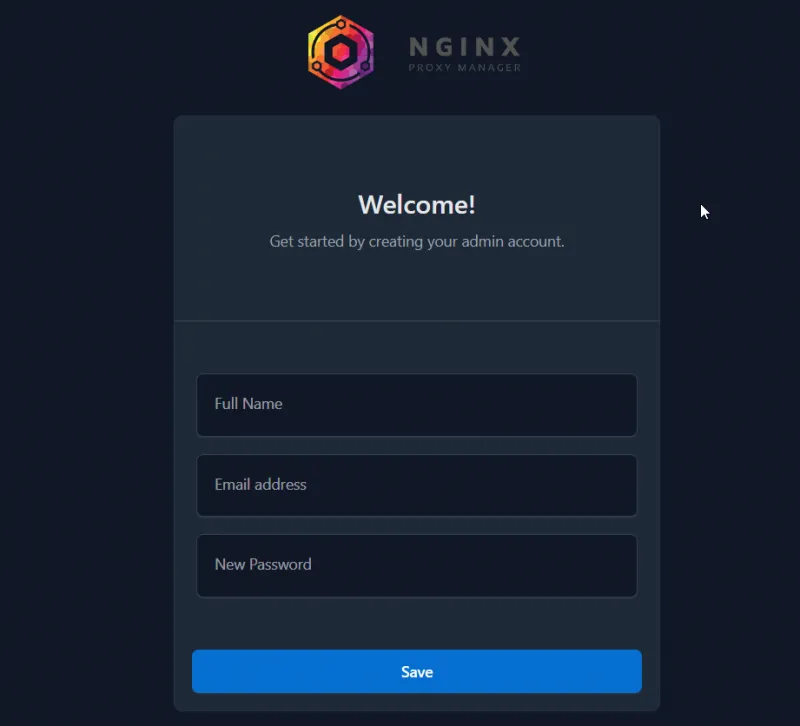
This confirms that:
- The container started successfully
- Port 81 is correctly exposed
- Firewall and external network access are working
Step 6. First Login
When accessing the Nginx Proxy Manager admin interface for the first time, you will be prompted to create an admin account.
Create the Admin Account
On the initial setup screen, fill in the following fields:
- Full Name – Your name or a descriptive administrator label
- Email Address – A valid email address you control
- New Password – A strong, unique password
Submit the form to create the administrator account.
This account will be used to manage all Nginx Proxy Manager configuration.
Access the Dashboard
After submitting the admin account details, you will be taken directly to the Nginx Proxy Manager dashboard.
You should see a screen similar to this:
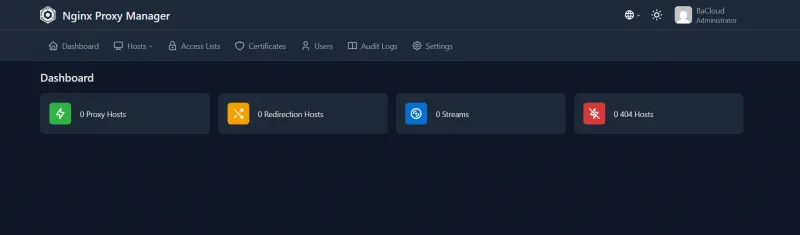
This confirms that:
- The admin account was created successfully
- Nginx Proxy Manager is fully operational
- You are logged in as the administrator
No additional login is required at this stage.
Step 7. Creating a Proxy Host
In this step, you will create your first proxy host and forward a domain or subdomain to a service running on the same VPS.
-
Open the Proxy Host Creation Form
From the Nginx Proxy Manager dashboard:
- Go to Hosts → Proxy Hosts
- Click Add Proxy Host
This opens the proxy configuration form.
-
Configure the Proxy Host (Details Tab)
Fill in the fields as follows:
- Domain Names
- Enter your domain or subdomain. Example: app.example.com (Do not include http:// or https://.)
- Scheme
Select the protocol used by the upstream service:
- http for most local services
- https only if the upstream service already uses SSL
- Forward Hostname / IP
Enter the internal address of the service you want to proxy.
- 127.0.0.1 — use this if the service runs directly on the VPS (outside Docker).
- Docker container name — use this if the service runs in another Docker container on the same VPS.
Do not use the nginx-proxy-manager container name. This field should point to the backend service you are proxying.
- Forward Port
Enter the port the service listens on.
Examples:
- 3000 (Node.js)
- 8080 (web apps)
- 9000 (various APIs)
-
Enable Recommended Options
Enable the following options (when applicable):
- Websockets Support
- Block Common Exploits. Recommended for public-facing services
Do not enable SSL yet unless your domain is already properly configured.
-
Save and Create the Proxy Host
Click Save to create the proxy host.
At this point:
- The domain is routed through Nginx Proxy Manager
- Traffic is forwarded to the upstream service
- The site may still load over HTTP only
If everything is configured correctly, the proxy host will be created successfully, incoming domain traffic will forward to the intended service.
Step 8. Enabling Let’s Encrypt SSL
Now that the proxy host is working over HTTP, you can secure it with a free SSL certificate from Let’s Encrypt.
DNS Requirement (Required for SSL Issuance)
Before requesting an SSL certificate, ensure the following is true:
- Your domain or subdomain points to your VPS public IP
- DNS changes have fully propagated (this can take a few minutes to several hours)
If DNS is incorrect, Let’s Encrypt will fail, regardless of your Nginx Proxy Manager configuration.
Enabling SSL in Nginx Proxy Manager
Open the proxy host you just created
Go to the SSL tab
Select Request a new SSL Certificate
Enable:
Force SSL
HTTP/2 Support
(Optional but recommended) Enable:
HSTS (only if you’re sure HTTPS will always be used)
Click Save
Nginx Proxy Manager will now attempt to issue the certificate automatically.
How to Tell If SSL Was Issued Successfully
SSL is working if:
- The proxy host displays a valid certificate in the SSL tab
- Visiting your domain loads over https://
- The browser shows a lock icon instead of a warning
SSL Auto-Renewal Behavior
- Certificates are valid for 90 days
- Nginx Proxy Manager automatically renews them
- Renewal happens in the background with no manual action required
As long as:
- DNS remains correct
- Ports 80 and 443 stay open
SSL renewal will continue to work automatically.
Step 9. Testing & Validation Checklist
This section confirms that Nginx Proxy Manager, SSL, and proxy routing are working correctly.
Verify HTTP → HTTPS Redirect
From your local machine, open a browser and visit:
|
http://your-domain.com |
Expected result:
- The browser automatically redirects to:
|
https://your-domain.com |
If the site remains on HTTP, ensure Force SSL is enabled in the proxy host’s SSL settings.
Verify Proxy Routing
Access your domain over HTTPS:
|
https://your-domain.com |
Expected result:
- The request loads the backend service configured in the proxy host
- You see the application or service response
Verify SSL Certificate Validity
In your browser:
- Click the lock icon in the address bar
- Confirm the certificate is valid and issued by Let’s Encrypt
Conclusion
You’ve successfully installed and configured Nginx Proxy Manager on a VPS using Docker. Your reverse proxy is running, HTTPS is enforced with Let’s Encrypt, and certificates are set to renew automatically.
From here, you can add additional proxy hosts, route multiple services through a single VPS, and manage SSL centrally from the Nginx Proxy Manager dashboard.
This setup is suitable for production use and works well for hosting web applications, APIs, and self-hosted services.
For more in-depth tutorials, visit the BaCloud blog, where you’ll find helpful guides.