

In a situation where you have a folder of files on your computer that also needs to stay updated on a remote server. Copying everything over each time can be slow and lead to errors. This is where rsync comes in. It lets you synchronize files and directories between systems efficiently, only transferring what’s new or changed.
In this guide, you’ll learn how to use rsync to sync local and remote directories in a few simple steps.
What is rsync?
Remote sync or Rsync is a command-line tool for keeping files and directories in sync. It can copy data between folders on the same computer or transfer them securely to another system over SSH. Unlike basic copy commands, it only sends what’s new or changed, and it preserves things like file permissions, timestamps, and links. It can even resume interrupted transfers, which makes it a reliable choice for backups, server management, and deployments.
Prerequisites
Before we jump into examples, here’s what you’ll need:
-
Operating system: rsync works on Linux and macOS. On Windows, you can follow along using WSL (Windows Subsystem for Linux), cwRsync, or Git Bash (see Rsync on Windows section).
-
Rsync installed: First, check if rsync is already installed using:
|
rsync --version |
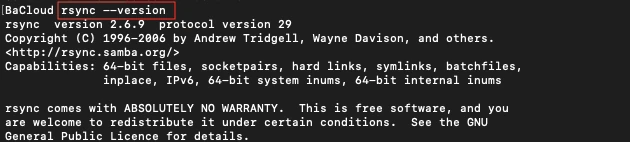
If you see an output like in the image above it means rsync is installed. If not, install it using your package manager. On Ubuntu/Debian run:
|
sudo apt install rsync |
-
For remote synchronization:
-
rsync must be installed on both the local and remote system.
-
SSH access to the remote system should be working. Test with:
-
|
ssh user@hostname |
First Steps: Local Sync Example
Before syncing with a remote server, let’s start with a safe local test. This way, you can see exactly how rsync works without risking important files.
Step 1 — Create a practice setup
Open a terminal and create two directories: one to act as the source and one as the backup.
|
mkdir -p ~/source ~/backup |
Next, create a few sample files inside ~/source/, run:
|
echo "This is file 1" > ~/source/file1.txt |
Verify the files exist:
|
ls ~/source/ |
Output should look like:
![]()
Step 2 — Run rsync
Now sync everything from the source folder to the backup folder:
|
rsync -av ~/source/ ~/backup/ |
Since this is the first time you’re running it, rsync will copy all the files over. On later runs, it will only update what has changed, such as new files, modified files, or deletions — so the two folders stay in sync.
Verify that the files are now in the backup folder:
|
ls ~/backup/ |
You should see the same file list as in ~/source/:

This is your first local sync. rsync ensured the destination matches the source. Because the destination started empty, it worked like a full copy this time.
Note:
-
The -a option (archive mode) preserves file permissions, timestamps, symbolic links, and more.
-
The -v option (verbose) prints out what rsync is doing so you can follow along.
Together (-av), they ensure the copy is both faithful and transparent.
Updating with rsync
To see how rsync is different from a plain copy, let’s make a change. Add a new file to the source directory:
|
echo "This is file 6" > ~/source/file6.txt |
Now run the same rsync command again:
|
rsync -av ~/source/ ~/backup/ |
This time, notice that only the new file (file6.txt) is transferred. The existing files are skipped because they haven’t changed.
Verify the update in the backup folder:
|
ls ~/backup/ |
You should now see:

This shows rsync’s real power: it keeps the destination in sync by only updating what’s new or modified, instead of copying everything again.
Syncing to a Remote Server (Over SSH)
Now that you’ve seen how rsync works locally, let’s try the same process with a remote server. The basic idea is the same: copy files from one place to another — only this time, the destination is over the network.
Step 1 — Prepare your source folder
For this example, let’s use a folder named ~/projects/. You can create it and add some sample files if it doesn’t already exist:
|
mkdir -p ~/projects |
Check what’s inside:
|
ls ~/projects/ |
You should see:
|
a.txt b.txt |
Step 2 — Run rsync with SSH
Use rsync to copy your project folder to a remote server, keeping the remote version in sync with your local one. Replace user with your actual username on the remote machine, and remote with its hostname or IP address:
|
rsync -av ~/projects/ user@remote:/home/user/projects/ |
Here’s what happens:
-
rsync compares the contents of ~/projects/ with /home/user/projects/ on the remote server.
-
Since this is the first run, it sends everything over to /home/user/projects/ on the remote server.
-
On later runs, only changes (like new or modified files) are transferred.
For example, if we add another file locally:
|
echo "Project C" > ~/projects/c.txt |
Then, run rsync again:
|
rsync -av ~/projects/ user@remote:/home/user/projects/ |
This time the output will show that only c.txt has been transferred.
To verify on the remote server, run:
|
ls /home/user/projects/ |
You should now see:
![]()
This confirms that rsync updated only what changed, keeping the two folders in sync without re-copying everything.
Push vs. Pull
The example above is a push, because you’re sending files from your local machine to the remote system.
You may also need the opposite, bringing files down from the remote server to your local machine. In that case, put the remote path first and your local path second:
|
rsync -av user@remote:/home/user/projects/ ~/projects/ |
This is a pull, and it works the same way: only new or changed files are transferred, keeping both sides in sync.
Common Options for Everyday Use
So far we’ve been using only -av for a reliable and transparent sync. However, rsync has many other options that make it more powerful. Let’s look at three you’ll use most often in everyday work.
-
Show Progress with --progress
When you’re transferring large files, it’s helpful to see how far along they are. The --progress flag prints a live progress bar for each file as it copies.
Example:
Run this command to enable progress output:
|
rsync -av --progress ~/source/ ~/backup/ |
Instead of just listing files, the output now shows extra details like size, percentage, and speed:
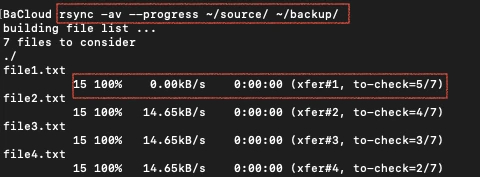
This is useful when syncing big files so you can monitor the transfer.
-
Keep Folders in Sync with --delete
By default, if you remove a file from the source, rsync doesn’t touch it in the destination. The --delete flag changes that: it removes files from the destination that no longer exist in the source, keeping them exactly in sync.
Example:
First, remove one file from the source:
|
rm ~/source/file5.txt |
Then, run rsync again with --delete:
|
rsync -av --delete ~/source/ ~/backup/ |
Now check the backup folder using ls ~/backup:
![]()
You’ll see that file5.txt is gone — the backup now mirrors the source exactly.
Be careful with this option, because it will delete anything extra in the destination.
-
Skip Files with --exclude
Sometimes you don’t want everything copied. For example, you might want to skip build folders, logs, or cache files. The --exclude flag lets you leave things out by pattern.
Example:
Run this command to exclude one file (file4.txt) from being copied:
|
rsync -av --exclude="file4.txt" ~/source/ ~/backup/ |
Check the backup folder again:
![]()
You’ll see that file4.txt is missing, even though it’s still in the source. This gives you fine control over what gets included in the sync.
Together, --progress, --delete, and --exclude cover the most common day-to-day needs. You can combine them with -av depending on your workflow.
Dry Runs
Before running a real sync, it’s smart to test what will happen without making any changes. That’s exactly what the --dry-run flag does — it shows you which files would be copied, deleted, or updated, but doesn’t actually touch anything.
This is especially useful for beginners, because a single wrong path could overwrite or delete important files. A dry run lets you check safely before committing.
Example:
Preview what would happen if you synced the source folder to the backup:
|
rsync -av --dry-run ~/source/ ~/backup/ |
The output lists which files would be copied, but adds nothing to the backup. It looks like this:
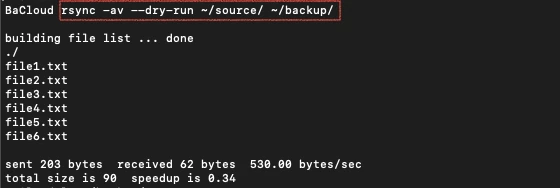
If you check the backup folder with ls ~/backup/, you’ll see nothing new was added or changed. This makes --dry-run a safe way to preview what rsync will do. Always test with it first when trying new commands, then remove --dry-run once you’re confident.
Rsync on Windows
If you’re on Windows, you still have easy ways to run rsync. The recommended method is Windows Subsystem for Linux (WSL), which gives you a real Linux environment inside Windows. This makes rsync behave exactly like it does on Linux, so you can follow the same examples without adjusting commands.
Other approaches exist (like cwRsync or Git Bash), but WSL is the most reliable and future-proof.
Option 1 — WSL (Recommended)
With WSL, you install a Linux distribution (such as Ubuntu) on Windows and then run rsync inside it. Here’s how:
Step 1 — Install a Linux distribution
Open PowerShell and run:
|
wsl --install -d Ubuntu |
If that doesn’t work, you can install Ubuntu manually from the Microsoft Store.
Step 2 — Launch Ubuntu
After installation, open Ubuntu from the Start menu. The first time you launch it, you’ll be asked to create a Linux username and password.
Step 3 — Install rsync inside Ubuntu
Update your system and install rsync:
|
sudo apt update |
Step 4 — Run rsync
Now you can use rsync inside Ubuntu exactly like on Linux:
|
rsync -av ~/source/ ~/backup/ |
This works the same way as all the examples earlier in the guide.
Option 2 — Other Approaches
If you don’t want to use WSL, there are lighter alternatives:
-
cwRsync → a native Windows build of rsync. Runs directly in Command Prompt or PowerShell, but uses Windows paths like C:\Users\Name\source.
-
Git Bash → comes with Git for Windows. It gives you a minimal Unix-like shell where rsync can run, using paths like /c/Users/Name/source.
These options work, but WSL is the simplest way to follow this guide step-by-step without changing commands.
Conclusion
With just a few commands, rsync gives you a reliable way to keep files in sync. Whether that’s between folders on your computer, across a network to a server, or even from Windows using WSL. Unlike simple copy tools, it transfers only what’s new or changed, which makes it both faster and safer for backups and deployments.
Once you’ve practiced with the basics, you can combine options like --delete, --progress, and --exclude to tailor rsync to your workflow. The key idea is simple: rsync keeps two locations in step with each other, so you don’t have to worry about what’s changed.
For more in-depth tutorials, visit the BaCloud blog, where you’ll find helpful guides.