
Having a fast-loading website is crucial for user satisfaction and SEO. In this post, we’ll first walk through how to run a website speed test using popular tools, and then cover popular techniques to improve your site’s speed.
How to Run a Website Speed Test
A typical website speed test interface allows you to enter a URL, select test settings (such as location or device), and then initiate the test to measure page load performance. Running a website speed test is straightforward and doesn’t require technical expertise. Below are five widely used tools, along with instructions on how to use each one. Pick a tool, enter your site’s URL, and let the service analyze your page load speed.
Bacloud offers fast and reliable shared hosting with LiteSpeed technology—perfect for WordPress websites. Enjoy fast loading speeds, security, and easy management. Get started today with Bacloud!
Google PageSpeed Insights
What it is: Google PageSpeed Insights is a free tool from Google that analyzes your website’s performance (load time, responsiveness, etc.) on mobile and desktop and scores it from 0 to 100. The higher your score, the better your site is performing (a score of 90+ is considered “good”). This tool also provides suggestions for improvement after the test.
Steps to use PageSpeed Insights:
-
Visit the PageSpeed Insights website – Go to the official PageSpeed Insights page (pagespeed.web.dev).
-
Enter your URL – You’ll see a field labeled “Enter a valid URL.” Type or paste your website’s full URL into the box.
-
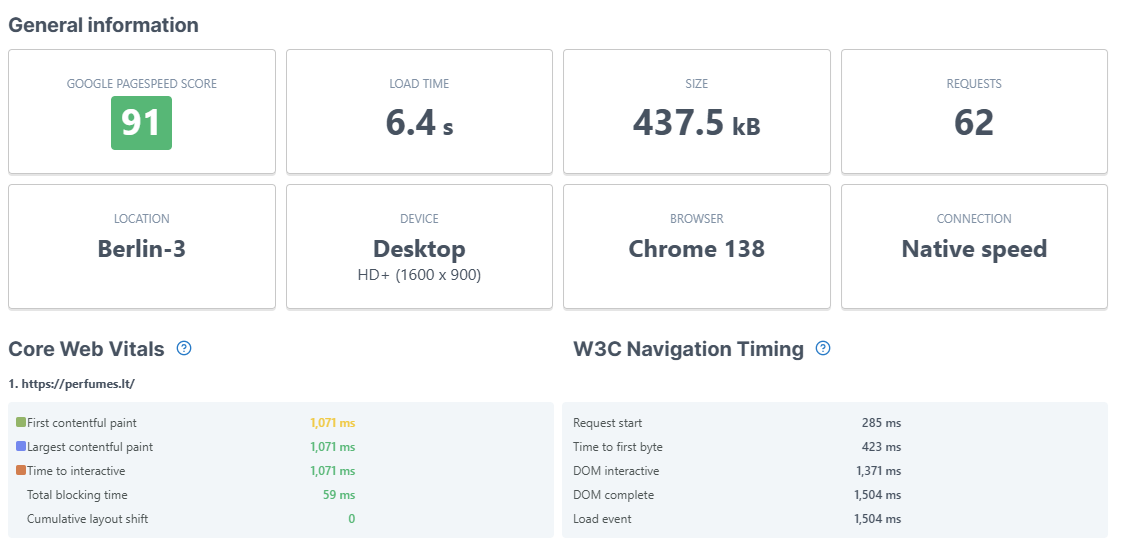
Click “Analyze” – Hit the Analyze button. Google will run the test and, after a few moments, present you with performance scores and a report for mobile and desktop. (No need to log in or configure anything else.). The Window with a speed result looks like this:
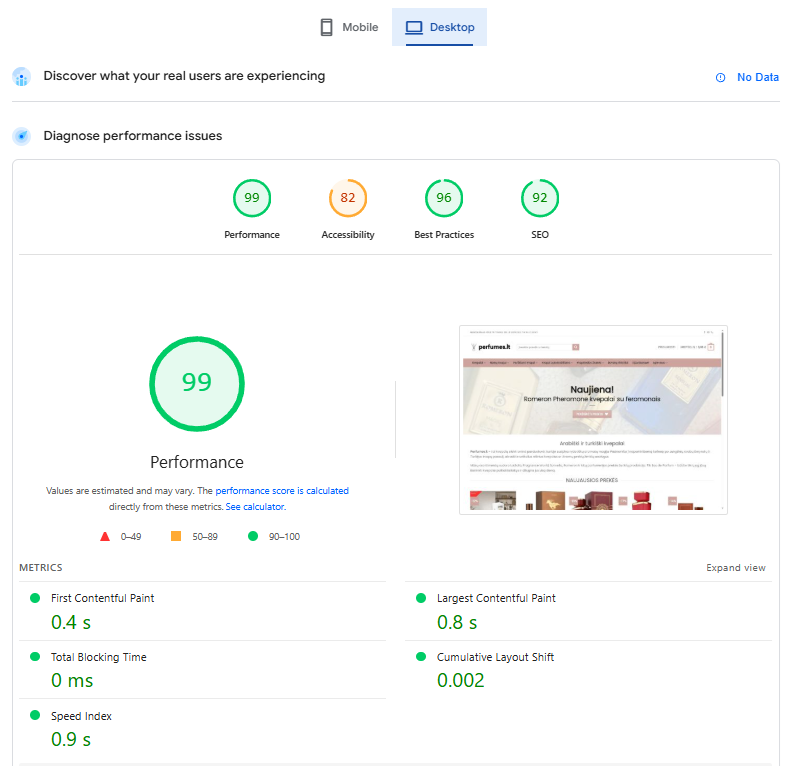
The results will include an overall performance score and specific metrics, such as Largest Contentful Paint, as well as a list of “Opportunities” suggesting areas for improvement to achieve better speed.
GTmetrix
What it is: GTmetrix is a popular website speed-testing tool that provides a performance score and a detailed report on why your site is slow and how to improve it. It incorporates data from Google Lighthouse and older YSlow rules to analyze your page. GTmetrix is free to use (with optional paid plans for more features).
Steps to use GTmetrix:
-
Go to GTmetrix.com – Navigate to the GTmetrix website. You’ll see a simple field on the homepage.
-
Enter your site URL – Type your website’s URL into the “Test your site” bar. If you have an account and want to configure options (such as test location or browser), click Analysis Options; however, this is optional for a basic test.
-
Click Analyze—Press the Analyze button to start the test. GTmetrix will then analyze your page and provide a summary of the results, including performance scores and load times. If interested, you can scroll for in-depth tabs (like Performance, Structure, Waterfall), but for now, note the main speed score and load time. An example of a results page:
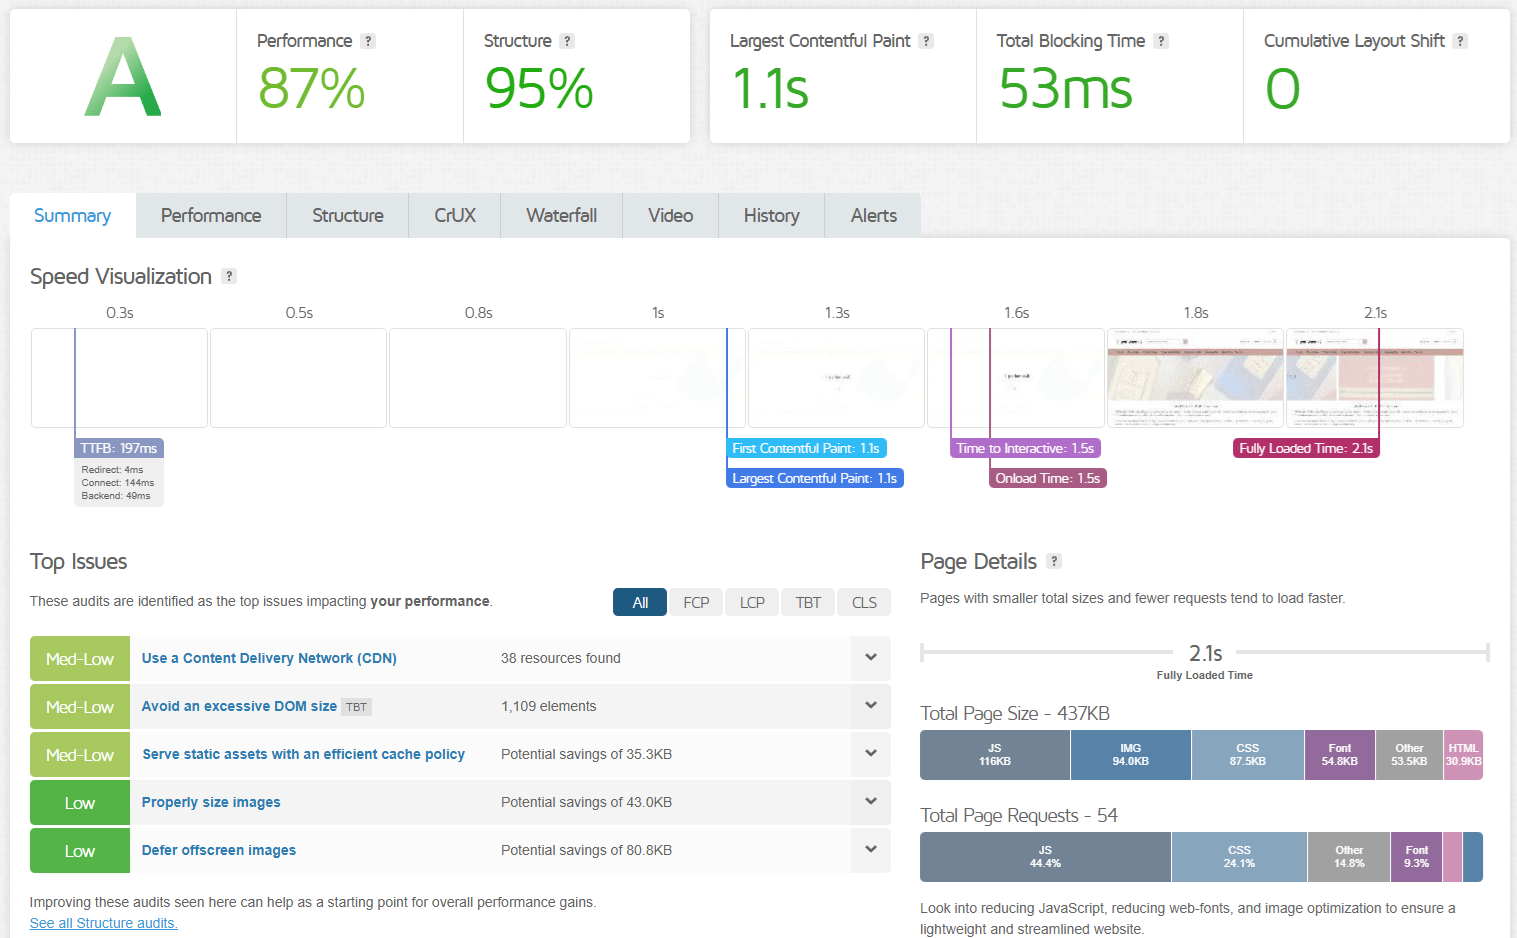
GTmetrix may ask you to sign up (free) to access certain features, such as choosing test servers, but you can still run a simple test without logging in. The output will show you key timings and a breakdown of issues to address.
Pingdom Tools (Website Speed Test)
What it is: Pingdom offers a free website speed test tool (by SolarWinds Pingdom) that gives quick insights into your page’s loading speed and what might be slowing it down. It’s known to be beginner-friendly with easy-to-understand results, grading your site performance and highlighting areas for improvement.
Steps to use Pingdom’s speed test:
-
Open Pingdom’s Website Speed Test – Go to tools.pingdom.com. You’ll land on a page with a test form.
-
Enter your URL and choose a test server. In the field that says “Enter a URL,” input your website’s URL. Below, you have the option to select the test region (e.g., North America, Europe, Asia). Select a location closest to your primary audience for more accurate results.
-
Run the test—Click the “Start Test” (or “Run Test”) button. Pingdom will load your site from the selected location and then display the results, including your site’s load time, page size, number of requests, and performance grade.
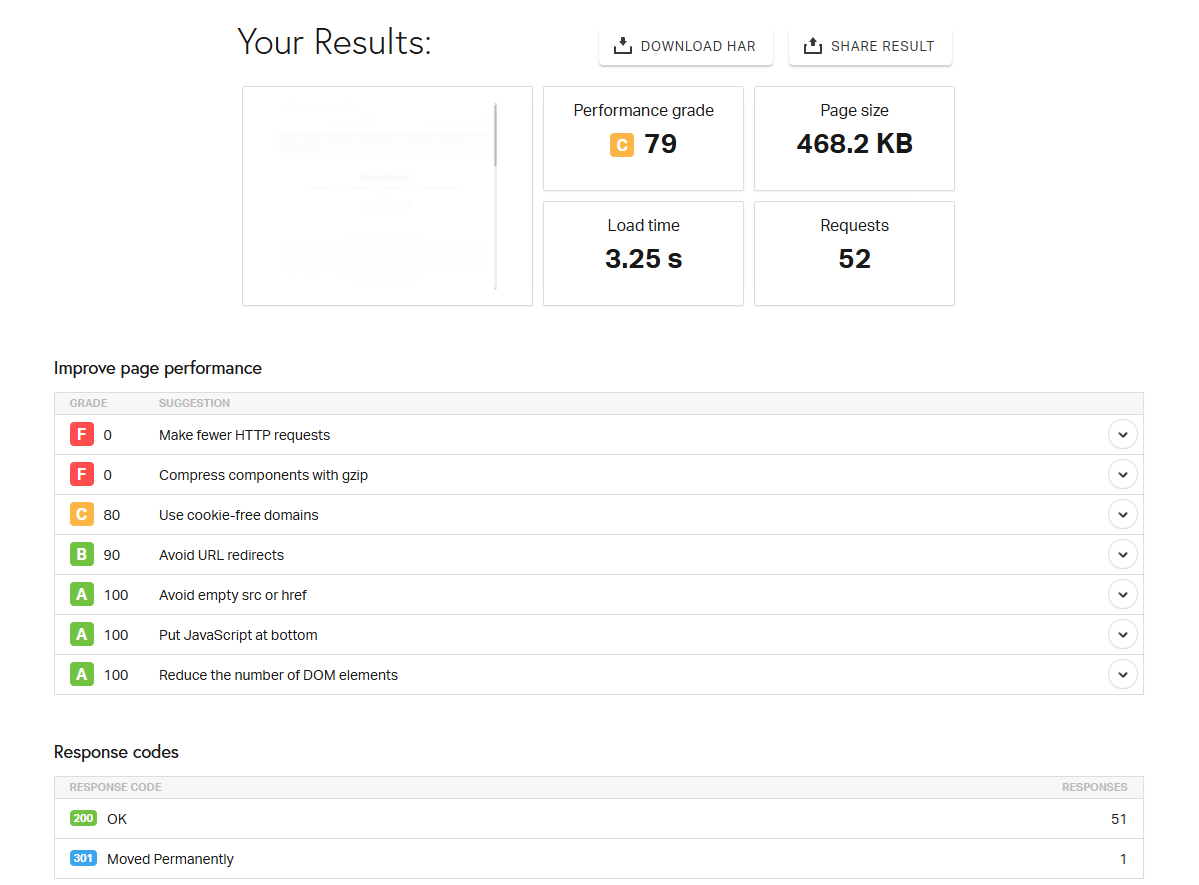
After a few seconds, you’ll see Pingdom’s results page. It will display an overall performance grade (on a 0 to 100 scale, where higher is better, similar to PageSpeed), along with details such as load time and suggestions (e.g., “Add Expires headers” or “Compress components with gzip”). For now, focus on the load time and the simple tips.
WebPageTest
What it is: WebPageTest is a free, open-source web performance tool that provides highly detailed insights. It’s a bit more advanced than other tools, as it allows testing from different browsers, connection speeds, and locations, and runs multiple test iterations by default for accuracy. Don’t let that intimidate you – it’s still straightforward to run a basic test.
Steps to use WebPageTest:
-
Navigate to WebPageTest.org – Head to the WebPageTest homepage. You’ll see a test form with many options (location, browser, etc.), but you can keep it simple.
-
Enter your website URL – Locate the field that requests the URL and enter the page URL you wish to test.
-
(Optional) Choose location/browser – By default, WebPageTest selects a test location (often on the East Coast of the USA) and browser (Chrome). If most of your users are elsewhere, you can use the dropdowns to select a closer Test Location and a browser or device. For a quick test, you can skip this or accept the defaults.
-
Start the test – Click the “Start Test” button. The test will run a few times (usually 3) and then present the results. WebPageTest may take a bit longer than other tools (it performs multiple runs), so please be patient while it displays the message “Running tests…”. Once done, you’ll get an in-depth report:

WebPageTest’s results include a summary with load time and Core Web Vitals, as well as various tabs (details, waterfall charts, etc.). If you’re a beginner, focus just on the top summary for now – it shows your fully loaded time and an overall performance snapshot.
Uptrends (Website Speed Test)
What it is: Uptrends offers a free website speed test tool that allows you to test your site from various global locations and on both desktop and mobile browsers. It’s another user-friendly tool: you can switch between mobile and desktop testing to see how your site performs for users worldwide. (Uptrends also offers paid monitoring services, but the basic speed test is free.)
Steps to use Uptrends’ speed test:
-
Go to the Uptrends Website Speed Test page – Visit uptrends.com/tools/website-speed-test. You’ll see a form labeled “Website Speed Test” with options.
-
Enter your URL and choose settings. In the “I want to test” field, enter your website URL. Then select a test location from the dropdown (for example, New York, London, etc.) and choose Desktop or Mobile test. You can also pick a browser (Chrome or Edge) and even a device type for mobile. These options allow you to see how location or device affects speed.
-
Start the test – Click the “Start test” button. Uptrends will load your site with the chosen settings and then show the results, including load time, page size, a waterfall chart of resources, and even a Google PageSpeed score with improvement suggestions.
Uptrends presents the data clearly, providing a clear load time and a breakdown of each element’s load duration. It’s helpful to try different locations – for instance, test from Europe vs. North America – to see how geography affects your speed.
Popular Website Speed Improvements
Once you’ve tested your site and identified areas for improvement, the next step is to optimize your website. Below are some of the most common and practical techniques for improving website speed. These concepts are explained in simple terms, making them accessible to even non-technical users. Implementing these can dramatically reduce your page load times and improve the user experience.
1. Optimize Images
High-resolution images are often the largest files on a webpage and can significantly slow down load times. To speed up your site, you should optimize your images: this means compressing them (reducing file size) without noticeable quality loss, resizing them to appropriate dimensions, and using efficient formats. For example, use JPEG for photographs, PNG for graphics with transparency, or modern formats like WebP or AVIF (if hosting supports), which provide better compression. By compressing images (using tools or WordPress plugins like TinyPNG, Imagify or ShortPixel ) and only loading images at the necessary size, you can save a significant amount of bandwidth and make pages load faster.
2. Enable Compression
Enabling server compression (such as Gzip or Brotli) shrinks the size of your website’s files (HTML, CSS, JS) before sending them to the user’s browser. This can reduce the size of those files by up to 70%, which means they transfer much more quickly. When a browser visits your site, it will accept compressed content if available; the server then compresses files on the fly and the browser decompresses them on arrival. The result: faster page delivery to users with no extra effort on their part. In practice, enabling compression is typically a server or hosting setting – many hosts have Gzip enabled by default; however, if not, it’s often as simple as adding a few lines to your .htaccess or server configuration file. The benefit of compression is huge: it’s a high-impact, low-cost change that speeds up every page load by cutting down the data sent over the network. In WordPress hosting powered by LiteSpeed, the LiteSpeed WordPress plugin has tools to compress the website.
3. Minify CSS, JavaScript, and HTML
Minification refers to the process of removing all unnecessary characters from code files (CSS, JS, HTML) – including extra whitespace, line breaks, comments, and redundant code – without altering the functionality. This process compresses the files, making them smaller and therefore faster to download. For example, a CSS file with numerous spaces and comments can be minified into a compact, one-line file. Similarly, JavaScript and HTML can be minified to eliminate any bytes that the browser doesn’t need to execute the code. By minifying these assets, you reduce their file sizes, which in turn speeds up page loading. Many tools, such as UglifyJS for JavaScript, CSSNano for CSS, or even plugins if you use a content management system (CMS), can automatically perform minification. This is a quick win: it doesn’t change what users see, but it eliminates bloat, allowing pages to load faster.
4. Leverage Browser Caching
Browser caching allows returning visitors to load your pages much faster. The first time someone visits your site, their browser has to download all the files (HTML, CSS, JS, images). With caching, you instruct the browser to store those files locally for a specific period (e.g., a week or a month) so that on subsequent visits – or as they navigate to other pages – the browser can reuse the cached files instead of downloading them again. This drastically reduces the amount that needs to be loaded for repeat page views. To leverage caching, you set HTTP headers (like Cache-Control or Expires) for your static resources. For example, you might set images, CSS, and JS to cache for a month. As a result, a user’s second page view will often be much quicker, because elements are loaded from their device’s cache rather than over the internet. In short, caching makes your site snappier for repeat visitors and reduces the server load. In WordPress hosting powered by LiteSpeed, the LiteSpeed WordPress plugin features LS cache tools to optimize website performance by caching web pages.
5. Use a Content Delivery Network (CDN)
A CDN is a network of servers distributed around the world that delivers your site’s content to users from the server nearest to them. Instead of all users hitting your origin server (which might be located far away from some visitors), a CDN caches copies of your site’s static files (images, scripts, CSS, etc.) on servers in various regions. When someone visits your site, the CDN will serve those files from a location that’s geographically close to the user, reducing latency and download time. For example, a visitor in London might load your images from a UK server, while a visitor in New York gets them from a U.S. server. Utilizing a CDN can significantly enhance load times, particularly for global audiences. Additionally, CDNs can help handle traffic spikes and offload bandwidth from your primary server, thereby reducing the load on your server. Many CDN providers (Cloudflare, Akamai, Amazon CloudFront, etc.) also optimize content delivery and offer HTTP/2, which can further speed up resource loading.
6. Reduce Server Response Time
Server response time is the time it takes for your web server to start sending back the first byte of a response when someone requests a page (this is often measured as TTFB – Time To First Byte). If your server is slow, even a fully optimized front-end (including images, CSS, etc.) will take a while to load. Common causes of slow server response include: overloaded hosting, inefficient server-side code or database queries, or lack of caching. To reduce server response time, you can optimize your backend by using faster hosting or a CDN, optimizing your database (cleaning up old data and adding proper indexes), utilizing server-side caching (such as caching HTML output), and ensuring your application code is efficient. In simple terms, this improvement involves making your server send pages more quickly. Google recommends a server response under 200ms. If you’re using a platform like WordPress, using caching plugins and upgrading to a better host can often dramatically cut down server response delays. A quicker server response means the user’s browser can start loading page content sooner.
7. Limit Render-Blocking Resources
“Render-blocking resources” are typically CSS and JavaScript files that pause the page from displaying until they are loaded. When a browser loads your page, it must process CSS and JS files. If these files are loaded in the head of your document (and not optimized), the browser may wait to finish loading them before displaying the page to the user, leaving a blank screen in the meantime. To improve both perceived and actual load times, limit the use of render-blocking resources. This usually involves techniques like deferring non-critical JS scripts (so they load after the main content), inlining small critical CSS (so no extra round-trip is needed for that CSS file), and marking other CSS as non-blocking or using media attributes. In essence, load the critical stuff first – the styles and scripts needed for content above the fold – and delay the rest. For example, you might load a critical CSS snippet for the page layout immediately, but defer a large JavaScript plugin file until after the page has at least partially rendered. By doing so, users see content faster (even if some scripts or styles are still loading in the background). This dramatically improves the user experience, as the page appears to load quicker. Techniques to achieve this include adding the defer or async attributes to script tags, splitting CSS into critical (inline) and non-critical styles, and utilizing tools or plugins that handle these optimizations.
By following the steps to test your site’s speed and implementing these optimization techniques, you’ll be well on your way to a faster, more user-friendly website. A quicker site not only keeps visitors engaged but also can improve your search rankings and conversion rates. Start with the basic fixes (such as images and compression) and measure the improvement using the speed test tools. Even small gains – a few hundred milliseconds here and there – can add up to a noticeable difference in performance. Happy optimizing!