


In this tutorial, you will know how to install Magento in a prepared VPS server with LiteSpeed and MariaDB. How to setup a VPS server to serve a Magento Installation? You can check the tutorial: How to Install and Configure VPS with LiteSpeed and MariaDB for Magento
Download and Install Magento
In this step, you will install Magento using Composer, configure the PHP runtime for both the web server and the command line, and set file permissions required for successful deployment and operation.
-
Install prerequisite tools
Install utilities required to fetch dependencies and manage archives:
|
sudo apt install composer git unzip software-properties-common -y |
-
Add the PHP repository
Ubuntu’s default repositories do not include the PHP versions or extensions required by Magento. This third-party PPA provides actively maintained PHP packages:
|
sudo add-apt-repository ppa:ondrej/php -y |
Then update:
|
sudo apt update |
-
Install PHP 8.2 CLI and required extensions
Magento’s installation and maintenance commands are executed via CLI. The following extensions enable functionality such as image processing, SOAP APIs, and internationalization:
|
sudo apt install php8.2-cli php8.2-bcmath php8.2-mbstring php8.2-xml php8.2-soap php8.2-zip php8.2-curl php8.2-intl php8.2-xsl php8.2-gd php8.2-opcache php8.2-mysql -y |
This ensures the CLI environment matches the runtime requirements of the application.
-
Point the system’s PHP to version 8.2
Multiple PHP versions may exist on the system. Magento’s installation and maintenance commands (such as bin/magento setup:install or setup:upgrade) rely on the CLI version, not the web server handler.
Register PHP 8.2 as an available alternative for the php command:
|
sudo update-alternatives --install /usr/bin/php php /usr/bin/php8.2 82 |
Select the active PHP version interactively:
|
sudo update-alternatives --config php |
When prompted, choose the entry corresponding to PHP 8.2.
Verify that PHP 8.2 is now the system default for all CLI operations:
|
php -v |
Confirm that the web server user (www-data) also invokes PHP 8.2 correctly:
|
sudo -u www-data php -v |
Both must report PHP 8.2.
|
PHP 8.2.x (cli) (built: ...) |
-
Configure Composer authentication
Magento requires valid Marketplace access keys to download its packages. Obtain keys from:
https://marketplace.magento.com/customer/accessKeys/
Configure Composer for the web server user:
|
sudo -u www-data composer config --global http-basic.repo.magento.com <public-key> <private-key> |
Without authentication, Composer cannot retrieve Magento source packages.
-
Prepare the Web Root and Composer Cache
Before installing Magento, ensure the web root exists and that the web server user (www-data) owns it.
This prevents file ownership conflicts during installation, static deployment, or upgrades.
Create the Magento application directory:
|
sudo mkdir -p /var/www/magento |
Assign ownership to the web server user:
|
sudo chown -R www-data:www-data /var/www/magento |
Apply safe directory permissions so the owner can write, and others can read or execute:
|
sudo chmod -R 755 /var/www/magento |
Composer requires a writable cache directory to store package metadata and dependencies.
Without it, installation may fail with “permission denied” or “cache directory not writable” errors.
Create a dedicated Composer cache directory:
|
sudo mkdir -p /var/www/.cache/composer |
Set ownership:
|
sudo chown -R www-data:www-data /var/www/.cache |
At this point, both directories (/var/www/magento and /var/www/.cache/composer) are ready for a smooth Magento installation.
-
Download the Magento Project
It’s best practice to navigate into the web root before running Composer. Installing into the current directory avoids errors where Composer tries to delete or recreate an existing folder.
Change into the Magento directory:
|
cd /var/www/magento |
Download Magento’s source code and dependencies from the official repository:
|
sudo -u www-data composer create-project --repository-url=https://repo.magento.com/ magento/project-community-edition . |
The download process may take several minutes, depending on your server’s CPU and network performance.
-
Apply Correct File Permissions
Magento needs specific permissions to generate code, static assets, and media files. Improper permissions are one of the most common causes of errors during deployment.
First, ensure all files belong to the web server user:
|
sudo chown -R www-data:www-data /var/www/magento |
Next, set appropriate file permissions:
|
sudo find var generated vendor pub/static pub/media app/etc -type f -exec chmod 664 {} \; |
and directory permissions:
|
sudo find var generated vendor pub/static pub/media app/etc -type d -exec chmod 775 {} \; |
Finally, apply Access Control Lists (ACLs) to ensure new files inherit the correct permissions automatically:
|
sudo setfacl -R -m u:www-data:rwx /var/www/magento |
These permissions ensure Magento can write to the required directories during upgrades, deployments, and cache regeneration.
-
Verify Magento CLI Installation
Confirm that the Magento command-line interface is correctly installed and functional.
Move into the Magento project directory, if not there already:
|
cd /var/www/magento |
Check the Magento CLI version using the web server user:
|
sudo -u www-data php bin/magento --version |
Expected output:

A successful version response indicates that Composer dependencies were installed correctly and that PHP CLI is properly configured for Magento.
Configure Magento
With Magento downloaded, the next step is to initialize the database, create an admin user, and generate the configuration files.
-
Navigate to the Magento root directory
All Magento CLI commands must run from the Magento root:
|
cd /var/www/magento |
-
Create required directories if they don’t exist
This ensures Magento has all the folders it needs to function and prevents 500 errors:
|
mkdir -p var/cache |
-
Set correct ownership
Assign ownership to the user your web server or PHP processes run as (www-data for Apache/Nginx, nobody for LiteSpeed):
|
sudo chown -R www-data:www-data var generated pub |
Replace www-data with nobody if using LiteSpeed child processes running as nobody.
-
Set correct permissions
Directories need to be writable; files need to be readable/writable:
|
sudo find var generated pub -type d -exec chmod 775 {} \; |
-
Run the setup command in one line
Run Magento’s setup command in one line to avoid line continuation issues (\) in Bash:
- If you have a domain:
|
sudo -u www-data php bin/magento setup:install --base-url=http://yourdomain.com --db-host=localhost --db-name=magento --db-user=magento --db-password='strongpassword' --admin-firstname=Admin --admin-lastname=User --admin-email[email protected] --admin-user=admin --admin-password='StrongPass123!' --language=en_US --currency=USD --timezone=UTC --use-rewrites=1 |
- If you are using a VPS without a domain:
|
sudo -u www-data php bin/magento setup:install --base-url=http://YOUR_SERVER_IP:8088/ --db-host=localhost --db-name=magento --db-user=magento --db-password='strongpassword' --admin-firstname=Admin --admin-lastname=User [email protected] --admin-user=admin --admin-password='StrongPass123!' --language=en_US --currency=USD --timezone=UTC --use-rewrites=1 |
Explanation of key options:
- --base-url → your site URL (IP + port if no domain)
- --db-* → database credentials you created earlier
- --admin-* → admin account for logging in
- --language, --currency, --timezone → store defaults
- --use-rewrites=1 → enables URL rewrites for SEO-friendly URLs
Running it in one line avoids line continuation errors.
-
Deploy static content
Generates CSS, JS, and other static assets to avoid 404 errors:
|
sudo -u www-data php bin/magento setup:di:compile |
-
Clear Magento caches
Ensures no stale cache causes errors:
|
sudo -u www-data php bin/magento cache:clean |
-
Verify the Admin URL
After installation, check the Magento admin URI using the CLI:
|
sudo -u www-data php bin/magento info:adminuri |
Example output:
|
Admin URI: /admin_ab12cd |
This means your admin panel is accessible at:
|
http://your-server-ip:8088/admin_ab12cd |
or, if you have a domain:
|
http://example.com/admin_ab12cd |
Visiting this URL in a browser should load the Magento admin login page.

You should see a login form like in the screenprompting for the admin username and password you set during setup.
Enable and Configure LiteSpeed Cache for Magento
LiteSpeed Cache (LSCache) is built into OpenLiteSpeed and provides full-page caching for Magento.
Although the cache module is loaded by default, it is often disabled at the server and virtual host levels, which prevents Magento from benefiting from LSCache.
This step ensures LSCache is properly activated and ready for Magento.
-
Enable LSCache globally
In the WebAdmin console, navigate to: Server Configuration → Modules
You should see a module named cache, scroll through the parameters and find:
|
enableCache 0 |
Change these values to:
|
enableCache 1 |
Then Save and perform a Graceful Restart.
-
Enable LSCache for your Magento Virtual Host
Go to: Virtual Hosts → magento → Modules
You will see a section titled Module Configuration, click Add, you will see a dropdown labeled Module *, select cache.
- Set Enable Module to Yes.
- Click Save.
- Perform a Graceful Restart.
Note: This step is required even if LSCache is enabled globally. OpenLiteSpeed requires you to allow caching per Virtual Host for it to take effect.
-
Configure Magento for caching
Now that LSCache is enabled in LiteSpeed, let’s ensure Magento's caches are enabled and cleared. Run the following commands from your Magento root directory:
Navigate to the Magento root directory
|
cd /var/www/magento |
Enable all Magento caches
|
sudo -u www-data php bin/magento cache:enable |
Flush existing caches
|
sudo -u www-data php bin/magento cache:flush |
-
Verify caching is working
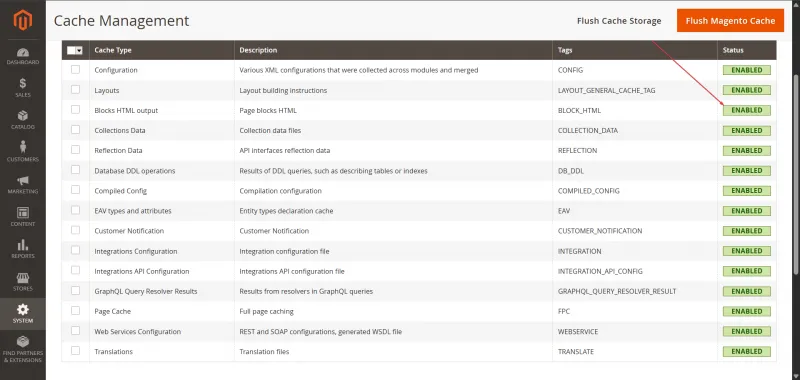
- Open your Magento admin panel → System → Cache Management
- Ensure all cache types (Configuration, Page Cache, Layout, etc.) are enabled.
Conclusion
Congratulations! Your Magento store is now fully installed, running on OpenLiteSpeed with PHP 8.2, MariaDB 11.4, Elasticsearch 8.x, and fully configured LiteSpeed Cache. With this setup, your store is optimized for performance, capable of handling higher traffic, and ready for production use. You can now log in to the Magento admin panel, add products, and begin customizing your storefront.
For more in-depth tutorials, visit the BaCloud blog, where you’ll find helpful guides.