

Podman was created to capture the best of Docker while solving some of its core limitations. With its Kubernetes-native capabilities and enhanced security through rootless operation, it’s becoming a go-to choice for secure container management.
Installing Podman on a VPS gives you the flexibility to manage containers in a clean, dedicated environment. In this guide, we’ll walk you through installing Podman on a BaCloud VPS running Ubuntu 24.04.
What is Podman?
Podman is a container engine for running, building, and managing containers, just like Docker, but with a few key differences. Unlike Docker, Podman doesn’t run a background daemon to manage containers. It’s built to work without root access and was designed with Kubernetes compatibility in mind. That means improved security, reduced overhead, and seamless integration into modern cloud-native workflows.
If you're on Linux, especially Fedora, RHEL, or any Red Hat-based distro, Podman feels like a natural fit. It’s lightweight, CLI-compatible with Docker (you can even alias docker to podman), and designed to integrate into containerized environments easily.
To better understand how Podman compares to Docker, you can check out our Podman vs. Docker comparison to see which one best fits your setup.
Prerequisites
Before getting started, make sure you have the following in place:
- A system running Ubuntu 24.04
- A user account with sudo privileges to run administrative commands
- An active internet connection is required to download the required packages
Once these are set up, you’re ready to install Podman.
Step 1: Update System Packages
Before installing anything new, updating your system's always a good idea. Run the following command to update and upgrade your packages:
|
sudo apt update && sudo apt upgrade -y |
Keeping your system updated lays a clean foundation for installing Podman without hiccups.
Step 2: Install Podman
With your system up to date, installing Podman is straightforward, thanks to Ubuntu 24.04 including it in the official repositories. Just run:
|
sudo apt install podman -y |
This will install Podman along with its dependencies. Since it’s part of the default Ubuntu 24.04 package sources, you don’t need to add any external repositories or PPAs.
Step 3: Verify the Installation
Once the installation is complete, it's a good idea to confirm that everything worked as expected. Use the command below to check the installed version:
|
podman --version |
If Podman is installed correctly, this should return output similar to:

If you see a version number, Podman is installed successfully.
Now that Podman is up and running, you may have noticed there’s no need to use sudo or add your user to a special group like Docker. That’s because Podman is rootless by default, meaning it’s designed to run containers as a regular user, right out of the box.
It also doesn’t rely on a background service (or “daemon”) like Docker does. That makes it simpler to set up, more secure by default, and a bit lighter on system resources.
Step 4: Basic Podman Usage
Now that Podman is installed, let’s go through a few basic commands to familiarize you with using it. Many of these commands will feel familiar if you've used Docker before.
-
Search for Images
To find container images from a registry like Docker Hub, use:
|
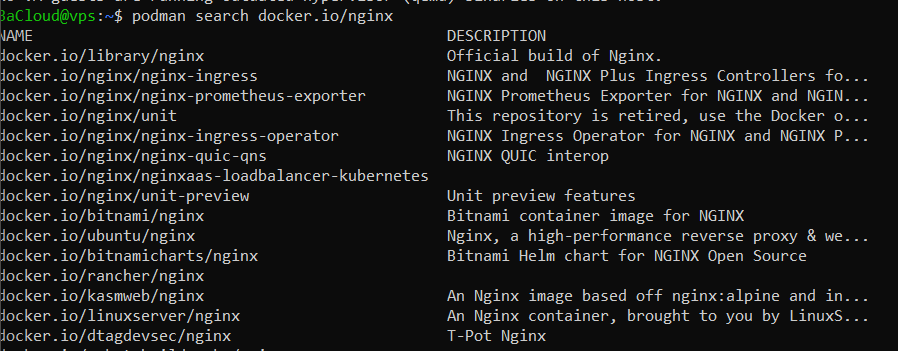
podman search docker.io/nginx |
This command looks for the nginx image on Docker Hub. You’ll get a list of available images and their descriptions, similar to the output below:
-
Pull an Image
Once you’ve found a container image you want to use, you can pull it to your local system. But before that, Podman may require a basic trust policy to be in place.
By default, Podman uses image signature verification. If a trust policy hasn’t been configured, you might encounter an error when pulling images from Docker Hub or other registries.
To allow Podman to pull images without signature checks, run:
|
sudo mkdir -p /etc/containers |
This creates a basic trust policy that disables signature verification for all images. You only need to do this once.
Note: This configuration is fine for personal use. In production or secure environments, use signed images and define a stricter policy.json.
Now you can proceed to pull an image. For example, to download the Bitnami NGINX image from Docker Hub, run:
|
podman pull docker.io/bitnami/nginx |

This command downloads the Bitnami NGINX image from Docker Hub. While Podman supports multiple container registries, Docker Hub is the default. If you don’t specify a registry, Podman will pull from there first.
-
List Images
To see which images you’ve downloaded locally, run:
|
podman images |
This displays a list of all pulled images, including their repository, tag, image ID, and size.

The output above clearly shows the Bitnami NGINX image we just pulled, which confirms that it’s available and ready to use.
-
Run a Container
Once you’ve pulled the Bitnami NGINX image, you can start a container from it by using:
|
podman run -dit --name web docker.io/bitnami/nginx |
Here’s what each part of the command does:
- -d runs the container in detached mode, so it runs in the background.
- -i keeps STDIN open, which is useful for interactive processes.
- -t allocates a pseudo-terminal (TTY), enabling terminal interaction if needed.
- --name web gives your container a friendly name you can use for future commands.
- docker.io/bitnami/nginx tells Podman which image to run, in this case, the Bitnami version of NGINX you pulled earlier.
If everything runs smoothly, you’ll see output like this:

That long string is the container ID, it confirms the container is up and running in the background.
-
View Running or All Containers
After starting your container, you’ll probably want to check its status. To see what’s currently running:
|
podman ps |
You should see output similar to this:

This shows key details like the container ID, the image it’s running from, how long it’s been up, and the container’s name.
To view all containers, including ones that have exited or stopped:
|
podman ps -a |
This is useful for tracking not just what’s currently running, but also past containers you might want to restart, inspect, or remove.
-
Start or Stop Containers
You can start or stop containers by using either their name or container ID. Since we named our container web, here’s how you’d stop it:
|
podman stop web |
This stops the running container.
To start it again:
|
podman start web |
This is useful when you want to pause a container without removing it, the container’s data and state remain intact, so you can resume activity anytime.
-
Remove Containers
To completely remove a container, run:
|
podman rm web |
Make sure the container is stopped before removing it. This clears it from your list and frees up system resources.
-
Commit Containers to Images (Optional)
If you've made changes inside a container and want to save those changes as a reusable image, you can use the podman commit command. Run:
|
podman commit --author "Your Name" web |
Here’s what the command does:
- --author "Your Name" adds your name or alias to the image’s metadata. This is optional, but useful for tracking who created the image.
- web is the name of the container you’re saving.
- The command creates a new image from the current state of that container.
You’ll see output similar to this:
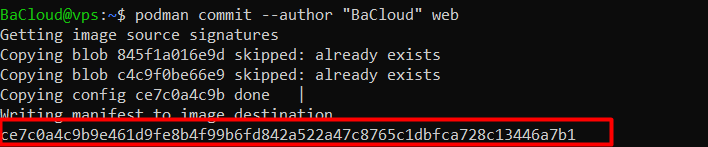
The final line is the image ID for your new image.
Troubleshooting Podman
If you encounter any issues while installing or using Podman on your BaCloud VPS, refer to the solutions below. These are some common problems that users face and how to resolve them.
-
Systemd or Cgroup-Related Warnings
Problem: You may see warnings such as:
- The cgroupv2 manager is set to systemd but there is no systemd user session available
- Falling back to --cgroup-manager=cgroupfs
These warnings are often triggered when running Podman in rootless mode and there’s no active systemd user session. Podman falls back to cgroupfs automatically, which doesn’t prevent you from running containers, but these warnings can be annoying.
Solution:
- You can enable systemd for your user by running:
|
sudo loginctl enable-linger $USER |
- Alternatively, to avoid the warnings altogether, you can configure Podman to use cgroupfs explicitly by running this command:
|
mkdir -p ~/.config/containers |
In the containers.conf file, add this line:
|
[engine] |
This will prevent Podman from attempting to use systemd and remove the warning messages.
-
Missing OCI Runtime (runc) Error
Problem: If you see an error like:
- OCI Runtime runc is in use but not available
This means Podman cannot find the OCI runtime (runc), which is necessary to manage containers.
Solution:
- To resolve this, you need to install runc:
|
sudo apt install runc |
After installing runc, the error should be resolved, and you can continue using Podman without issues.
-
Podman Command Not Found After Installation
Problem: After installation, if you run the podman command and get a command not found error, it may indicate an issue with your installation or system PATH.
Solution:
First, ensure that Podman was successfully installed by checking its version:
|
podman --version |
If the command is still not found, reinstall Podman:
|
sudo apt update |
If the issue persists, verify that the Podman binary path (usually/usr/bin) is included in your system’s PATH:
|
echo $PATH |
If /usr/bin is missing, add it by updating your shell profile:
|
echo 'export PATH=$PATH:/usr/bin' >> ~/.bashrc |
This ensures your terminal can locate the podman binary. If problems continue, consult additional Podman troubleshooting resources.
Conclusion
As you may have noticed, setting up Podman isn't so different from Docker. The process feels pretty familiar, especially if you’ve used Docker before. The r